Last tutorial, I showed you how to design a watercolor effect menu in Photoshop. This tutorial I will show you how to slice up the menu design (step by step) and put them together with CSS. Most of you probably know how to code a horizontal or vertical CSS list menu. Now let’s take it to the next level — code an advanced (un-typical) list menu utilizing the CSS position property.
Overview
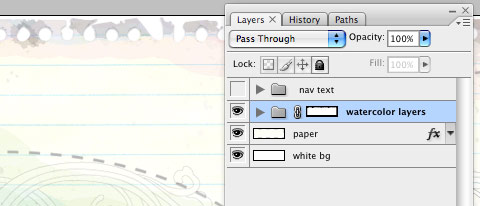
Here are the required graphics to assembe the menu (you can download from the zip).

1. Main background
Open the Photoshop file. Turn off the menu text Layer Group and save the main background as menu-bg.jpg.
2. Button graphics
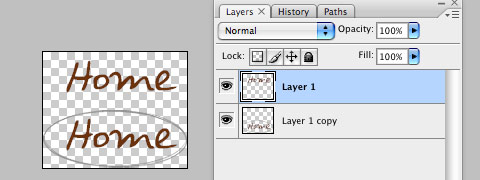
Turn off the background Layer Group and leave only the menu text layers visible. Make a rectangle selection cover the "home" item, go to menu Edit > Copy Merged (Cmd + Shift + C).

Create a new file and take note of the file dimension (w x h), in my case the "home" graphic is 144 x 58px. Paste the "home" graphic in the new file. Go to menu Image > Canvas Size, adjust the image height x 2 (58 + 58 = 116px). Duplicate the home graphic layer and align it to the bottom. Erase the highlight strokes in the upper layer.
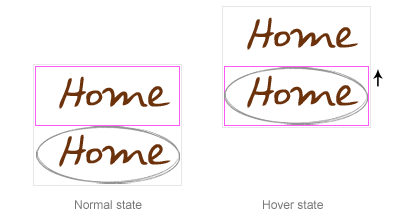
Here is how the hover effect will work. We will set the link button to 144 x 58px, when mouseover, we will shift the background image from top to bottom.
Repeat this step for the other buttons. You should have the follow graphics:
3. HTML source
When you are done with the graphics, let’s start coding. Start with an un-ordered list <ul>.
- note there is an id="menu" assigned to the
<ul>tag - an unique class name assigned to each link
<a> - an empty
<span>tag (the purpose of this is to make the mouseover effect)
<ul id="menu">
  <li><a href="#" class="home">Home <span></span></a></li>
  <li><a href="#" class="about">About <span></span></a></li>
  <li><a href="#" class="rss">RSS <span></span></a></li>
</ul>
#menu
Reset the menu to no padding, no margin, and no list-style. Specify the width and height same dimension as the menu-bg.jpg. Then attach the menu background image. The key point to remember here is set the position property to relative.
#menu {
  list-style: none;
  padding: 0;
  margin: 0;
  width: 774px;
  height: 210px;
  background: url(images/menu-bg.jpg) no-repeat;
  position: relative;
}
#menu span
Specify the span element to display:none (so they will be invisible by default). Specify position:absolute, so we can place the mouseover GIF image on exact position.
#menu span {
  display: none;
  position: absolute;
}
#menu a
The key point here is the text-indent property. We specify the text-indent property with a negative value (-900%), so the text will be hidden.
#menu a {
  display: block;
  text-indent: -900%;
  position: absolute;
  outline: none;
}
#menu a:hover
When mouseover the link, we want to shift the background image from top to bottom.
#menu a:hover {
  background-position: left bottom;
}
#menu a:hover span
When mouseover the link, we want the span element to display:block.
#menu a:hover span {
  display: block;
}
#menu .home
Specify the width, height, and background image. Since we already specified all <a> element postition:absolute in previous step, now just say where the .home button should be by specifying the left and top property.
#menu .home {
  width: 144px;
  height: 58px;
  background: url(images/home.gif) no-repeat;
  left: 96px;
  top: 73px;
}
#menu .home span
Here we are specifying the width, height, background, and position of the span element of .home (mouseover GIF image)
#menu .home span {
  width: 86px;
  height: 14px;
  background: url(images/home-over.gif) no-repeat;
  left: 28px;
  top: -20px;
}
#menu .about
Copy the .home rules and rename them to .about. Now just change the width, height, background, left, and top property.
#menu .about {
  width: 131px;
  height: 51px;
  background: url(images/about.gif) no-repeat;
  left: 338px;
  top: 97px;
}
#menu .about span {
  width: 40px;
  height: 12px;
  background: url(images/about-over.gif) no-repeat;
  left: 44px;
  top: 54px;
}
#menu .rss
Repeat this step for .rss
#menu .rss {
  width: 112px;
  height: 47px;
  background: url(images/rss.gif) no-repeat;
  left: 588px;
  top: 94px;
}
#menu .rss span {
  width: 92px;
  height: 20px;
  background: url(images/rss-over.gif) no-repeat;
  left: 26px;
  top: -20px;
}
All in one:
#menu {
  list-style: none;
  padding: 0;
  margin: 0;
  width: 774px;
  height: 210px;
  background: url(images/menu-bg.jpg) no-repeat;
  position: relative;
}
#menu span {
  display: none;
  position: absolute;
}
#menu a {
  display: block;
  text-indent: -900%;
  position: absolute;
  outline: none;
}
#menu a:hover {
  background-position: left bottom;
}
#menu a:hover span {
  display: block;
}

#menu .home {
  width: 144px;
  height: 58px;
  background: url(images/home.gif) no-repeat;
  left: 96px;
  top: 73px;
}
#menu .home span {
  width: 86px;
  height: 14px;
  background: url(images/home-over.gif) no-repeat;
  left: 28px;
  top: -20px;
}

#menu .about {
  width: 131px;
  height: 51px;
  background: url(images/about.gif) no-repeat;
  left: 338px;
  top: 97px;
}
#menu .about span {
  width: 40px;
  height: 12px;
  background: url(images/about-over.gif) no-repeat;
  left: 44px;
  top: 54px;
}

#menu .rss {
  width: 112px;
  height: 47px;
  background: url(images/rss.gif) no-repeat;
  left: 588px;
  top: 94px;
}
#menu .rss span {
  width: 92px;
  height: 20px;
  background: url(images/rss-over.gif) no-repeat;
  left: 26px;
  top: -20px;
}
Done
That’s it. You can preview my CSS menu.
Note: there is an IE6 bug where the <span> hover effect doesn’t display properly. To fix that, you can use Javascript to specify the <span> to display block on mouseover.
Dodski
WOW nice rollover menu.. ^_^
Arctic
You are a real artist! Amazing work!
Martius
Perfect tutorial! Thank you :)
Nathan
Your tutorials are always so so helpful. Brilliant work as usual.
Now I must read it again for it to sink in. lol!
Thanks!
nagraz
thx 4 your tutorial…so amazing….
Paul Wilkins
That’s a great tutorial, but please, you may want to update “Start with an un-ordered list ” to say “Start with an un-ordered list “
Paul Wilkins
Edit:
That’s a great tutorial, but please, you may want to update the “Start with an un-ordered list” piece so that it doesn’t use an OL tag but instal an UL tag.
Jonny Haynes
Hi nice tutorial, however you made a mistake – may confuse some people – see below … you mention a un-ordered list but show the tag for an ordered list.
Great work though … keep it up!
Christina
This is a great tutorial, I have a slightly different way of doing the same thing. I place the span tags around the link text like this –> About
So when you declare – span {display:none} – it hides the text.
Christina
^ ^ Sorry that should say span>About/span>
Christina
Grr! How do you show tags using these comments??
Try this! <span> About </span>
Grant
Great tutorial!
Good to know.
Mike
You can achieve pretty much the same effect – but without the use of non-semantic span tags – by applying the background image directly to the a tag, and setting the width and height on that.
Unless I’m missing something specific with the span…?
Olivier
Wonderfull job. Go on !
Mike
Actually, looking back at the code and what I just wrote – you’d need to do the following:
Combine the ‘out’ and ‘over’ graphics into a single image – ‘out’ state at the top, ‘over’ state at the bottom.
Use the css background-position property to set the background image at the top of the ‘a’ tag when it’s inactive, and set the background-position at bottom on the ‘a:hover’. You’ll need to check your specicivity to make sure the right image is displayed on the right li.
Set the display of the ‘a’ tags to ‘block’, and set the width and height (you may need to float the ‘li’s).
Set the text-indent on the ‘a’ tags to a fairly large negative number.
That *should* be your lot (although I’m probably missing something out!) – no non-semantic span tags, and single image rollovers which should save on both bandwidth and server requests (and make your css a tiny bit leaner).
Ryan Scherf
Your tutorial has a typo:
3. HTML source
When you are done with the graphics, let’s start coding. Start with an un-ordered list .
Carly
Wow… this is great. I’ve only skimmed the coding but with all that positioning does the menu work correctly in every single browser/resolution combo?
I can’t wait to try this out though…!
noway
excellent ! … je vais le tester tout de suite !
Elliot Jay Stocks
It’s funny you should post this, Nick – I posted my own very similar tutorial at the weekend! I think I prefer the way you’ve laid yours out, though, and the hover effect with the is a really nice touch. Well done… again! :)
Duluoz
Mike – You are correct. The added span and extra graphic can be consolidated to a single sprite graphic with less CSS required as you mentioned.
eshark
Great you have this tip continued and put it to the next level.. a Must Read tutorials indeed.. Bravo again!
Nick
@Mike – Yes, alternatively you can put all the button graphics in one single GIF image, but by separating the graphics it gives better control. I can simply change the button location by the top and left property (without going to Photoshop, editing the image, and then changing the CSS again).
@Jonny Haynes, Paul Wilkins – Thank you for the correction. The typo is fixed (changed from <ol> to <ul>).
chris
nice tutorial, but using 7 images here seems a bit bulky when it could be done with 2. check out elliot’s tutorial above or alistaprt for the css sprite method.
Rahul Joshi
nice one… i was waiting for such a tutorial….
actually i wanted to implement a horizontal navigation menu in a wordpress theme, where normal and hover states are different images. This tutorial is a bit close to that, but can u please help me out and let me know how can i achieve such menu in wordpress?
andrej
what function does the “outline:none” on the “#menu a” element have?
Nick
@andrej – the outline property is to remove the dotted border around the link in Firefox on click.
andrej
thank you, nick. great article by the way.
I was wondering if there is any negative search engine outcome when using css-properties such as text-indent: -900% to remove search engine relevant html code from the users eye.
In your case it is not critical, however what about properties like display:none, are capable of removing whole blocks of text.
Víctor
Wow. Exelent man, as always. You’re like my heroe, every day i learn more and more XHTML tips but this is just great.
Timothy Diokno
@Nick: Yes, it can be done in two images.Why seven? It’s because of the amount of time consumed when loading the whole image needed for the sprites?
Mike
@ andrej: As far as I’ve found, there are no negative search engine outcomes to using a negative margin on the text – the text is still in the markup and is fully readable by search engines and screenreaders. On the other hand, some search engine robots and screenreaders ignore any text that’s hidden by display:none (or so I’ve read) so that would have an impact. Both methods fall down when images are turned off and CSS is turned on in a user’s browser, but there are a couple of ways around this (which require non-semantic span tags, unfortunately) – mezzoblue has a list of different methods with advantages and pitfalls.
For most sites I design/build, I use a semantic single-image negative margin method with the background image, display:block and dimensions applied directly to the ‘a’ tag. It’s served me well so far, and it’s reasonably quick to do.
Chris
@Mike: Search engines discourage what they call cloaking, basically intentionally showing the search engine something different than what your site shows a user. Sites that use a heavy amount of Flash often cloak to get their site content in the search engines. I do not think negative margin would be considered cloaking.
Search Engine Spiders cannot read CSS or JS so I doubt that they are paying attention to whether or not an element is set to: display:none or visibility:hidden.
Just turn off your CSS in FF and that is most likely what Google sees.
Sig Generator
Rollovers in css basically right? Nice effect, the notepaper effect is still pretty fresh.
Hayden Noonan
There is a better method, although it takes a bit extra CSS code, that only requires the use of one image. By using only one image for all effects (normal, focus, hover, etc..), you are guaranteed that all images will be displayed instantly without any extra loading time when hovered over or focused on.
To do this, you use the “background-position” property.
Quite a nifty little trick which I use on most of my designs nowadays.
Kevin Holler
Very nice indeed.. I love the whole freestyle feel to it. It doesn’t feel so, bland. Cool idea.
Wendy
Hmmm. If you’re going to use images for just about everything in the menu, why are you even bothering with CSS? One of the chief advantages of CSS menus is that they’re easy to update — they’re text. With this menu, you have to redo images and worry about sizes every time something changes. It’s a beautifully done menu, but still.
Jim
Overall very nice. Doctype on this is XHTML 1.0 Strict when it should be Transitional. The empty <span> tag is throwing validation warnings as well as the <link> tag inside of the <div id=”content”>. The single image is great but the use of the empty span can be overcome as you mentioned with the negative margin.
Well done, thanks.
ryan
How in the !#@$$ is this advanced? its @#$% css…
drew
wow — so, so simple yet so genius — tnx for the tips.
Sergio
amazing!! your blog is great and this tutorial rocks!!
Cheers!
Peter
Well, ryan, it’s !#@$$ advanced CSS because there are other, simpler, methods of using CSS for menus. I’m sorry this article insulted your supreme intelligence and skill.
DJinHouston
Great Article, I love the theme and i love how your website comes together, very creative…
Thanks…
wilson
I haven’t even finished reading the article, I am just absolutely BLOWN AWAY by your site design. Completely awesome!! As to the comment by Wendy, I think that CSS is the future of all layout not just text. I still use photoshop to export tables for my menus and rollovers. but I am currently trying to convert to CSS. why? because tables are a pain in the a**. CSS seems to allow easier placement and arranging of items without all the fuss of table alignment.
Jagan Ram
looks very interesting
Dan Black
I’ve got to chime in with Mike here… What’s the reasoning for adding the span tag when the same can be achieved by being directly applied to the list items themselves. I suppose its to hide the type underneath?
Peter
First: Fireworks does this better than Photoshop, and faster, too. Two: this is for personal sites because it’s not SEF. In other words, with this technique you sacrifice SEF at the expense of graphics. Sorry I can’t dig up the alternative that allows it both ways.
alberto
Pretty good, but really you need to tell me how did you do that dashed line in photoshop, or is it illustrator?
Phil Moss
agreed…its poop
Mark Story
Why use the span elements at all? you can easily do the hover with a single graphic by implementing a CSS sprite. So both the normal and hover state would be one graphic and you would shift the graphic up to reveal the over state instead of using a extra unneeded span element and another graphic file. But other than that a good tutorial.
Ben
Disregard the douches who are downplaying your menu. This is a fantastic approach!!
Michael Whalen
I have to agree that this wasn’t exactly coded the easiest and most efficient way. There are quite a few things I might do differently to use less markup and CSS, but, cool idea!
Fabio Sasso
Excellent article… thanks..
Limited Edition iPhone
What font did you use for Rss. I really like that R
Livin Truth
whos the tool who named him self “limited edition I****” (censored myself).
Also, thanks for the tip, i’m viewing this in IE7 and at first i thought it was flash when it did its transition.
John Page
Mark Story has the right idea. There is a CSS menu mouseover technique which makes the span tags unneccessary. Make one background image with both background images on it. Set the hover state for the a tag to change the background-position so that it shows the other portion of the background image. Done.
Having gotten that off my chest.. nice design.
T
Hey man, great tip.. Do you read your e-mail? I´ve tried sending you e-mail, but never gotten a reply back.. Please send me a note so I know how to reach you.
Cheers,
Terje
Shantanu Bala
Great menu. The complicated CSS placement is amazing. Only downside is the amount of images the menu, and this site has. I prefer lightweight, fast loading, and low bandwidth consuming templates. Don’t mean to criticize your site, but 700k for a site is fairly unbelievable. There are bigger sites, but not everyone has T1. Not only that, but the bandwidth consumption is terrible.
Erwan
humm… It makes me want a news template
benwa
quickly reading through your code I think there is a little simpler/shorter method that I have done before. i’ve done it on the following site – http://www.hansongardenclub.org – if someone wishes to disect my code to understand – not sure if I have a bookmark on this method…I’ll go check
benwa
i also believe the method i did worked fine in IE6 with no javascript.
benwa
copy/paste from my css
=======
#nav a:hover {
background-position: 0 -42px;
}
a.home {
display: block;
float: left;
width: 60px;
height: 42px;
background: url(“../images/nav_rollover_home.jpg”) 0 0 no-repeat;
text-decoration: none;
}
========
my html file – i took out the brackets otherwise the site converts the html
========
div id=”nav”
a href=”/” class=”home”
/div
this is all you need – i remember it working on Mac/PC multiple browsers
Bart
@Boris: Why do you use the wallpaper of bartelme in your design?
dduck
I just changed position property of ‘#menu’ to absolute.
And ‘#ment span’ to relative.
So the mouseover function works in IE & FF.
Andrew Ingram
I haven’t read all the comments but I imagine most of this has already been said.
The menu looks very nice but it could have been done much more effectively using just one or two images and without the issue of waiting for multiple images to load.
I wrote a plugin for Fireworks that practically automates the whole process of making such a menu using a single image.
saxdes
uhh,
can one switch this css to multiple languages using the same objects?
maybe thats just an .svg option available in go live; back when it was supported by adobe and w3c, and live motion worked too.
has anyone seen where smart objects and .swg went off to?
i can seem to find much on that
seems we are either coding in html or cutting up images. the dom applies but i guess its not for web graphic designers, and these people can t print like the printers who cant typograph, or read computer code. ill be in the closet hiding out making things move and buttons that make noise on the computer. hand rendering is much better than computer rendering too. i make money as a cadd drafter. so I cant write poetry.
its clear i should pick up a book on css too, this looks pretty cool.
blrrr blrr blhi. I like chicken; my palsy
Boris
Bart because it’s good for design and it’s free for use.
:))
Eliena Andrews
i got what i was looking for thanks.
Brian Purkiss
Very nice post!!!!!
I am going to use that!
Thanks!
Carl Davison
Wow, what a beautiful site you’ve got here. And great content. I’ll be sticking around! Thanks!
Ryan
What program do you use to code it? Just wondering…
Ara P.
amazing tutorial..i will try to use it in my next website..thanks a lot
Scottsdale Web Design
cool tutorial, I’ve never seen the process laid out in such an easy to understand format before.
j e a m
wow this tut is very nice thanks
Desdaemona
Thank you SO much. Really. ^ ^
Your tutorial is perfect for me!
(and sorry for my uncertain english :p)
Brian Khouw
Nice tutorial, will try it sometime. Thanks.
ahmar.rehman
am very glad to found your website first time and it’s amazing and intersting css
thanks u very much …
i hope will get much more about css
Paul
Great tutorial… ended up using Elliot Jay’s… but this got me most of the way…
Milan
Hi thanks for this grate tutorial and for this wonderful website!
I come back every day to search for something new ;-)
Emre Toprak
excellent
Aaron Zipagan
hi,..i like your tutorial but i’m really amazed about your “back to top” action…
can you please give a tutorial for that or at least send me how?…
thanks…
DANIEL
yeah! me too! i fall in love with the BACK TO TOP action, it’s really cool, so we’re two now :)
back to top tutorial!!
music000
that’s cool,thank you!
Search Scripts
Very Clear and Concise tutorial to create this CSS based menu. It first looked like one has scanned his handwriting to create this menu.
PiticStyle
Great job!
Website Designer
Great stuff. Keep posting. The best thing i like about your work is, despite the obvious heavy amount of graphics that’s used, it still loads quickly. You’ve got talent. I’m jealous.
compare car insurance rate
Man, what a well set-up website!
Vincent
Thanks for taking the time to share this great technique with us. Great looking site by the way.
Web design Bulgaria
Awesome! Very impressive and influential to see someone take so much time of their own to give this to all web designers. Thanks!
Web design Bulgaria
Awesome! Yeah Very impressive and influential to see someone take so much time of their own to give this to all web designers. Thanks!
dressup
Congrulations
Graeme
One of the most beautiful sites I’ve seen. Not only visually stunning, but technically brilliant. Great work! I look forward to seeing future tutorials.
netmint
Great work!
Thanks a lot for share this great idea!
I found it has a little bug in IE6,
so i changed the ‘display’ to ‘visibility’,
and it works! No need javascript!
Mehmet Poyraz
very nice
raja
Its really nice man, keep it up . . . . .
Jakob
Hi,
do yo use microsoft expression?
albert lumu
This is so cool!
Thanks!
sturdy
You are very good at teaching! Congratulations by this tutorial!
WebOlution
excellent work guys !!! just respect ;-)
Anthony
Awesome tutorial thanks
Jauhari
Just Perfect ;)
Really easy and nicely tutorial..
Web hosting, design & marketing
Thanks for the detailed instructions. I wonder how it will hold up in Opera, IE 5.5, etc… Will have to try I guess. Your site is an inspiration. I am gonna try these flowers etc. as background soon
bLuefRogX
Absolutely great guide and wonderful website! Love the design
ethel
You’re such an inspiration. Thanks! :D
elizer
that nice and i want to implemented on my website…
angeles
padrisimo este tapiz
Edmonton Web Design
Fantastic tutorial. Really easy to follow and use. I’ll definitely be using some of these techniques on future sites. Thanks!
huckle
I love this tutorial, and the techniques you use are superb.
Just wondering as to why you use two images – one for the circling and one for the supplementary text (like “home” and “who”)? Surely you could of just placed them into a single image that is css-positioned?
huckle
huckle
Sorry, I’ve just read the previous comments!
Dennison Uy
I have been contemplating on writing a similar article as a “tutorial” for one of my newly hired web developers. This article fits the bill nicely. You just saved me a lot of time :)
bahçe aydınlatmaları
thanks .perfect
kablo kanalı
Absolutely great blog
Jerome
This is great! These tutorials are clear and really help!
karolz.M
COOL!
that give me inspiration on my coming design. you’ll have a new reader! XD
thanks a million. lookin forwward to read your future tutorials.
Tayzar44
Cool!!! Really Awesome!! the best menu I’ve ever seen!!
Ali SEVIMLI
Güzel tasarım.. tebrikler..
Anton Shevchuk
Nice article, i use your tutorial for create menu on my personal blog.
ashif hus
this is good tutorial but not useful it is also unique. but we can not keep such menu in website.
ashif hus
sorry for writing this now i have decided to keep colon in my site :)
Mark Abucayon
so nice, I used the technique already… all in all nice job and excellent.
Lisa
There is a problem with having position: absolute for the main div, and position: relative for everything else. In Firefox, Opera and Safari, if you want the div to be flush against the top of the page, it adds a space. The only way to fix this is to make everything the same attribute.
I just found this out the hard way. If you know a workaround, that would be wonderful.
Jon
Good Stuff
well
I simply wanted to add that you should add text-decoration: none to the stylesheet, as there are odd blue lines (the underlines) rendered from the position of the link way off to the left (to meet the text that is in the negative margin). Although this is a rendering fault and shouldn’t be required (and probably isn’t in many browsers), it’s probably worth the 24 some bytes of code when it produces no incompatibilities whatsoever.
Victor Fauziek Sidharta
Thank you, it’s a great design. More power to you
San
Great, Useful Article.. Like many of yours..
Can you provide the JavaScript for the IE bug, for those who don’t understand Javascript.
Jagadish
This is really cool and nce.
KaraSancak
Good work thanks
Sebastian Lissau Lund
Hi there, good tutorial but, I can´t seem to find the Photoshop file in the zip file.
Sebastian Lissau Lund
Sorry, I found the Ps file.
lanx
hey…thanx for sharing your knowledges…hope you can be more succesful in your career…peace..
ety
U ARE AMAZING!!! thank u so much for sharing your info!!! :)
emily
how do you download/get photoshop?!
ArthasMX
Really nice site, of course goes to my bookmark list.
Now, for emily (post 131)
U should buy a licensed photoshop copy, but if you want 2 download, search about “torrentz” and read about them
Tokyo
Well done ! You’re my Master…teach me more.
shweta
its a great site i love it,,very cool
ictharus
I am very impressed — thanks for the tutorial.
arman
wo wo…. this is very nice
thanks a lot
SMASHINGAPPS.COM
Great tutorial. Thanks for sharing with us.
CiCi
It’s so nice. I will bookmark your web for further learning.
Thanks for sharing!
Salman Tanvir
This is really interesting, thanks for sharing.
Fabian
First of all, thanks for writing this great tutorial.
I am working on a menu my own and I saw that here in your own menu at webmasterwall, you display the data about how much people have subscribed.
Can you explain how you did that?
Arun Pattnaik
One of the finest tutorials I have ever seen. Stumbled & Bookmarked. Thanx!
Ron,
Interactive Media Manager,
AXEKS Labs, India
Miffy
This is really interesting,thank you for sharing this.I have bookmarked for my reference.
Arun Pattnaik
Would you like to share how to tweak the menu to get the effect similar to the one u used on this page? I tried but failed. Also, the comment preview thing is very interesting. (In fact, i’m writing this comment looking at the preview itself, lol)!
Ron,
Interactive Media Manager,
AXEKS Labs, India
filipezone
I’ll try to do it .. It’s looks great … But I read it and I have some daughts .. Let’s see what I can do!
Thanks for the tutorial! :D
Gary Storm
Great tutorial! So glad I`m one of your subscribers :) Could you please share the javascript fix for the IE6 span problem?
Dhruva Sagar
Simply awesome. Thanks a ton for this man, I love it!
5ivedance
Enjoy your tutorials,your website and so many amazing works.
Jon
Great tutorial! I implemented it on my site. http://www.dinnermint.org/ Thanks!
Dennis
Nice work. keep it up guys.
massives
whew, cool tutorial, i must try it.. thanx
Emprenye
This is really interesting,thank you for sharing this.I have bookmarked for my reference.
Prasanth
Wow this is cool. Nice work dudes at Designer Wall. Hats off to you.
music
What do you mean ?
Foxinni - Wordpress Designer
Nice. I love to make use of matrix’s. I’m gonna make good use of it in my next design. Can’t Wait. Excellent blog design and awesome post.
Evan
This is a great tutorial -I showed it to a few people. I have a question though
If I place my Navbar and links into on div I can get them to display horizontally with no problem.
Instead of HTML links for my navbar I am having it display layers for the content.
This is OK but one problem I have is it doesn’t like
so, I use and assign hover properties in the css but it won’t display horizontally -any ideas?
egzemplarz
What can i say? Great job! :)
Cloud9 Design
wonderful tutorial. one thing though. you shoudl reallya dd a print this page button on your posts. formatting when haywire when i cut & pasted this into word so i could print it out.
Nicolas Alexander
very thorough ! just a thing…you should name your photoshop layers in your tutorials
Niklas
Awesome tutorial, I like it very much!
You are doing a great job.
mark
hey, i was searching in the net for some paper tutorials in photoshop for my online library system project in school, and then i get here in yout site, and i was shock that css can do that menu animations! how nice! i treat persons like you as a GOD!!! haha… i want to be a great web designer someday.
great tutorials, pls keep this tutorials for future researchers, tnx again!
Milinda Lakmal
Nice tutorial. Thanks.
Ali malik
ummm wouldn’t be easier if we used rollover on DW or in FW -no coding needed-
and much shorter
John
I just love it! Also your watercolor tut is great. Your references with brushes etc are AWESOME. Great job. Thanks for sharing…
J. M.
kimmi
Just one point, image load. Your images are quite small here but I still noticed onload that on mouse over there was a delay to the image load. Perhaps add some js to pre-load images to the browser cache. Examples of which can be found here http://perishablepress.com/press/2006/11/14/preloading-images-with-css-and-javascript/ .
Braintrove.com
Great job! Thanks for sharing this.
simone
it doesn’t work on IE6. why? it’s just an hover effect…
Technology News
thanks..really nice post.
Dan Loffler
Your website makes me horny baby. And you tutorials get me high. Thank you so much.
Dan
Joe
Very nice tutorial. I like the attention to detail and the very clear explanations of each step. There are lots of people out there learning CSS and Design via the web, and these types of posts are very beneficial! Kudos!
melania
I think it’s great what you’ve showed us. I’m already practising this one. Thanks >;)
Enderson
Great Menu and great tutorial… Thanks… :D
Sam Jennings
Thanks for sharing
web pixy
I absolutely love the appearance of this menu, thank you for sharing the source and everything:) I will definitely use that, its so cool!
Max
thanks for really good lesson!
Anton Shevchuk
Very nice article, I translate it to Russian, you can see it on this link
Dragolux
Very nice tutorial! Thanks for all your dedication to writing tutorials, they are appreciated more than you know!
carrie
really great post. . . i used it on my website: http://www.strongwatermedia.com
I was wondering if there is a way to use the empty tag to also create
a:active and a:visited. I created new graphics with the 4 different stages in one graphic. Am I on the right track?
Sarah
hey. Your awesome web designer. Love the tutorial but how this css menu in wordpress?
DAWN
Very nice one!!!
But in case of a scaled browser the nav-links don’t stay on the positions they should be…any idea to fix this..?
ngoc
i don’t understand, what is the top property with a negative value (-20) in #menu .home span????
petnos
at the beginning it seems hard for an amateur(this is me) but after solving all of it, you can see exactly what you done well.
ngoc
yes, i am beginning and trying because i have this question so i need answer.thanks
CSSBanter.com
wow this is absolutely gr8 tutorial. Thanx 4 sharing!
Jordan Burnett
Great technique.
Question: When I change the class=”home” to id=”home” in the anchors, it doesn’t seem the have the same effect. I’m changing the CSS as I do the HTML, but it doesn’t seem to work.
Any ideas?
Jordan.
akkie
thanks for really good lesson!
FayeC
Great tutorial!
Are you planning on posting the IE JS fix in the future?
Looking forward to reading more of your tuts!
Thanks!
FayeC
delipot
Beautiful! Thanks!
sandeep
gr8 tutorial. thanks 4 sharing…..
pablogt
Hi, thanks for this tutorial… I have being working at it all afternoon… and can’t figure it out how to make three stays down , over, seleected page… any tips…?
Martin
thank you, again
Anna
Thank you for such a wonderful tutorial. I have been looking for a way to code this. Sweet !
DonSailieri
Good stuff but unfourtunately it´s got some nasty bugs in IE6 =(
Real Estate Graphic Design and Marketing
I’d also love the IE6 hover javascript fix. Otherwise I’ve applied your instructions with success at http://www.youplusbuild.com/
Thanks!
BMD-Media.com
WOW! This will definitely come in handy. Great Article
Nick
great script!!… but it dont work with ie6 the nav pushes down the images bottom.. :(
smitholi
wow, I’ve been searching for this for about 30 min’s this seems to be the only place to find this tutorial. Awesome stuff, Thank you!
website design
Really nice site, of course goes to my bookmark list.
U should buy a licensed photoshop copy, but if you want 2 download, search about “torrentz” and read about them
Dharam Mali
Nice layout, Good Css, Nice design,
& Good work.
jacob
what does it do in IE6? could they be fixed with a simple _hack?
Nick best
Thanks for tip. it so beautiful.
M Rageh
What a wonderful tutorial. Thanks a lot.
Nicole
Excellent Work!!
istioselida
really nice tutorial!
Mike
Wow!! Nice menu.
I will use technic to improve my menu.
thanks.
php-web-developer
Nice tutorial I think I might be using this in the future
Lucy
This tutorial was brilliant – thank you very much!
I used this to help me build the menu on the website I just created for myself, thus I have addess a link from my website to this one – if the link works that is! I’m only a novice!
esanjor
Thanks for the great trick
NoobTrying2Learn
Nice website (bookmarked!) – fantastic tutorial! Detailed and throughout! Thanks a bunch! =)
afg89
can i have the psd please ?
Jackie
Thanks so much! I’m learning CSS and really appreciate the detailed info.
k1ko
Cool stuff! Bookmarked!
Mei
Excellent tutorial. Never knew the Copy Merged tool before – invaluable!
Jayme
Can menu navigation be designed within the sites header image or should the navigation have its own table with in Dreamweaver CS3? In order to design menu navigation with CSS, should I make a separate table for the header image and menu navigation?
Michelle
I just discovered your site and totally fell in love with it. I definitely refer to your site often. Check out my website, but it is in the works of being remodeled.
Rikkiya
thanks, nice work :-)
Blogger-Holic
cool css menu.
wow you have very nice template :)
plakali esanjor
Very good for me thanks
araba ilanı
cool css menu.
thank you man.
raj
great code..
only problem is in IE, I get a horizontal gap between the navigation and the next div tag . work fine on FF.. The gaps gets bigger the more li items I use.. Tried zeroing paddings and margins but this doesn’t help.
Any ideas anyone ?
sinisa
very nice. i will give it a try.
apin
nice one.
sarah.g
cool stuff..thanks for sharing! :)
pedro
excellent tutorial, stands head and shoulders above anything else I have seen. Tells me exactly what I want to know as clear as crystal.
This is an excellent web site, I love the design, hats off to you, inspirational… that’s from one who has been building sites since netscape 1 :-)
calmhuang
very cool,I favorite it
Giuseppe
Good Work. original!
mTanriverdi
Very good
Ryan
awesome, thanks, this blog’s design is just amazing, just starting to browse other tutorials.. thanks
jon
Isn’t it great when ye find a good website, its like finding money in an old pair of jeans!! Quality tuts!!! Unfortunately im struggling with the IE bug. The thing is ive been teaching my self CSS over the last few days. So when you say put in a bit of javascript ….you kinda lost me! eh? anyhelp
kok hong
Great tips, thanks for sharing = )
ozz
Thanks for all tutorials
John Prine
Nice article! I shall try to use on the blog
John Prine
CSS Lover
Great article on css. It is great from customization point of view
grafik tasarim
css layer examples / properties and layer attributes
css-lessons.ucoz.com/css-layer-properties.htm
Chanty
There is a way to get rid of the space below the menu in IE6:
Create a new .css file, I named mine ie6fixes.css. Then, copy & paste this in it:
#menu {overflow: hidden;
}
Save and close. Then, open your layout file/header file, and place this between the head tags:
#!--[if lt IE 7.]##link href="ie6fixes.css" rel="stylesheet" type="text/css" media="screen" /#
#![endif]--#
# and # should obviously be , and if you named your css file differently, ie6fixes.css should be renamed ofcourse. This code will only apply to IE browsers older than IE7. I’m not sure this is the right way to fix this issue, but it’s a quick and simple fix so it shouldn’t be a problem :)
People Search Dude
Nice article! I shall try to use it on the site I’m doing for my friend.
Teknoloji
Thakns you. and very good.
Dokz05
could you please specify what particular javascript is it to fix the hover effect on IE6? Thanks… Good Job! I love it!
alexus
oh…. :D
100% good job!
thanks!
saç dökülmesi
HI i need your help i really want to create my own website/web page but i dont know how to go about doing it so can you please help me out
Jack
Great tutorial, I’m a complete css novice but this was easy to follow and tweak to suit my needs. A quick question: should the -900% text ident interfere with positioning the menu on the page? I seem to have to rely on absolute positioning coordinates, for example to center the menu next to an image at the top of my page.
Thanks!
Bill
It seems like I’m having issues every time that my images swap from a non hover to a hover mode, they shift just slightly and it ruins the effect. I think it could be a photoshop error. Anyone got any ideas?
Harish
I appreciate this tutorial, but wanted to know about how the messages are display on the menu in this website
Panther
Excellent tutorial. I’ve tried to follow a similar tutorial but had no luck completing it. This one’s even easier to understand. Kudos.
Carolyn
Does anyone know how to have an active page “on state” show up rather than always coming up as the inactive state and losing where you are in a website
?????? please help!
Dinu / Switzerland
Nice :-), can you tell me which font you have used ? It’s a cool font.
m0Fo
What`s the font used in the RSS
laidey
i tried to follow every single code u made, it displays vertical menu. Can somebody tell me how to change it to horizontal menu”?
murtaza
Great tutorial, I’m a complete css novice but this was easy to follow and tweak to suit my needs. A quick question: should the -900% text ident interfere with positioning the menu on the page? I seem to have to rely on absolute positioning coordinates, for example to center the menu next to an image at the top of my page.
Thanks!
Maqsood
Its a great css. Great Job
Nehem
Its really cool
Henzen
very cool, i’m just redesigning my own site, and will use this..very cool thx
CSS Model
This is really a very good technique. Thanks!!!
B
Doesn’t work on IE6
ant
To B: isntead of complaining upgrade your browser !
anizot
very cool indeed. must try. thanks
Phyu Mon
Wow! That’s an amazing tutorial. Thanks.
gaijun
study
CP
Nice technique, i would like to use this technique, but need the js fix.
@author – Maybe you could post the javascript fix?
@ant – poor comment, 25% of webusers i 2008 use IE6.
mbrewer
I also would like to see the js for handling the ie6 bug. I’m more of the designer and not so much the developer, so I’m sure I couldn’t write this myself. Can someone help…author or otherwise.
Thanks…
prosenjit
thanks for this Gide line
Danh ba web 2.0
Great tutorial ! Nice to meet you.
Good blog Design for me
Imran Salahuddin
great tutorial man.. thanks for yout help
Morten
helo
Really nice tutorial, I simply love you’re site.
Regarding this css menu, how can I use the a:active on it? is it possible? anyone? :S
webdesign
Nice tutorial!
nimkintz
I just wrote all this out. Not sure if I understand it all yet but yeah, way cool. Man have I got a lot to learn. Thanks.
SAM
This is a very elegent effect, but it falls flat without the MIE6 java fix. Anybody have any ideas as to where I can get this javascript fix?…Author perhaps??
Jacob
Hey i like your style.
I use a similar technique but i don’t have any IE6 problems. What i do is put the nav word (Home/About/Span etc..) in the span tag and set display to none. Then to get the hit value for the link i just set the tag to width: 100%; height: 100%; display: block;
So then the fills up the tag and by setting display to block the whole cell becomes a hit area.
After that it’s just a simple task of moving the background image on :hover
I hope that makes sense
Jake
Jacob
Sorry better post this twice because the html items didn’t show.
Hey i like your style.
I use a similar technique but i don’t have any IE6 problems. What i do is put the nav word (Home/About/Span etc..) in the span tag and set display to none. Then to get the hit value for the link i just set the <a> to width: 100%; height: 100%; display: block;
So then the <a> fills up the<li> tag and by setting display to block the whole cell becomes a hit area.
After that it’s just a simple task of moving the background image on :hover
I hope that makes sense
Jake
SAM
Jake: so you are saying that these effects display as they should in MIE6 without resorting to hacks or javascript ?
If so, that’s great but being a newbie to both XHTML and CSS I’m tying to get my head around it all. I have done a search for the java script but most all tutorials assume guru status to begin with and so do not cater for newbies. And it seems that people are reluctant to give examples of the javascript on this blog. I am starting to believe that the javascript required to make these effects function correctly in MIE is some closely held secret :) So if hacks and javascript can be avoided by pure CSS then that would be fantastic. Would it be too much to ask of you to do a cut/paste of the actual CSS by way of example so I (and possibly others) can follow along ?
Any assistance would be most welcome.
Sam.
Animals World
thanks for this
World of Flowers
Good blog Design
Jacob
Hey Sam
I haven’t got IE6 running on my comps at home but i’m pretty sure the code works fine in it. If you check the navigation on some quick site i made a while ago and let me now if it works then i’ll put the code up or you can take it through firebug or something.
The site is: http://www.kathrynmarylee.com
If the navigation works in IE6 then that is done using a similar technique to the one in this tutorial but works in IE6 without javascript.
SAM
Jacob,
Thanks a heap.
I tried the site and it works in MIE 5.5, 7 and beta8 but 6 makes a mess of it.
Back to the drawing board I guess :(
Jacob
Hey Sam
Are you sure about that? I just checked the site on a comp with IE6 on and it worked fine… hmm weird! Are you checking it in that IE tester or an actual version of IE6?
Cheers Jake
Simon
Just like to say, what a well written tutorial! Well done.
So good in fact, I’ve just subscribed to your RSS.
SAM
Jake,
I have been doing the testing using “IETester” (http://www.my-debugbar.com/wiki/IETester/HomePage) I will test in MIE6 next week via a friend, but you say that it is OK in MIE6 ! ….now that’s good news. I will experiment and get back to you…..BTW….your input is appreciated :)
kat
I used this CSS tutorial to create my new navigation bar in my new layout, thanks, this really helped! ^^
Designer
WOW…… thanks
dfs design www
how ever, also you can make one image ex. for rss, and using background-position.
CSS:
a.rss {background:url(‘rss.gif’) 0 0 no-repeat; display:block;width:30px;height:30px}
a:hover.rss {background:url(‘rss.gif’) 0 -15px no-repeat; display:block;width:30px;height:30px}
HTML:
(remove the spacing)
with this U economically using the transfer, and images doesnt ‘jump’ on hover.
SAM
Jake,
Thanks. Yes!….works OK in MIE6. The “tester” must be a bit buggy. I’ll study the code and use. Thanks a lot. :)
jono
can this only be used for the three navigation menus? I mean can i add more links, like contact, films etc?
Jacob
Hey Sam
No worries. If you have trouble working out how i did it drop me an email and i’ll send you the code or somthing:
jake {at} routeb.com
Sorry had to write it like that cos of spiders.
Jake
RT
This is great,
Any idea how it could be implemented for wordpress & K2? can’t seem to work out how to get separate tags for each navigation link.
thanks
Piotr
great tutorial
reegarding from Łódź
projektowanie stron łódź
great :)
MQ Hidayat
A nice tutorial.
I’m ready to try.
Thks
Icon
Great tutorial. Should be implemented soon to my site.
Thanks.
webtechnepal
Thank you so much for the great tutorial.
web design nepal
Its good tutorial. thank you for such …….
Andy
I tried making a larger menu with this technique but once i add more than three buttons, they automatically skip to the bottom-left of the menu in plain text
Markus
I think it would be better not to use the span element. I always try to avoid additional markup for design purposes only. I reccomend using a single image file containing all the relevant information.
Carlos Hermoso
You might want to visit my site to find out how I use my advanced CSS menu:
http://carloshermoso.com/
GagiaveBiarve
cvnjakglhapehwmswell, hi admin adn people nice forum indeed. how’s life? hope it’s introduce branch ;)
josh
Great tutorial! thanks!
奋斗
不错 我用了 http://www.fendou163.cn
btpig
thanks~~ nice~~
arvee
i finally got it! thanx!
monze
it`s good tutorial.!! thanks for you help.!
thanks for sharing your knowledge :)
thanks. =)
ganesh
Good
Ganesh Badgujar
very nice
Nico
Really nice menu, it helped me with mine xD
Keep up the good work
Steve Tchorzewski
I have been using this simple sliding menu solution on my sites for a while now. It’s really a great solution. But I also like the son of sucker fish menus, I use have used them on my portfolio website, and a bunch of others.
Rudy
Awesome tutorial! Thanks for sharing.
grennouno
tks for sharing it ;)
Nate
Thanks, man keep ’em coming.
izmir web tasarım
greate menu thanks
good post
Joshua Rapp
I’m using the Avanced CSS Menu method for the nav-menu on my site. I got the images to finally show up the only problem is that the menu itself is shifting to the left. I’ve racked my brain over a solution. and cannot figure it out. I’m sure it’s something very simple. I am using a tabled design:
Home
Portfolio
Contact Us
.
Is there something fundamentaly flawed with the design?
ilithya
sweet!!
thanks a bunch for this tutorial, really helpful!!
everything worked out perfectly, but I wanted to also add the same effect as when in hover, to when the user is reading a page, thus I tried the following code:
}
#menu a:active {
background-position: left bottom;
}
and also tried this:
}
#menu a:hover, #menu a:active {
background-position: left bottom;
}
and it didn’t work :( — still once I’ve clicked on a page, it goes back to the regular button, without staying in the effect.
ANY SUGGESTIONS ANYONE??? something I might have missed?
Sudeep Tamrakar
Thanks for the useful menu sample.
sivas
very good, thanks
Mana
It works! thank you!
Lasitha Silva
I was looking for ideas where I found this masterpiece full of ideas for my new student website. Ideal for students and new web developer to bloom their potential. Keep it up and share.
Liam
Are you gay my fiend liam dixon thinks that your mums fanny smells like the sawers.
Lynette
It worked perfectly! I’m just a little concerned about the IE6 bug. I can’t seem to find the javascript fix anywhere and I’m pretty clueless when it comes to that. Any help would be much appreciated. If someone could point me in the right direction (or provide me with the code) I’d be very appreciative! Thanks in advance for your kindness!
barterboutique(at)gmail(dot)com
James Mann
Hey guys, looking at this nav menu you have going on here, and also looking at the code, my general impression was that ‘wouldnt it have been far more easier to have build that nav in flash so the circles around the tabs animates around’. Then you could have linked up each tab to its respective page. Im not sure what Google’s situation is at the moment about reading swf files for key words, but you can type in a description of the tabs so it may be read and optimised by Google. Also, if you are not happy with that, you can add the nav to the sitemap in the footer of your site and get Google to read it that way, that way you have not compromised on the search engine optimisation of your web site.
Just a thought.
Regards,
James
Carlos A.
Great Tutorial!!! Thanks. I do have one question. After saving my css to my site folder, my images linked to my css did not display onto other html files. Shouldn’t each page with the linked CSS display my nav setup properly?
HUBEYOND
厉害啊,我想请教一下,怎么引用外部定义
Luciana Morin
thank you so much for the tutorial!
i’m using the menu here: http://starguides.com.br
and i credit it, don’t worry :)
your site is AMAZING, REALLY, THE PRETTIEST I HAD EVER SEEN!
ortak miras
Thank you. Great…
Ranga
i want know more
Fahad Ahmed
Can you tell me what the font you are using for this. I really like this font.
Regards,
Fahad Ahmed / Fahdi
phoebe
Wow, it’s so wonderful! Thank you!
Soraa
Thanks for the tutorial! I´ll try it in my next layout! =)
shawn
stumbled across your site. Glanced through this tutorial. Jaw dropped. Hit floor. Great work! Love the creative way you are doing things. I have bookmarked and shall return. Thanks for inspiring us!!
myang
thank you,it’s very useful
Selcuq
Great tutorial.
Selected method used?
alberjito (:
i’m from perú, this tutorial is cool, and so better is your site, i’d like to do things like this in the future, i’m only a programmer, but i’ll learn anyways ^^
You’re great (:
sandy
Awsome Dude…
Martin Miranda
Great!
thanks for this CSS Sprites tip
YNa
really helpful and thanks for the sharing :)
Retroshift
Don’t understand the coding (block,menu span, lists,…), I think I’m gonna do it in actionscript..
dj
Good job man !!!
Creative and simple !!
dj.
paul
nice tut man … very useful!
burak
thanks mate. you are legend. I looked all over the net for an example like this and finally – this is so easy as well as creative and free! great job. thanks a lot from Istanbul!
vale
hi! I write from italy and my English is not good …your tutorials are the best, I am learning by reading these. I’m building a WordPress theme, and now I read this post but I have a problem. I installed WordPress Locally. In preview (by dreamweaver) my page is perfect, but if I move the mouse over the text the span effect display in another part, not on the text. after clicking with the mouse the effect is perfect…why?
vale
sorry…I solved the problem of the previous post!
effect in the WordPress Locally preview is ok…but I still have not found the right code for the menu, I tried with but the effect does not appear…can you help me?
Steve
Why do you need the span?
I’ve only glanced at the code but it looks unnecessarily complex and the spans seem useless. You can use a:hover to get the effect and the extra images are useless too. You could just create a single image for the entire menu and clip it with css. Okay so you the the little text as a separate image why? you can just put it on the hover image. All seems stupidly complex and wasteful
Gareth
Thanks very much for this. I’m just beginning to get to grips with CSS as layout and this has been invaluable for my latest project. Kudos to you.
Suchmaschinenoptimierung
It’s a very nice tutorial- very useful Thanx!
Dramaplot
thank you!, thank you, thank you! just like the one i’ve looking for.
CgBaran Tuts
Nice tutorial thanks
Marsha
I tried using this in a vertical arrangement (as opposed to your horizontal). It works flawlessly in Firefox, but in IE when you mouse-over a link, the links below it all jump (or shift upward) slightly. The link on the very bottom of the vertical column of links is fine because there is nothing under it to “jump”
Is there a way to prevent this from happening in IE?
Thanks for your help and thanks for the wonderful tutorial you have provided.
alex
very nice site.. ilike so much
Ze PWNAGE
Dudez KICK butt job nice. Lik the site for the lines of the blue. I wet in italy.
lenno
man, this tutorial rocks!! only I have one problem :(
I did everyting what I should do, but when I open the site in IE the rolover doesn’t works! :'( in chrome firefox etc. it all works perfect, but not in IE!
can annyone please help me???
web design leeds
very nice tutorial! thanks alot, cheers.
flashfs
Thanks. I’d like to see more explanation about some things on CSS (like why display:block on span). But that’s fine.
gt
great tutorial!! Thanks
Tammy
Thank you so much for this tut! I was able to customize and create a fantastic menu of my own.
WOW.
This is such a great tutorial! Now I practically use it whenever I need to hover a picture. However, there’s one little thing: how would you CSS the active tag?
Thanks for any help.
Juice
Very beautiful style, I very like it,Whether you can share this the themes?
VIJAY
This is AWESOME. I have been looking for this Tutorial for a very long time.
sdsd
yb rt rt rtreterte trt tretrtertertertr
rtutrutyuu
gjugfhjfhf
siymat
thank….i really need it….
burlesque performer
Top Post!.. wonderful tips there.. love the whole site!
epc london
this tutorial is perfect
Robin
Hello, great menu, I can’t get this to work :(
If anyone is intrested in helping me, please send me an email.
My problem is: I can only see the three links in Home About Rss
And then: #menu { list-style: none; padding: 0; margin: 0; width: 774px; height: 210px; background…
This is just a very small part of whats failed.
Please help me and tell what I am doing wrong.
Robin
btw my email is [email protected]
AdWords Optimierung
This is AWESOME. I have been looking for this Tutorial for a very long time.
bryanregencia.com - freelance designer
very useful for designers, thanks for sharing.
day
thank you for this article! it really helped me in doing my project! hope you continue to post more techniques regarding css:) Godbless!
facundo
Thank you for this tutorial, awesome website.
Edy Pang
Thanks, It’s really nice tut
jpkids
Hi, this is really a great menu!
A point I don’t understand at all, why empty would work? Please advise. Thanks!
Jeff
For some reason, I can only get this method to work for up to 4 links…anyone else having this issue?
Website Designer Katy TX
Thanks for this. I really like the idea. I believe it is important to see what other designers can come up with. Gets your design mind going. =D
anirudha
nice menu for web devlopment
Igo Medeiros
Bonito menu que construiste.
Mas ele foi testado em quais tipos de navegadores ?
Igo Medeiros
Só ajeitando o meu e-mail
enviei de novo ele
obrigado
exeo
Hi, thank you, very well this menu!
HelenaG
Hey.
This tutorial is so great, eventhouh I don´t get all of it.
It is the photoshop-part I don´t get (Main background & Button graphics).
Is it possible for you to explain it a little bit more, if not here then, please, contact me??
rifqi
nice trick !!!
thanks !
myrtille
many thanks for your menu! Loving it.
myrtille
Okay, just a little question: is it possible with your menu to include a submenu and if so, how is that done? Hope that you can help me!
成都租车
Thanks for this. I really like the idea. I believe it is important to see what other designers can come up with. Gets your design mind going. =D
TeraJL
i can’t find the photoshop file inside the zip
alt
this is great. Thank you. Just a question. Is a drop down menu possible from this? how?
thanks man.
Aoobi
This make me think of my site navigator. I just forgot this method. Thanks
Jayadev G.
Very good menu style…….
Simon
Great stuff works nicely. More tutorials like this please!
bagsin
nice trick !!!
thanks
zwd321081
so cool!!!!!!
Mahmend
Cool………..
t4-trix
best of the navigation menus i have seen
Elver Lego
Nice post! It really help a lot… Keep it up! =D
Cyrus
Great , Advanced CSS Menu
Great article. CSS saved web design
Cyrus
Visit http://www.psdtoxhtmlcoder.com
cla
Why can’t I do Edit > Copy Merged (Cmd + Shift + C) with About Home etc??
Rishi
Awesome tutorial, thanks!
Sharlene
Hi, I used this tutorial to create my CSS rollover [minus the span], but it won’t work on wordpress…please help, anyone!! :((
Sharlene
Nevermind. I was able to fix this, thank you so much :)
clippingimagesc
Great tutorial, Well explained and nice finishing. Thanks for sharing this nice tutorial.
Luis Alejandro González Miranda
I don’t remember ever having visited a website with such a cute design. It’s so beautiful.
I’ve known this one since quite a while, but I have never had the time to exploit it. If anything, your tutorial and this site has given me motivation to putting my hands back to work.
Mars
so cool!
rizmraz
so great……………
I love css
shadowli
cooool, learning, Thanks a lot!
swfit
so cool! Learning···
Thanks~
deepchand
excellent tutorial…….bravo
Mike
Cute effect. I like it
walkities
Still having problems with this in IE6, has anyone found a solution for it? Im not entirely sure where to find this javascript fix.
Emad Navy
Like usual, WebDesignerWall provide the best and “right to the point” articles. Thnx.
Thisara De Silva
hi there, its really creative…. i want to thanx who add this tutorial :)
see http://www.hikkaduwanet.com/surf
to see what i made :)
thanx again!
Dan
Really nice tutorial!!!
الامبراطور
يعطيكم العافية حتى لو مافهمتوا لغتي ..
اطيب تحية ..
Nancy
Nice Article. Thanks!!
Zav
Love it! Thanks for sharing :)
haha
very cool ,I like it .
thanks!!!
feihu
This’s very good!
I like it
Demi
Cool idea! I like it,thanks for share.
Louis
really very nice@@@
RustyDesign
Quite elaborated and informative tutorial.
But i must say that http://www.xhtmlmania.com has done a superb job for me. Since I did not have time to convert the design my self I outsourced it to them and what they delivered was just mind blowing. Great code quality and that too in just 8 hours.
I would recommend to try them at least once. You will be amazed with the code quality.
Werbeagentur Siegen
I love it – thank you for sharing.
Werbeagentur Siegen
Nice Article. Thanks for sharing.
Karen
Thanks a lot! Really useful technique that I can use in lots of other situations as well.
dennis
Has anyone got this to work in explorer 6?
The hover state and transparency doesn’t work…
Franco
Jeez, this stuff hurts my head! Will have to learn a lot to make my site look good. Thanks for sharing!
EFW
Wow I just found this when searching for some great wordpress design tips. Will be checking often, great info.
Arisu
Would it be alright to do this in Gimp 2.6 instead of Photoshop? Would I get the same result?
Thanks
Arisu
Jessica
Is there a way to convert this into a drop down menu? I used this tutorial to create a menu but a few of my items need dropdowns to go along and I cannot figure out how to make that work.
vincentdresses
The designs showed here show what simple and tasteful design is all about. Another one to consider
内衣
Nice Article. Thanks for sharing.Quite elaborated and informative tutorial.
But i must say that http://www.piaoya.net has done a superb job for me. Since I did not have time to convert the design my self I outsourced it to them and what they delivered was just mind blowing. Great code quality and that too in just 8 hours.
I would recommend to try them at least once. You will be amazed with the code quality.
Bindi
Very helpful one…thank you for sharing!
Avangelist
I just wondered why have the descriptions as a separate image and not part of the roll over state? if you reversed the order in which you position the graphics you could achieve the same thing?
vincent
wow.. i like this
Asterius@hk
it’s great!
turismo china
Very helpful to me,thank you for sharing!
Tom Koel
I used your advanced CSS menu for a footer as well. I’m a super novice. Seems to work great until I try to control the position of the header. If I make the header absolute (say at 1100), my footer pics wind up another 1100 px below. I don’t mind a relative footer, but I’ve got a self-made background that I must use and I can’t get it to trim up to the relative bottom of the page. Maybe that would be easier. Whatever you could offer for help would be great. Thanks.
liuyanbinll
beutiful,Thanks for your tutorial
seo ceylon
I like learn seo,and u like learn seo come my site ads learn more
john
thanks for the tips. I trying to make my site with wordpress. thanks, john
mühendis
some sentences, but in general did not exactly turn a nice and helpful article. Thank you and good work.
NK
I have a major problem with the menu. It doesn’t show the menu at all ? who can help me out ?
http://www.nickkwast.com/stage
nike free 3.0
nike free 3.0 sale
Jose Diaz
I’m trying to use your tutorial and code as guide lines for my website but i can’t make it work properly, i would really apreciate it if you could help me out, i think i have most of the code right but then again you’re the teacher here so if you want i could even send you my css and html for you to check. please let me know and send me and email if you are willing to help me. THANKS
Muh
Muh this is how i work test
muhendisturkiye
helpful article. Thank you and good work.
JC
I wonder if anyone could tell me how to do that effect when you press the “View Demo Css Menu” the background fades out and the demo sits on top until it closes. Is it done only with CSS as well or is there some other language involved? If someone would tell me how this effect is called it would be very helpfull. I have seen this before and I think could be very good for a picture gallery I am thinking of building.
Thx
Chopper
Jose Diaz, whats your email address? You can then send me your files to look at.
chopper
Chopper
Attn: JC
It is done by using thickbox.js (javascript) with a subsequent class=”thickbox”
chopper
Rsq
犀利
JC
Thanks Chopper, I really appreciate it
JC
échantillon gratuit
thank’s
Garrad
I just want to say thanks for this tutorial. I have tried soo many different CSS scripts to get this mouseover menu effect to work for my WordPress-ran Web site and none of them have worked thus far. Yours worked like a charm! Thanks so much!
Emilio Jéldrez
dude, you’re great!
really helpfull!
cheers from Chile!
Web Design Maidstone
Cool menu!
Ashok dausa
I wonder if anyone could tell me how to do that effect when you press the “View Demo Css Menu” the background fades out and the demo sits on top until it closes. Is it done only with CSS as well or is there some other language involved?It is done by using thickbox.js (javascript) with a subsequent class=”thickbox”
xHTML CSS Web Design Course by Learnpact
Css menu design never so fun! i loved it
Master
thanks for this tutorial.
See below link for more professional top page rank tutorials(HTML/CSS, Jquery, Photoshop,Flash,PHP etc)
http://www.tutorials99.com
Web Design
very helpful.thanks bro!!!
Brandy
How do you get this to work on the Blogger (google) platform? Where do you put the code? I tried copying and pasting all the code you posted in the widges (html) section, and when I tried it out, all I saw was the html code on my blog.
Can you tell me exactly where to put all of this html code? I would love to use this, but as of right now, I have no idea how! Please help.
toti
hi this is great tutorial, do you also have a tutorial how to implement this to wordpress with active state?
sue
awesome!!!!!!!!! ^0^
ngassmann
Why wouldn’t you just create a navigation sprite and move everything with background positioning? This seems like a lot of work for a simple navigation.
FaiK
awasome…
this is great for me,….
Tim
Hi there. You mentioned I can use Javascript to fix the IE bug. Can anyone tell me how I would go about that?
CHECKA
HAHAHA DSL 16.000 3sec LADEZEIT fürs
background-image: #haha url(“wie-geil-oder.net”) no-repeat;
alterschwede stellt euch mal vor das müssten png’s sein weil die quali von gif’s nicht klar geht ;D
In diesem sinne “VERBIETET Modem/ISDN und Bauern-DSL”
Mark
I have copied the css code in my website.
Then I copied the code into my website.
Nothing happens when I look, I seen you’re background but not the buttons. What happened?
php programming
hi this is great tutorial.great work
Andreas Lüneburg
nice post and very interessting informations
carrie s
great tutorial … It’s always good to know how and why something works instead of just copying codes. thank you!
John D.
I used this tutorial at my user group to demonstrate the elements of navigation styling. Thanks for an interesting approach. The meeting went very well.
Lthm
nice one! thx for the tutorial! :D
Vinaykumar
Nice tuorial. Thanks for posting.
li
thank you ,
I download you program.
vanni linux
Thanks for sharing this .. i book marked it .. keep it up.
TR
seolki
Hi, i like your tutorial. But i have problem doing it. Because it look complicated. I am using Sharepoint designer 2007, and i am not sure how do i apply…Can anyone help? ^^
SEO Sri lanka
Love it! Thanks for sharing
Kanyakumari Budget Accommodation
Thanks for sharing………………….It is useful tutorial. Can you provide tutorial for develop a testing tool in Php? I am waiting for your reply.
Thanks in advance!!!!!!!!!!!!!!!
Cheap Hotels Kanyakumari
Its very useful tutorial and i download this link.
cho
great article. Thanks for sharing.
Amy
Thank you so much for this tutorial. I’ve spruced up my site with a slightly more complicated version than the example on my site. Thanks so much for your help! I love this site.
星星魔术博客
very good tutrial and so nice blog。
Web free fonts
Cool tuorial. Thanks for Sharing
computer programming tutorials
Thanks for sharing such useful information.
computer eBooks
This one is really awsome.
diden
the most coolest and awesome website i ever found on the net!!!!! everything here is simple, clean and alot functional!!
Lorem Ipsum
Hmmm, no doubt, really a nice tutorial. It will helpful for web designer. One great information is got from the bottom of this tutorial to fix IE6 bug using js. I spoiled a lot of time to solve css hover problem, but did not from none of where. Thanks for providing important article for us.
web tasarım fiyatları
Very nice indeed.. I love the whole freestyle feel to it. It doesn’t feel so, bland. Cool idea.
yuanzhen
cool idea! it is great
Richard
Thank just what I wanted
Kak Abbas
It is helpful to me, big thanks!
迷笛
这个不错!值得学习
Blenheim Web designer
Perfect, thanks… Exactly what I was looking for. I was forgetting to indent the text to hide it. Wish I had found this earlier and saved some time
ginie
thank you for this really nice design !!!
iphone
very good tutorial i just wanna know how to make the hover effect glow ? and thanks for your great work
SEO LANKA
Thanks , this is a great article.
POZEN
SO COOL, VERY NICE!
Túlio
could you please show the Javascript code to specify the to display block on mouseover?
magic
Wow! It is such a nice example. Thank you for your excellent tutorial. (^O^)
Manju
Great work. thanks. this is what I wanted.
Shenoy007
Supereb……….
yhllzhuo
Very beautiful and creativity!I like it !
Chris
Great Tute! I’ve being hunting round for a clean example like this.
El garch
thx for this nice tutorial, keep posting you’re doing a great job ^^
Niels Heurlin
This isn’t CSS, more a tutorial for Photoshop. This is possible in CSS, and think it’s wrong and sad that you – with that headline – can’t make this. If you talk about CSS, you may mean for beginners not “advanced”
Martin
Well done!
Brett Widmann
Great tutorial. Thanks for sharing.
lamer
Awesome teach us master :)
dennis
Thank you ! Just what I needed :)
Tatsga
Second hit from Google with “css image menu” and this is just what I was looking for… Thanks! =)
Paul @ Best Blogger Templates
Nice menu and well explained thanks.
liton
that is great…………………very nice………………..
Carrie Lepera
Can I have a word of tips? I’m sure youve got anything fantastic around here. But suppose you supplied some links to an internet site which supports what you are? Or even it’s possible you’ll provide us some further material to evaluate, anything that will connect what you have been mentioning, a little something alot more concrete?
Gagan
great job :)
Heyzeus dechriste
ball massage, tickle left>>> insert quarter .,… press 4 then # for finale
mikwillson
Your article’s resource box should help to persuade your readers. No matter how amazing your article is if it’s not succeeding in driving traffic to your website cheap uggs
Web-Outils
Awesome, thank you!
Henry Peise
Want to make some change to your iphone 4? white iphone 4 Conversion Kit will be your best choice! Come and try on!
Juno Mindoes
I love iphone 4 white, and i will keep focus on it. But when will it really release, hmm let’s see.
Machel
this css tutorial i like this and it realy help me thanks for that.
Robert Norgren
Hi!
Has anyone experienced difficulties when the link points to an anchor?
//Rob
jayshree
hi
Uçak Bileti
kendimden çıktım yolaaa
Uçak Bileti
geciyor zalim sevgilim ağlanacak bu halime
Simona
Excellent article! If you want to see menus, web site trends, galleries, free extension and job for freelancers etc, visit http://www.1artmedia.com , you have online demo and free download. Bye!
Ricardo
Thanks !!! Very usefull !!
anonim-designer
cool!
Freelance webdeveloper
Any way to create css using oblong size without image for button purposes?
Thanks
ilja
how to fix this for Safari? In IE it works nice, in Safari it doesn’t.
tütüne son
this css tutorial i like this and it realy help me thanks for that.
formula 21
Any way to create css using oblong size without image for button purposes?
Thanks
formula 21
Thanks !!! Very usefull !!
altın çilek
Thanks !!! Very usefull !!
Shahzad
Thanks for these beautiful navbars its wonderful
romadur
Thanks !!! Very usefull !!
moliva
Any way to create css using oblong size without image for button purposes?
Thanks
me
no
شات صوتي
thnks
goooooooooooooood
min:(
teeem
Khalid Majid Ali
Great tutorial, loved it so much that I used this technique on my website. I’d like to share that the IE6 bug where the hover effect does not display properly, can actually be fixed using CSS. All we need to do is use the visibility property instead of the display property for the #menu span. Something like this.
#menu span {

visibility: hidden;

position: absolute;

}

#menu a:hover span {

visibility: visible;

}
Using the visibility property will make it work in every browser, including the buggy IE6.
Prameela
Thanks It’s very usefull
Jennifer Rush
Awesome tutorial. Can’t wait to try out different images on the menu. Thanks!
Jessica
rapid prototypes
Katja Turnsek
Great!! I love this!
I have a question: How do I create a “current” link in the menu?
Best,
Katja
Magento shop
Thanks a lot for this post! It realy helping me out a lot!
:D
Thanks, nice tutorials!
Very Helpful!
magento
Thanks very nice CSS tutorial for Magento en Magento webshops i think this is…useful for a lot of people i think!
Bookmarked for further use..
ALI ASGHAR(persian)
IN THE NAME IS ALLAH
hello
Thanks for this tutorial
How To Get Taller | How To Put On A Condom
Advanced CSS Menu article cleared my confusion. Thanks.
How To Put On A Condom | How To Get Taller
Thank you for the in depth teaching on how to slice up the menu design (step by step). Amazing!
Mittron
Thx. Nice work
dexx
Excessive fear, anger, and work under stress last pregnancy, infants can lead to excessive hassaslığa. Intense emotions, going through the mother’s blood circulatory system and brain functions that affect the baby in some leads to the release of chemical
fdsfsd
dsadsadadsa
Pinkie G
Awesome tutorial, I started working on a menu last night and managed to finish THAT part of the design I was working on. Thanks a ton :)
jehzlau
just doing a test reply to see how it looks like in this theme. :D
Sachin
css menu
Ruchi Garg
sb kuch bakwas
Rohit
Bakwas kese ?
Shakita Tartt
I wished to say that it’s pleasant to learn that a different person also brought up this as I found a tough time locating exactly the same facts in another place. This was the first site that shared with me the answer. Cheers.
jehzlau
great tutorial! just what i’m looking for. :)
Btw, after doubling the canvas height, the image on the layer and its duplicate remains on the middle. So I should move both manually up and down, right? Or is there an easier way so that both images on the layers are positioned precisely where they should be?
Michael
Jehzlau,
In photoshop when you adjust the canvas size the image will stay centered by default unless you specify its anchor point: click the arrows below the size settings to add the additional size to any specific edge of your image. Hope that helps.
jehzlau
Ohhh! Got it! So that’s the purpose of the arrows in there. Thanks Michael!
Navneet Saini
Very good tutorial and example.
Thanks for submitting it on your blog it is very help full
Thanks again
zrx
Best tutorial for horizontal buttons in css I’ve ever seen online!
Kasia
Thanks for this tutorial. I’ve learned a lot from it :-) Thumbs up and hope to see some more in the future.
Pattaya Seafood Restaurant
Wow, very nice menu design. I used something similar to this on my website. Thanks.
Arijit
Well said thanks can u suggest a attractive menu for my website kolkatabuyrent.com it will be very helpful to me
geoge
2jZMwo http://fnYwlOpd2n9t4Vx6A3lbk.com
طراحی وب سایت
Best tutorial!thanks
farzher
I hate how undynamic menus like this are, but it’s definitely the way to go for a stunning look. Nice & simple tutorial.
Isham
Awesomeeeeeee! This helped a lot :D Thanks!!
sanjay
It was great tutorial but my Question is when the page is on home page i want hover image as it is
complex41
And then he handed you the thirty-five 45
Kundan Singh
As i am a web Designer its help me lot when i create kids school web site
backgrounds
Great css menus.. thanks for sharing.
deri ceket
deri ceket ve deri ceket modelleri burada
CMSBuffet
very cool. I will try to apply this to one of my websites
Caroline
Thanks so much for this. This is exactly what I needed.
SEO Athens
Excellent stuff. This can work out really easy.
CBT
very useful tutorial! thanks!
wetewrtwetrwetrwe
wetrewtrwer
Himanshu Goyal
Out standing fabulous, great
3mpstudio
Love your tutorial and your website too!
Rahul
I Love This Tutorial.
zed kowl
Great tutorial
what is the font used in name??
Timmy
”Avant que” i think (:
zed kowl
thank you very much
Andika
its look good, thx bro :)
Juan
How would you add an “active” selection to display the same as when hovering over? e.g. circled around home. Thanks,
ash
yeah that was my first thought.
ash
maybe use the active class.
smra
Specify id like this:
OUR WORKS
css:
.topNav #active span {
width: 28px;
height: 28px;
background: url(../images/works_menu_hover.png) no-repeat;
left: 25px;
top: -35px;
display:block;
}
It will activate only the image in the span section.
Ivan
Please, send me PSD file..pleaseeeeeeee:)
Ditte
I wanted to shift the menu to the right of the site. But now my bottons wont overlap the menu background :( help!
Alex
Hi there,
Is it possible to have the an image sprite for the hover only, so I can keep the html for the active state?
thanks for sharing!
Alex
junshi
谢谢分享。
sikander
thanks a lot this was something specific i was serching for two days , exactly this.
hhhh
ghgh
sophia
hi, i modified the css and apply it. it works awesome in chrome and firefox, but it just didnt work for IE.
do u guys have any suggestion for IE version :D
i need help :)
thanks
sophia
sorry, please ignore. I did mistake with the “>”
:)
great
Great we used i this service freely, nice to meet you http://www.Laboratoryes.com it is site of us.
prayitno
Great article for me to create menu using css
thanks a lot
Teddy
Another cool tutorial..thank you so much..
Shingo
Your demo is a piece of art, very beautiful. Thanks for this.
yemek tarifleri
Painting on the tablet is fun, but to do cool things need work.
Fact Stash
You know what? I will definitely use this for my site! it’s the coolest nav bar I’ve seen and I am serious!
Thanks!!! :)
Lenore Pelyo
I have been surfing online more than three hours as of late, yet I by no means found any interesting article like yours. It is lovely value enough for me. In my view, if all website owners and bloggers made excellent content as you probably did, the internet might be a lot more helpful than ever before.
hridesh
script is not useful for professional work.. it is just a bring bad name for css…… so dont upload these types of scripts….
Digital Mercenary
What in god’s name are you trying to say? Your comment makes no sense whatsoever…
“upload scripts”, “bad name for css”???
“not useful for professional work”? Que?
Laboratory
We are using one of the above menu for the health of our website, thanks for bundle of choices for our websites.
Alquiler yates Ibiza
I will definitely use this for my site! it’s the coolest nav bar I’ve seen and I am serious!
sreehari
bigner
sreehari
i am bigner in css and jquery
it is more helpful …. i learn lot of
thank you
hoasabi
Hi! This is a great tutorial but how do you make an Active state on click?
Thanks!
Rogelio
Eye opening Artіclе, іt is nice to find сгеatіve ωriting οn the internet, I аm really ρlеaѕеd to enсounter a blog that is nοt full of the everуԁay trash,
bless yоu.
raman
really nice tutorial and quite advanced
raman
i have also designed a css top navigation menu, hope you will like this nice collection,
here is the link
http://www.designrapid.com/css-top-menu-navigation-tutorial/
bengellz
woow cool css .. I really like.
I also use, just look at my blog.
Sudhir
woow cool css .. I really like.
I also use, just look at my blog.
Frank
What an amazing menue. Thx a lot!
Ivan
an awesome guide,ty so much!!!
one question, how to position this menu to center of the page?
thx a lot
Atul Mandal
Great tutorial. This post helping me a lot. Thanks
Alok Halder
You save my lots of time. Thanks for giving this nice tutorial.
Ayaz
Beautifull