It is proven that by using software shortcuts can boost up productivity. Here are 30 secret Photoshop shortcuts that I’ve learned from years of experience. Well, what I mean by "secret" is that these shortcuts are not documented in the menus. Keep reading and you will find how these shortcuts can speed up your productivity. I bet you don’t know all of them.
Note: this article is written in Mac Photoshop format. If you are using PC, Cmd = Ctrl and Opt = Alt.
-
Drag selection
With the Marquee tool, drag on the document (do not release the mouse yet), now hold down Spacebar, it will let you drag the undefined selection.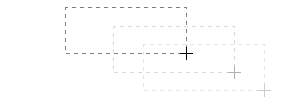
-
Navigate the document left or right
Hold down the Cmd key and scroll up or down allows you to navigate the document left or right. For example, hold down Cmd + scroll up will navigate to right.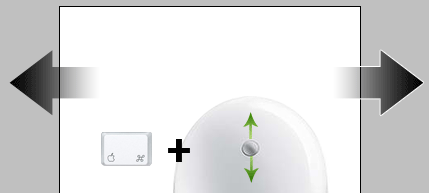
-
Browse the font list
Put your cursor in the font list dropdown, you can browse the font list by pressing arrow Up or Down key.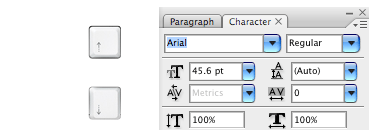
-
Scale font size
Select the text that you want to scale the font size, press Cmd + Shift + > or < to increase / decrease font size.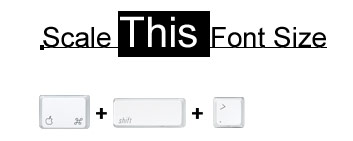
-
Zoom with the scroll wheel
You can zoom in / out by Cmd + Opt + scroll up or down.
-
Drag to adjust numberic value
Mouseover the input box, hold down Cmd + drag left or right to increase / decrease. Hold down Cmd + Opt or Shift key and drag can change the value in decimal or 10 interval. This shortcut works in all dialog palettes.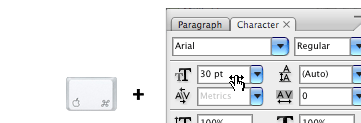
-
Scroll to adjust numeric value
Put the cursor in the input box, scroll up or down to increase / decrease value. This shortcut works in all dialog palettes.
-
Arrow up / down to adjust numeric value
Put the cursor in the input box, press arrow Up or Down to increase / decrease. Hold down Shift and press arrow Up or Down will change value in 10 interval.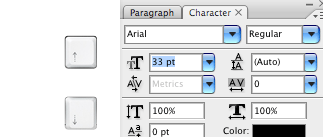
-
Zoom to 100%
Double click on the Zoom tool will zoom document to 100%.
-
Collapse or expand all layer groups
You can collapse or expand all root-level layer groups by holding down Cmd + click on the triangle icon. Hold down Cmd + Opt + click on the triangle icon will collapse or expand all level layer groups.
-
Show / hide in a row
If you need to show / hide more than one layers, instead of clicking one by one, you can click on the visibility icon and drag in a row.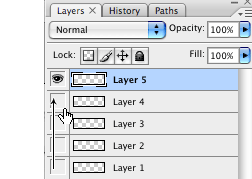
-
Hide other layers
Hold down Opt + click on the visibility icon will hide all other layers.
-
Navigate layer blending mode
Opt + Shift + "-" or "+" key allows you to navigate through the blending mode dropdown.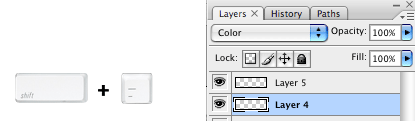
-
Set specific blending mode
Opt + Shift + C, N, M, S, D… allows to set layer to specific blending mode.
For examples:
Normal = Opt + Shift + N
Screen = Opt + Shift + S
Multiply = Opt + Shift + M
Color = Opt + Shift + C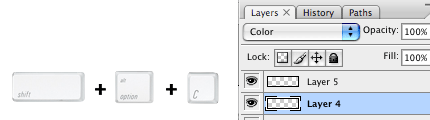
-
Lock layer transparency
Press forward slash ("/") to lock layer transparency.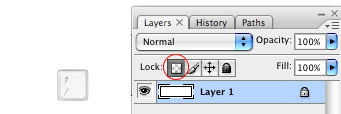
-
Load Channel selection
You probably know that Cmd + number keys (1, 2, 3) will activate the channels in sequent. Press Cmd + Opt + number keys will load the selection. For example, press Cmd + Opt + 4 will load Alpha channel 1.
-
Tool panels
Press Tab to toggle tool panels.
-
Precise cursor
Caps lock will display tool cursor in precise mode.
-
Navigate the tool list
You can navigate through the tool list by pressing Shift + tool shorcut. For example: B = Brush tool, if you press Shift + B again, you will switch to Pencil tool.
-
Increase / decrease brush size
With the Brush tool selected, you can increase / decrease the brush size by pressing [ or ] key (square bracket key). Press Shift + [ or ] will increase / decrease brush hardness.
-
Opacity
You can set the layer opacity by pressing the number keys (ie. 1 = 10%, 2 = 20%…). When you have the brush tool selected, pressing the number keys will adjust the brush opacity.
-
Duplicate layer
There are several shortcuts to duplicate layers.
1. You can hold down Cmd + Opt + drag to duplicate the active layer.
2. Cmd + Opt + arrow keys (Up, Down, Left, Right).
3. Cmd + J will duplicate the active layer in exact position.
4. Hold down Opt + drag within the Layers palette can also duplicate layers.
-
Copy visible and paste in a new layer
Press Cmd + Opt + Shift + E will copy the visible layers and paste in a new layer.
-
Change workspace background
By default Photoshop use grey for the workspace background color. You can change that by:
1. select your favorite color
2. choose the Paint Bucket tool
3. Hold down Shift + click on the working area (outside the document area)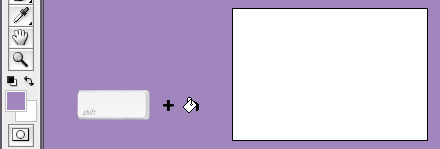
Update: right-click on the workspace area to get a dropdown menu – allows you to set the background to black, grey, or a custom color (commented by Todd Patrick).
-
Fill background or foreground color
Opt + Delete (Backspace) = fill the layer with foreground color.
Cmd + Delete (Backspace) = fill the layer with background color
Update:
Cmd + Shift + Delete (Backspace) = Fill non-transparent pixels with background color
Opt + Shift + Delete (Backspace) = Fill non-transparent pixels with foreground color
(commented by André Dion) -
Switch between document windows
Ctrl + Tab will switch between document windows.
-
Load layer transparent
Cmd + click on the layer thumbnail will load its transparency.
-
Scale proportionally from center
When you are using the Marquee tools or Free Transform, hold down Opt + Shift + drag will scale proportionally from the center.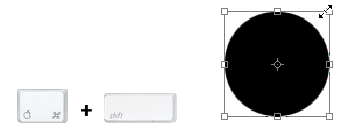
-
Shortcut to Eyedropper
If you have the Brush tool selected, hold down Opt key will quickly activate the Eyedropper tool. Hold down Opt + Shift will activate the Color Sampler Tool.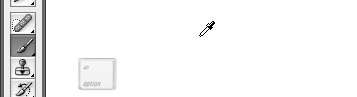
-
Finally…
Finally, if you want to check or set your own custom shortcuts, press Cmd + Opt + Shift + K will bring up the Keyboard Shortcuts panel.
Additional from the comments
- In some dialog boxes, holding the Opt key will turn the “Cancel” button into a most useful “Reset”. (by Miguel Tavares)
- To stroke a path, first select the path, then change to the brush tool, select a brush, and type Enter or Return. This works with all of the brush-like tools (eraser, clone, blur, etc.). (by buddhistMonkey)
- To turn a path into a selection, type Command-Enter or Command-Return (doesn’t matter what tool is selected). If there is already a selection, then Command-Shift-Return will add your path’s shape to the selection, Command-Option-Return will subtract it, and Command-Option-Shift-Return will select the intersection. (by buddhistMonkey)
- If you are adding a “Drop Shadow” layer effect, and you have the Layer Style dialog open to the Drop Shadow settings, you can move the shadow around by clicking and dragging in the image. This also works with the “Inner Shadow” effect. If you hold down the Option key, you can also adjust the Gradient Overlay, Pattern Overlay, and Satin effects by clicking and dragging. (by buddhistMonkey)
Do you know more shortcuts?
Do you know more Photoshop shortcuts that are not listed in this article? Please post them in the comment form. Make sure they are "secret" (not documented in the Photoshop menus).
Absolut Ken
Man, you are so cool, collect all those shortcuts and share with us!
qureyoon
whoaaa ! this is completely useful !
gotta practice all of ’em every time i use PS ^^
*bookmarked !
ninechars
note: “numeric” not “numberic”
Oliver
Perfect, thanks!!!
Ustadz
Good Tips Nick
jayhan
woot, learn some new tricks today, thanks!
Nathan Chapman
Wow…
Someone’s been busy looking for shortcuts. Thanks, they’re really productive.
Jan
Uau, thank you! Now I’ll be more productive!
Harry
Useful tips thanks!
Michael Castilla
Thanks for the useful tips Nick. I’ll be using them the next time I open up PS!
Dirk
the shortcuts i use very often are (i don’t know if they are documented):
Merge all layers:
APPLE + SHIFT + E
Merge the active layer with the next one:
APPLE + E
Save for the internet:
APPLE + ALT + SHIFT + S
Resize:
APLLE + T
Resize proportional:
APPLE + T and than dragging the corner while pressing SHIFT
good work!
greetings
gautham Vram
thank full to the team working on this ….this will help all the designer to get use and give very fast out put ….increasing thier productivity…
warm regadrs,
gautham varma
98809999734
Colurz
Thank you for this great list of shortcuts! Very useful!
Saulo
Very good tips. Thanks for increase my productivity!
Jarand
That was very useful! Off course, i knew about most of them, but some of them i didn’t know of! Great!
André Dion
25 continued:
Cmd + Shift + Delete (Backspace) = Fill all non-transparent pixels on a layer with background color
Opt + Shift + Delete (Backspace) = Fill all non-transparent pixels on a layer with foreground color
Jim Epler
Technically, the Cmd + Shift + Delete (Backspace) shortcut fills w/foreground color and MAINTAINS transparency. Subtle change from the term filling “non-transparent” pixels, but it could apply to search verbiage someone might apply when seeking information found in this post. I offer from first-hand experience! :-)
Kent
thanks mate
nay-k
thanks for these tips!
Nils
Wow, cool … some of these were new to me. Thanks a lot!
cenourinha
Mighty Mouse for the power!
modifiyeli arabalar
Very good tips. Thanks for increase my productivity!
sturdy
Thanks a lot for those tips!
Shortshire
Those are useful tips. I knew around 6 of those but the one people ask me about which I didn’t see up there is holding down shift to get an equally proportioned shape. But thank you for those tips I didn’t know many of those. I’ll use those now and hopefully I can get better at photoshop.
shery
Very useful tips. thanks nick
Pixelist
Just noticed that clicking canvas with type tool when holding ALT (in win) gives option to give measures of paragraph text size; width/height. Don’t know if ever need that..
july
you gonna find these and many many more tricks and tips on my blog pixelmind.org/blog
david bennett
Useful, shamefully useful – I didn’t know there was all this stuff. Or maybe I ignored it, but this is a very useful set of shortcuts; not some arcane stuff to use once in a blue moon, but good everyday stuff. Thanks for sharing.
I’ve dugg it :)
eduardo
sou cara comul e sofro
eduardo
sou um cara comul
Han
One thing that would speed up my PS usage would be being able to scroll through the layer styles, I can do it on PC but not mac!
JPH
Thanks for the tips. Handy shortcuts for making photoshop easier to use.
Alyssa
Awesome! Some of these are really going to help me out. I’m especially psyched to discover the shortcuts to increase / decrease brush size and drag selections –big pet peeves of mine gone! And the one to change the bg color of the workspace is just neat. :)
Thanks for these!
Miguel Tavares
• In some dialog boxes, holding the Opt key will turn the “Cancel” button into a most useful “Reset”.
• Cmd+Shift+L (for instance) will do the auto-levels.
• Cmd+Opt+L (for instance) will instantly load the last used settings.
buddhistMonkey
Here are a few more:
• To select the layer above the current layer, use Option-right bracket ( ] ); to select the layer below, use Option-left bracket.
• With the move tool selected, Control-delete will delete a layer or group.
• To stroke a path, first select the path, then change to the brush tool, select a brush, and type Enter or Return. This works with all of the brush-like tools (eraser, clone, blur, etc.).
• To turn a path into a selection, type Command-Enter or Command-Return (doesn’t matter what tool is selected). If there is already a selection, then Command-Shift-Return will add your path’s shape to the selection, Command-Option-Return will subtract it, and Command-Option-Shift-Return will select the intersection.
• To expand on hint #21 (Opacity) above: first, since it’s not obvious, 0 = 100%. You can also set a specific opacity by quickly typing the percent with the move tool selected. For example, if you want your layer’s opacity to be 27%, select the move tool and quickly type the number 27. If you are too slow, you’ll get 20% opacity, then 70% opacity instead. This also works with brush opacity, if you have a brush-like tool selected.
• If you are adding a “Drop Shadow” layer effect, and you have the Layer Style dialog open to the Drop Shadow settings, you can move the shadow around by clicking and dragging in the image. This also works with the “Inner Shadow” effect. If you hold down the Option key, you can also adjust the Gradient Overlay, Pattern Overlay, and Satin effects by clicking and dragging.
• If you have two documents open that are the same dimensions, Shift-dragging a layer (or group) from one image to the other will duplicate that layer in the same spot as in the original image.
• Easter eggs: hold down Command-Shift when selecting “About Photoshop…” and you’ll get a different splash screen. Hold down Option when selecting “Palette Options…” from either the Paths or Channels palette to summon the Photoshop wizard.
Ander
Good stuff here. Sent it around the office and the Photoshop geeks were stoked.
I may have missed it, but one I use ALL THE TIME is a direct area select. If you’re using the Move Tool (V) hold down the Apple key and click on the element you want. No matter what layer you were on, you will now be on the layer of the element you clicked. No more jumping over to your layers palette and sifting through it trying to find the right layer to tweak.
When you’re using another tool, you don’t have to choose the Move Tool to do this. Simply hold down Control + Option + Apple key (the tool will change to the Move Tool until you release the keys) and click on whatever element you want to select.
Hope that’s clear, I might revisit my comment in the morning, but right now… I’m going home! :D
Andrew Mager
I love your site!! And the blog post is fantastic.
Arion
I loved these shortcuts!
Thanks you!
Max
Great tips! – I’ll use these as quick references.
—
Max … Out!
http://www.cmyos.com free online operating system.
Chris Brophy
one i hoped to be there, select a bunch of layers, hold down shift and click the new folder icon in the layer palette. and all of those layers will be grouped. Throw an alt/opt + shift + Click and name that layer group all in one.
Ben
Something that took me a while to figure out, and let me hate Photoshop a lot more before I figured it out was CTRL + ALT/OPT + Z to undo more than once.
Kent
grerat, thanks mate
Grant Blakeman
Thanks for putting these together – a lot of new, really helpful ones to me.
Shaymaa
Thank you so much!!! Very useful !
martinsc
great! very useful
posted a link to this on my blog.
Antoine
Very very very (did I mention “very”?) interesting article, just printed it out to put it on my desk…
Thanks a lot!
jupi
Very Awesome site! visually stimulating and yet so functionally pragmatic.
Online TV
Hey there’s also this one:
Press Tab in Photoshop to hide or reveal the toolbars/swatches/layers panels.
Douglas H. Hanbury
Do you want to know which layer has a correction, a blotch, or a specific pixel? Control-Alt-Right click on that pixel, and you will go to that layer with the layer highlighted in the panel.
sam
very useful tips
Ninjaboy
Really good selection of tips – I came across this site from a link discussing how lovely the site design was, and congrats on that too!
I run a site over at http://www.photoshopninja.com that has lots of great keyboard shortcuts and tricks, many of which are covered above. I tend to focus on the really good Photoshop tips and tricks, rather than the usual basic tutorials and stuff.
Ta4ka
That’s very cool
digital photographer
That is very easy, but i didn’t know many of them. Thanks to the author and all who shares their own secrets.
stuart
Hi, I love this website, you’ve inspired me to make my own video tutorials, is it ok if I put these into a video and credit you+your website for finding them?
Stu
Ryan Robot
Cool, but i knew all of those! lol
Todd Patrick
I didn’t know about setting the background color to something besides grey – good find! To change it back, option-click in the canvas to load the default grey into the foreground color, and repeat. Or, control/right-click in the canvas to get a dropdown menu that allows you to set the background to black, grey, or a custom color.
Dan
Some of these would be great to use if only my Mighty Mouse’s downscroll worked :-(
Kenny Saunders
Absolutely amazing list. Now comes the daunting task of remembering all of them :)
We need a photoshop tip of the day twiiter account or something….
Andrei Gonzales
Pretty good, learned some new ones today… although I wonder how they’re done on a Windows machine.
Tim
Don´t know if it´s a secret shortcut, but if u use STRG + Shift + C on a selection, ist makes a copy of all layers. There are still a lot of people out there who don´t know that ;-)
Nick
@Andrei Gonzales – PC uses the same shortcuts, Cmd = Ctrl, Opt = Alt key in Windows system.
drjt
Quite handy and maybe obvious?
1. Make selection, with any marquee tool over desired area of document.
2. Shift+Apple+C (to copy all visible content)
3. Apple+V (the old paste man)
Essentially a screen grab function within PS
Nice site BTW
tom d
great list – i had discovered quite a few of these myself but very useful to have everything compiled in one list :)
alex
Not sure if it has been posted, but here is one I find useful:
1. Double-Click anywhere on gray area: Open File
2. CTRL-Double-Click anywhere on gray area: Create New File
I can’t seem to change the gray area’s color though :( tried all kinds of things but it won’t let me.. no menu is appearing :(
Paul
Great stuff… some really useful tips which I’m sure I’ll have to refer back to this page for!! One point for extra efficiency – on number 6, you don’t need to hold down any keys, just click and drag from the label, not within the numerical form field. It does the same thing.
eshark
Really great tips!! pity for PC user.. lucky I was a Mac user. Thanks!
skyjuice
goodjob bro for this list and its worth my time
rajesh balakrishnan
Whaaahw Gr8 article & good job friend….
tilelayer
but there is still no way to key though the layer blending modes? :(
Grigolon
Hey! Where’s the PC shortcuts?
Mac is too expensive on my country!! :(
Jenny
Cool stuff
JeffreyG
I knew a few important ones of them, but by reading the article I know a lot more. Thanks for that :)
funkmaster3000
when in text editing mode (T) press ctrl + enter to apply changes and exit text mode.
Mark
Nice!
Most of them I knew already, but I’ve learned a few new ones.. Thanks!
dilip patel
i have Realy like the shortcuts of mac because i have a new user of mac sestem and i want to buy a new mac PC on this month but i don’t know to fimilier with mac operiting system so will you suggest how i learn the mac operating system
if any web sit that i have down load book and this type of shortcuts so ple send me a mail
Sphynxylynxy
Don’t pity the PC user, it’s quite obvious if you read at the top about control
+ alt for those who never knew!
Jens R B Hansen
Re: But there is still no way to key though the layer blending modes?
_______________________
Right after having changed a layer mode manually, you can key though the layer blending modes with arrow up / arrow down.
Subphonic
On PC wheel on mouse scrolls through the whole layer blend menu, select the the top one then roll…
Slevi
Great shortcuts :), it’s also funny how there’s multiple ways to do the same thing with shortcuts. In example zoom with scroll wheel but also the zoom without scroll wheel by using ctrl + +/-. Nice listing of 30 commonly used though :).
Tobias
how about pressing the spacebar just to drag around your workspace. this works when you have changed into the special window mode by pressing the f-key. this mode also allows you to access the far out corners of a picture even when you are at a high zoom level. cheers
John Breo Reyes
I’ve learned 5 new shortcuts, this is cool thanks for sharing this one.
another shortcut when duplicating layers is to drag a layer into the “Create a new layer” icon.
and in the paint bucket tool, press alt to simply switch between an eye-dropper and paint bucket.
thanks again. =)
José
Tu página web es muy espectacular
Felicitaciones!
José
Andrew
Awesome article. Screenshots are extremely helpful. Thank you for taking the time to put this together!
the j
wow! i knew 70% of the shortcuts you explained. i’m always happy as a little child if i learn a new one. no i’ve learned a few more. can’t express how i feel now… ;)
Cool, thnx for that, Great…
the j
Robert
You can also zoom to actual pixels by using ctrl-alt-0 , other by double clicking the zoom tool.
harry
hi this is really a cool secret to use photoshop very fast. love it man. nice
infernojester
press tab button and it will hide your workspace window
Test
test
brandon
“wow! i knew 70% of the shortcuts you explained. i’m always happy as a little child if i learn a new one. no i’ve learned a few more. can’t express how i feel now… ;)
Cool, thnx for that, Great…
the j”
ME TOO!
Malene Hald
Really useful, and very nice wit the images.
gr8pixel
awesome!!!
Abhijit V. Chaore
Though I already knew most of the shortcuts, after reading this tutorial i knew few more important ones. Indeed a good tutorial and thanks for sharing such a useful trick with us.
Uday
Not worthy!! I already knew all these before. Say something which i donno…
del4yo
I loved the wizard ;) thanks!
control+tab will make you jump from a document window to the next one. This hotkey is particularly handy when you have a lot of opened documents!
I said control, not apple or ctrl, huh? yup, that large key on the low left end of your keyboard. I found out because I wondered once if there was an unused key in Photoshop ^^’
frick
nice post with good tips. I would not state that these shortcuts are “secret” though. Many of them are documented by adobe in the manual. If not in the latest release they have been published before. Nevertheless, a nice post.
Avi Cornfeld
I’ve got some good ones. These are TOP SECRET so don’t tell anyone….
ALT + Click on a Guide to rotate it 90%, or while dragging a Guide from the Ruler-Bar hold down the ALT.
PC users can right-click on the top of the window of a photo for some image related options such as “image size” and “duplicate image” ect…
For options that don’t have a Shortcut Key, rather than customizing my own shortcuts I find the following technique to be very useful:
Using the ALT > letter > letter. For example: Hitting ALT > E > S will stroke the selection/layer. Hitting ALT > I > M > G will convert an image to greyscale. Do not hold down the keys, just press once.
Try going through and choosing tool by tool and hitting the ENTER key. You will find many time-saving features…
ALT + CLICK on a tool on the left, to navigate through the other tools. For example: ALT + CLICK on the Brush tool will give you the Pencil tool.
Use the Brush tool while playing with the Shift key…
ALT + Click on the “New layer” button will create a new layer underneath the current layer.
Right-Click on the eye beside the layer on the layer palette to change the color.
CTRL + SHIFT + D will load the last selection used.
Double-click on a text layer in the layer palette to edit its content.
Someone mentioned it already, but I’ll say is again because it is so useful: While you are typing in a text box, CTRL + ENTER will commit and close the text box.
To open an Adjustment Window that has the previous setting use CTRL + ALT + letter. For example CTRL + ALT + U for a Hue Saturation window with the last-used Hue Saturation settings.
CTR + SHIFT + Z to go forward in history states (like CTR + ALT + Z but the other way)
CTRL + ALT + SHIFT to create a new layer.
After you know this one your life will never be the same:
Make a symbol, transform it. Now hit:
SHIFT + CTRL + T to repeat the transform, or even better:
SHIFT + CTRL + ALT + T to repeat and duplicate the transform.
CTRL + ALT + T will duplicate and transform the layer.
Thant’s all for today. Don’t forget to use the ALT > letter Shortcuts, they’re time saving.
Thanks for all the new shortcuts i have learned today.
i ♥ ps
rAfA vAlDéS
cool to save time while design on Ps
Livingston Samuel
Great tips, definitely will save me a lot of precious time.
manu
schau mal
el.walto
I don’t know if this is documented in the manual, but it’s one of the simplest shortcuts that I see not being used. While typing using the type tool, you can confirm your entry or changes by simply hitting the ‘enter’ key on your 10-pad. No clicking, no option or control combos, just ‘enter’.
Speaking of the type tool, long ago… say PS 3.0, the type tool used to change into a color picker when you hit the option key. It was GREAT to be able to pick up color from anywhere and apply it to whatever you were typing without switching tools. Now you have to click on your color box, or go to the picker separately. Why won’t Adobe bring this functionality back???
yuvan
hey uday .All these shortcuts are useful for who’s learning photoshop. Not for u.If u know just see n njoy.
zeux
“Uday Said Not worthy!! I already knew all these before. Say something which i donno…”
wakwkawkakwak, if you already knew all.., just press the power button from your PC/Mac/Laptop..
Shut Up, and enjoyed the rest..
seenu
wow,
very good list of shortcuts,
btw, your site rocks
nani
i find very useful the shortcut to switch the frontal and background color just with the “x”, but im not sure if it secret or not
Scripts Directory
Excellent! Thanks for sahring them. Secret tips from Avi Cornfeld are also great. Thanks to him as well.
Aaron Riddle
A great list of short cuts. There were a few that I had no idea about. Thank you for spreading the knowledge!
Sedrak Mkrtchyan
I didn’t know the 11 of the hints. Thank you.
I don’t know whether this hint is documented, but I got to know it recently, well:
Ctrl + Y – shows how the document will look in CMYK, and you need not to change the document into CMYK, work in RBG and convert it in the end, and not to got to problem with colors, that looked great first in RGB.
Joycee
awesomee thanks!
Carlo Prina
Additional to no. 26:
Cmd + “>” or “” & “
CrazyLeaf
That’s a good article. Thanks for that.
Sedrak Mkrtchyan
CTRL + “]” or “[” – moves layers up and down through layer list
ALT + “]” or “[” – selects layers up and down through layer list
Amu
Thanks a lot. Very helpful.
gavster
no 5. is wrong…..just need to press option witht the mouse wheel
Cátia
Thanx for the tips, Nick. I’ve got another shortcut that wasn’t mentioned yet: to create a clipping mask, on the layers pannel, hold the mouse between the two layers where you want to create the clipping mask and press “alt” key.
May I give you a suggestion: it would be even nicer if you gathered all the different shortcuts (not doccumented, only, for sure) that were sent by your readers and make another post with them. That’s because before I posted this one, I had to read all the comments to see if I wasn’t repeating a shortcut already mentioned before.
Anyway, thank you very much! Great work!
Polar
This is a great list. Another couple of tips I have learned over the years – 1) When using the eraser tool, holding down the “alt” key turns the eraser into an uneraser – allowing you to un-erase something that you accidently erased. 2) Using the pencil, brush, eraser, etc – if you click on a point, then release and hold down the “shift” key, you can move your cursor to another position and click, causing a line to be drawn between the 2 points. These have been great time savers for me!
Jaffer Syed
Good Job ! Thanks for the tips, looking forward for more !
eRiC
Hey Nice list!! :]
I actually knew almost all of them (didn’t know workspace coloring, font scale and double click zoom – but I won’t use them anyhow)
100% zoom can also be achieved through Ctrl+Alt+NumPad0
(wich is for me much faster- because I don’t have to mouse all over the screen and look for a tool I never use)
very handy Layer Stuff:
Grouping: select layers you want to group and hit Ctrl+G (just like in Maya :D)
I also set up F2 and F3 for create Layer and Delete Layer. I did this with actions: just recorded me deleting a layer and asigned it to F3 and the same with make layer. VERY useful!!! and MUCH faster than looking for the tiny icons or dragging a layer to the trash can!! OH MY! That seems to take ages now! :)
also undocumented I guess:
RMB on the titlebar of a document to choose between:
*duplicate…
*IMAGE SIZE…
*CANVAS SIZE…
*file info
*page setup
RMB on the ruler and you can choose the ruler units
RMB on a transform area to choose from all transform modes including warp
or very nice as well:
shift drag guide lines from the ruler to make them snap to ruler graduations – no more sub-pixel guidelines!
Ah and about font choosing: I never take the hand away from the mouse to do that: just klick in the font field ans scroll for the font you want.
and did you know this: doubleclick the Photoshop background to open a file
DOH! You are on the mac you have no background, don’t you? Oh pardon me .. I did everything win-style as well ^^
Mox Folder
Good work!
There’s a little mistake in the number 28, the cmd button should actually be the opt (alt) button.
one other trick : you can create a clipping mask by pressing the option button (alt) just beetwen 2 layers.
SLCphoto
Another one that took me YEARS to stumble upon: ALT + CMD + M brings up the curves dialog box and brings back the last curve you applied.
Christopher Jones
Just found this out! Shift + double-click in workspace starts Adobe Bridge.
Cool!
Renato Carvalho
Wow! Great tips.
Thanks!
ricky
Nice… time is money… // N this read was well worth the time : )
Leah
Thanks! I’d known about half of them, routinely use about half of those, but I’m sure going to most of the rest.
Nadine
im amazed …great tips and awesome website
thanks alot
Felix Valentin
Where are the secrets? :D
But thanks for sharing… didnt know the “Set specific blending mode” ;-)
Lackar
The tips are very useful to me. I’m just a beginner. Thanks a lot!
Funny Gall
I think I fall in love with this awesome post , let me make a muaaaaaaaah lol :-)
sonty
zakkas……
bole to….
kya khopadi paya yaar
Char
those tips would be very useful for beginners :]]
Matt Davies
Love this post. Just shows why Adobe are the best at what they do…
Zivko Kondic
Great article, I have been working in Photoshop since version 5 or 6, and still haven’t made use of a good part of these shortcuts, almost a half :D
Thanx for pointing those out, and ultimate kudos for the design of this website, I got so impressed I stared into the screen for a whole hour watching and noticing all the fabulous hand drawn details…and that has never happened before, since I rarely get impressed :D
manoj kumar
great work , thanks for thess amazing shortcuts .
Gayatri
Hii
Ur site is too cool and wonderful,espescially the tutorials and shortcuts u have provided,hope to see more works from youu;thanks a lot
detour
beautiful site design. beautiful tutorials. i really dig your content too. keep up the good work. thanks for giving me inspiration.
Sevên
Thanxs, that’s a great informations.and
kimatg
well there is my favorite “X” key,
which switches the current colors around (foreground and background)
and the “D” key, which resets the colors to “Black, White”.
…i think they’re not documented :)
Guilherme Zühlke O'Connor
Great list.
Regarding the 21th, it is also possible to change opacity to a value not multiple of 10 with the keyboard. For instance, to set opacity to 76% you should press [7] and the [6] very quicky, on the speed of a double-click, say…
crip
Any mac shortcut key for Crop?
TheUprock.com
One of my favorite short-cuts is Command + Option + 0 on the number pad, which allows you to jump back to the 100% view size, without using the mouse.
Ched
Wow. Great list. This will definitely save me tons of time.
caocao
blog的界面做的不错。
JOnatan
Ok, nice info, but if a have Windows OS….?
Mike Permenter
Easter egg:
Useless but fun!
Hold Ctrl+Shift+Alt then on the top tool bar go to Help / About Photoshop
Jonathan Bird
Just a thought: using similar CSS methods for displaying different colours (background, links, etc.) shouldn’t it be possible to have a Mac/Win selector that automagically changes the CMD to CTRL and OPTION to ALT?
“…Note: this article is written in Mac Photoshop format. If you are using PC, Cmd = Ctrl and Opt = Alt “
evertt de sousa
very thanks for your working
very nice tutorial
thanks
ptamaro
Great set of useful time-saving tips. I’ve stumbled on and used a bunch of these myself, but this list really helps to remember them… Thanks for a great post!
Fleur
Nice)
NikNok
Just to add one which is passing through my head,
ctrl + arrows when having a selection will make it move one pixel at a time.
ctrl + shift + arrows will move it 10 per 10 pixels
NikNok
oh, and as I see TheUprock.com ‘s message saying about command + option + 0(num) wich zoom back to 100%, I must add also :
ctrl + 0(num) will zoom to fit workspace ;)
NikNok
As I’m here, double click on background will bring the “open file” dialog box
Apenan
I am a novice to digital photo imaging and these photoshop shortcuts are simply great and save me a lot of time. However, Mr. NikNok, can you explain explicitly what arrows to use, as contained in your comment 147?
Thanks.
erikk
to respond to crip (comment 137), the shortcut for crop is ‘c’
Bogdan Bucur
Anyone knows what’s the shortcut 4 the color picker palete?
I’m using a graphic tablete and i change colors many times, i need a shortcut to make it faster…
Thank you
Akmal
Amazing shortcuts!
but i knew number 3 – 7 – 11 – 17 – 20 – 29. six of 30.
denmurl
for complete photoshop shortcut : http://denmuel.blogspot.com/2007/08/photoshop-keyboard-shortcuts.html
raj
fine
Xpo
to zoom back to 100% press “space”(hand appear(H)) and right-click, then in menu -> actual pixels, or just ctrl+0(numpad), as said before…
u can override shift-letter combo for sellecting diferent tool(pencil/brush).
to remove shift from combo go to: edit/preferences/general – there is a check box for this
when edit text – ctrl-arrow jumps 1 word, with ctrl-shift-arrow makes selection of 1 word
Xpo
edit: ctrl-alt-0
rAfA vAlDéS
I don’t know if this is before (there are 157 comments, i can’t read them all) but if you select a part of the text and hold down alt + shift + up or down keys, the vertical scroll (i don’t know if this is exactly the name, i run Ps CS3 in spanish) increase and decrease.
PD: 4th tip didn’t work me on Windows.
rAfA vAlDéS
Another, sorry if it’s right now, but if you hold down F, this will toggle the screen within different ones (you’ll can see the fullscreen, without taskbar).
Cathy
First of all, thanks for the great tip. It’s very helpful.
However, I’ve tried the tip on “Navigate the document left or right” and it didn’t work for me. Any idea why?
Bryan
If you hold down “ctrl H” while text is selected it will hide the selection mask so you can see your text clearly. Really cool… now you can see exactly what its going to look like
fanboy
I feel like I will never remember all of these
prabhu
hi
prabhu
sri.
Picturesurgeon
#13 and 14, regarding blend modes, affect the blend mode of the brush tool if you have it active, instead of the layer (CS2)
manish
this is very nice bloge
luc
Hit tips… One thing that always bugs me and im sure was feature in older versions of photoshops was when you have a selection and want to crop to that selection what short keys do you press. I thought it was cmd shift backspace but its not and i wish i knew what it was.. anyone hear me?
justin
@luc
In regards to cropping a selection, I had to make my own shortcut from the edits menu, just like in step #30. I use “option + cmd + .” It doesn’t seem to conflict with any other the other built in shortcuts.
Someone in a previous post asked what the shortcuts were to change blending modes on a mac. First select your move tool(v). Then select your layer. While holding the shift key down, you can cycle through modes using the plus(+) and minus(-) keys. I should note that it will keep cycling and will not “stop” at the end or beginning like it does on pc.
psycho
Luc, it’s Ctrl + Shift + I, than Delete, than Ctrl + Shift + I again :P
That’s what I use… That’s “reverse selection”, than “clear selection”, than “reverse selection” again.
psycho
I meant “inverse selection”.
That’s what the ‘i’ in Ctrl+Shift+I stands for.
Photoshop CS3
good tips. I especially find # 7 and # 16 very useful.
btw guys, we have Adobe Photoshop CS3 on sale now for only $347.
If you mention this site, we’ll give a 10% rebate back from Paypal after you place your order. http://4-ps.com
TheUprock.com
@crip: There isn’t a shortcut for Crop specifically, but if you go to Edit > Keyboard Shortcuts, you can remap Crop to a hotkey of your choosing. Personally, I use Apple + Option + X, as it is easy to remember, and the original mapping of Apple + Option + X is to a Filter called Extract, that I have never used to date and probably won’t… I should probably check it out though, just to teach myself about something I’m not already familiar with.
Hope that helps.
belly
IN DESPERATE NEED OF HELP
using photoshop cs3, how do i get rid of the grey background of my working space so that i can see through to the desktop. plz help!! i want to use photoshop and view a tutorial on a website behind it so that i dont have to change from ps to website. thx in advance!!
belly
im using photoshop cs3 extended if that changes anything =}
Chris
Wow, detailed and specific with loads of helpful information. But I was wondering if you knew something that I have yet to figure out, in a graphic design course the background color was transparent. You covered how to change that background to your preferred color but I dont see transparent as an option. Is there a way to make this work?
Thanks,
Chris
Darren
@luc: in cs3 at least, you can set your own keyboard shortcut for it. I’m on a mac, and I use control + command + c
Sussex Web Design
Another great set of tips, keeps me coming back all the time! :-)
Paul
Hey hey
Since moving to Norway i do not have a separate [ or ] key i have to do alt + 8 or 9 and this just gives me eye dropper, any suggestions if either i can change this or if there is a work around, as i used to love it :(
btw, great list :)
Best,
Paul
mail me: [email protected]
RubyDo
Very nice :)
Can I add this please:
Shortcut to Eyedropper.
If you have the PAINT BUCKET tool selected, hold down Opt key will quickly activate the Eyedropper tool.
Bharat
These all option are not so new. I already know about them. These all are waste of time, so friend don’t waste your time to read them.
B
Just because you knew then all doesn’t mean everyone else doesn’t.
RianneDeJaneiro
I think there are few shortcuts i can use…
some i already knew and some i dont think i would think are useful…
thnx anyway….
to Bharat << why wasting your time posting here…
Mads
To shuffel between the diffrent baggrunds, push the F key. There are 4 diffrents stages as I recale. If you are in the “window” stage (where alle the open doc are showen i cascade) then push the F tow time to get in a mode where you can work like illustrator, by using the hand (spacebar) to drag your view even longer than the egedes.
I also found the cmd + < to shift between open doc’s.
I found this POST very usefull, thanks a lot. More of this, please. And maby some toturial about retouching skin tones. (Not the 100% plastick look, but the natural looking skin!)
Jack Waters
A great set of Photoshop shortcuts, cheers for the tips….
DSA1101
You can get a pdf file that has ALL of the shortcuts (including those plus more) in it.
I can send it to anyone if they need.
I got it of a website… Don’t remember the url but it prob’ly says in the pdf.
If you want it just send me an e-mail
[email protected]
sumosa
I may have missed it, but one I use ALL THE TIME is a direct area select. If you’re using the Move Tool (V) hold down the Apple key and click on the element you want. No matter what layer you were on, you will now be on the layer of the element you clicked. No more jumping over to your layers palette and sifting through it trying to find the right layer to tweak.
When you’re using another tool, you don’t have to choose the Move Tool to do this. Simply hold down Control + Option + Apple key (the tool will change to the Move Tool until you release the keys) and click on whatever element you want to select.
Hope that’s clear, I might revisit my comment in the morning, but right now… I’m going home!
Anthony
I may have missed this:
The Open Dialog Box can be opened by double-clicking on an empty work area’s (grey) background.
doN
thx for the tutorials man, i’ve learnt a couple of new things here…
and to Bharat: ur an A-hole…
aydınlatma
very useful shortcuts ,thanks for that
wmwebtr ödüllü seo yarışması
Woow thanks for useful informations.
jared
I think Bharat is a designer-want-to-be and needs serious help. He probably works at McDonalds too.
Bubba
“180 Bharat http://www.rediffmail.com
November 24th, 2007 at 2:25 am
These all option are not so new. I already know about them. These all are waste of time, so friend don’t waste your time to read them.”
1. Learn to speak english
2. Learn some manners
Mukarram
Welll … i don’t hav words for YOU !!!
always YOU do things Differently !
I really appreciate the way YOU teach.
You deserve alot but this time i only wanna say ” May God Bless You “.
Take Care
Mukarram
wmwebtr ödüllü seo yarışması
i like it thanks you.
Yaseen Shaik
Cool………i appreciate this……
Marity
Thats great! I like very much it.
e-okul
thanks you nice.
tedavisi
thanks you
himanshu
thank you keep on going[:)]
intel
hi, thanks a lot this tutorial very useful 4me
sorin986
te rog gratuit
Sumit
Most of the tricks i know. But thank you for the addition tricks
chris
yea learned new things.. thanks
youtube
hi, Thats great! I like very much it.
Pavel
your article is in my top bookmarks, I refer to it every day!
Ricardo
Great list. Thanks.
punk
Learned a few new ones ;) thanks
MegamaN
Thanks
vet store
great tips. thanks… :)
Glen
Very useful list of shortcuts. You can never have to many. Thanks.
Fashion Zealot
Awesome tips for newbies like me! Thanks for these tips.
Webdesign
really useful shortcuts.
Wellness-Hotel-Bayern
good job
Wellness-Hotel-Bayerischer-Wald
good ressourcelist.
ctraos
muchas gracias, perfecto tutorial ! Awesome :D
Nicolas Alexander
whoa! very helpful!!
Alvin
Great Again.
Useful Shortcuts
Note for part 28 (Scale proportionally from center):
You can use only Shift + Drag to scale
kris
Good stuff, some handy tips here, thanks.
if you can, [Windows CTRL/ALT keys] next to the APPLE/OPTION keys would be good for us poor Microsufferers.
Q: Does anyone know how to increase the selection cursor size (ie. beyond the precise / standard ‘+’), in CS3 ?!? I’m still struggling with my ageing eyesight to see the selection cursor and zooming in-out constantly is a little painful.
BTW: Borat [sic] above obviously doesn’t realise that English-speakers read text from top to bottom, clearly read the comments AFTER the body of the page.
wanyx
Thanks for shortcuts ;)
SJshah
Please add shortcuts for windows…
this is v. good, but i knew many of them already.
Isabelle
Thanks for sharing!
Inverted Reality Designworks
Nice. I’ve always wondered what turned on the precise cursor. That was always very frustrating to me. Overall, couple cool thing I didnt know. Bound to speed up some processes. Thanks.
var
/ – sets transparency lock for a layer… infinitely useful..
SHIFT+dragging a guide… will snap to ruler marks.. stay on whole pixels ya know?
and i think those two belong at the top-ish…
Both of these are very important.. a lot more important than some on the list..
thank you for the brush/enter… and path+cmd/enter for selection… bellisima!
Jared
This post would’ve been useful a long time ago, knowing all these makes things a lot easier. Most of them I have figured out already, but there were a few mentioned that I am glad I know now. Thanks.
Also, I know there are some useful one’s I don’t think I saw here, but I can’t remember what they are right now except,
If you want to use the hand tool, to grab a layer and move it around, you can use spacebar + click and moving the layer. It works no matter what tool is seleveted, too.
If I remember anymore I will post them too.
Akbar
hi, these were awsome though i new half of it but the rest half was just awsome.. there are couple of more. u may be knowing it or they maybe be common i dont know cos i never went phtoshop class anyway these (in windows) ctrl + [ and ctrl + ] to move the layers up and down. ctrl + shift + [ and ctrl + shift + ] to move the layer to the top or to the bottom.
Malakaih
Thanks a lot!
One shortcut I could not find here and it tends to be seriously useful when creating actions:
ALT + . selects top layer
Caroline
Thank you – thank you – thank you and tack (thank you in Swedish)
Dmitri
I’ve seen how one guy quickly changed between bird’s view (fit to screen) and current zoom. I wonder if anyone knows shortcut for that.
Leo
Hi there,
The photoshop shortcuts are really helpful. i guess probably most of you’ll would know how to select one particular element on the canvas from 20 or more odd layers ( without lables ). Its very difficult to figure out which unnamed layer contains that particular element to be amended. To do that, press CMD ( mac ) or CTRL (windows) key and click on the element on the canvas and see it highlights the relevant layer containing the element you need to make changes to. hope this is helpful. thanks
Jannis
@ Dmitri, this might be what you have seen:
STRG + 0 = Zoom to fit
STRG + ALT + 0 = Zoom to 100%
I find this quite useful at times:
SHIFT + ALT + 0 = Cycle through all blending modes on the selected layer.
Note: The “Blending Mode” field does not have to be selected to be cycled through. Also, once you hit “Luminosity” it will start automatically at the top again.
swank
Excellent
kirubakaran
One of the Good Design page Love you so much
Byeeeeee…
Tamila solanumma nachunu eruku……………….!!!!!!!
ganesh
great work keep it up
Abhisek
I am a n00b with photoshop. Here’s a shortcut I found is useful: CTRL+0 zooms the document 100%
Vincent
it is very useful to me
and i got so many things from this page.
Thank You so much to web designer wall.
Rana
Hi there,
The photoshop shortcuts are really helpful. i guess probably most of you’ll would know how to select one particular element on the canvas from 20 or more odd layers ( without lables ). Its very difficult to figure out which unnamed layer contains that particular element to be amended. To do that, press CMD ( mac ) or CTRL (windows) key and click on the element on the canvas and see it highlights the relevant layer containing the element you need to make changes to. hope this is helpful. thanks
Kevin
Just a minor addition
21 Opacity if you press the say number 5 many times it switches between 50 & 55% same with all the rest.
Mnaira
Looks like if you click Hand tool twice, it will zoom to “Fit on Screen”
can you send more secret shortcut keys
thanks for ideas and tircks of keyboard short cut keys in that i can make my so easy and faster. thank you so much and every one those each and every one of them bye.
Leandro Nascimento Camargo
*Alt + [ OR ] to navigate through layers at layers palette.
*Alt + Shift + [ OR ] to add layer selection below or above the (group of) layer(s) selected.
*Ctrl + Alt + A to select all layers
*Alt + , to select the bottom layer
*Alt + . to select the top layer
shining
select type tool (t) then press ctrl+t to show/hide type pallete
media
Great tutorial! Thank you!
Ashish Lohorung Rai
What a cool post…!!
pradip patel
nice tutoriel it is great
Thomas
Very good tutorial. Thank you.
JD
hey thanks buddy for the shortcuts they all are really very helpful and i also wanna to share my shortcuts tht I discovered while working they are:
Ctrl + ] = moves the current layer upwards one by one layer
Ctrl + [ = moves the current layer downwards one by one layer
Ctrl + Shift + ] = moves the current layer on top.
Ctrl + Shift + [ = moves the current layer to down.
select Move (V) tool and press Alt to duplicate the current (or any selected layer)
Alt + [ = to select the layers downwords.
Alt + ] = to select the layers upwards.
ödev
select type tool (t) then press ctrl+t to show/hide type pallete
harmu
thanks for sharing this nice and helpful tutorial,
Scooter
Found some awesome tips here! Cheers.
philfreelanceweb
ctrl + j to duplicate layer
ctrl + g to group a layer
to merget select the layers and ctrl + e to merge
for deselect ctrl + d
ctrl + f4 close current active file
tab + hide or show tools and palletes
hope this help! :)
sree
nice tutorials but i didn’t understand that Cmd, Opt keys.thanks
Dan Philibin
There should be a shortcut for switching layers…
major bug!
alert(document.cookie)
major bug!
in “Comment Preview” works XSS :(
David Brugge
The first command that most of us learn is Cmd + Z to undo our last step. Many don’t realize that Cmd + Opt + Z will undo the step before that! You can keep undoing steps for as many history states that you have in your history pallet.
bias
Dan Philibin – You can switch layers without clicking the layers palette or ALT+Right clicking… ALT+[ or ALT+] “scrolls” through the layers in your palette…
Jobo
Thanks for the tips. Found some interesting shortcuts that I didn’t know.
Maria
I’d advice to check out: http://www.photo-templates.com/images/keyboard-with-shortcuts.gif
I guess this suites more for the beginners, yet- useful to have printed out on the desk.
pj
Cmd is for Ctrl?
and Opt is for Alt?
Marija Zamaryte
I guess all the shortcuts can be found here… Hope this helps.
http://morris-photographics.com/photoshop/shortcuts/downloads/PSCS3_Keyboard_Shortcuts_Mac.pdf
Francisco Camberos
WOW These are great! I knew these had to exist thanks for posting them!
Best Regards!
Giuseppe
There’s always something new to discover!good work!
Roustem
Type any world, then select any letters, then click (Ctrl)+(Shift)+(+). Letters will go to Superscript level.
HM the Cat
One of my favourites, which is the same for Illustrator and InDesign as well as PhotoShop, is Ctrl+0 to fit the artwork/page in window.
Love your site!
Martin
Hey, good stuff. Last week i learn some shortcuts and now i see the next.^^
patricia
I’ve got a problem. Maybe you can help me. When I’m writing something with the text tool I cannot select any other tool with shortcuts because obviously it writes de letter instead of changing the tool. If I press Esc the changes I’ve made doesn’t keep so… Any idea?
kanak
i think ur secret shortcuts will help me a lot
love ur site
belial
@patricia…
When you’re done writing the text you want… press Ctrl-Enter (Cmd-Enter). Then you can select other tools, etc. w/out affecting your text.
Chr.Mogel
wow, nice work (even if I have to translate them into windows style^^)
some more shortcuts (don´t know if someone had allready posted)
01) “X” – changes fore- and backgroundcolor (nice for painting with two colors)
02) “Spacebar” – changes the tool into the moving-hand-tool for moving the picture only while holding the spacebar (when leaving the last tool will appear back)
03) as in 22. mentioned how to copy layers, it is even possible to dublicate the layer-effects from one layer to others (when not wanting to adjust same effects several times)
04) “F” – changes the window into several modi, like fullscreen with no borders and so on (usefull when painting with brushes etc. at huge pics at the border or behind)
05) “Cmd”+Mouseclick on layer – makes the viewable parts of the layer as a selection
06) “numbers” – as in 21 said, you can choose the opacity of any brush and layer by selecting any number BUT you can write TWO NUMBERS or THREE, for also selecting 25%, 75% or any other number between the full tenner
Ahmed
Thanks! That was great :)
ibnushodiq
Makasih atas ilmunya..mbah bejo
web designer
These are useful.. I do not know most of these shortcuts..
Matt
You can duplicate a layer by dropping it onto new layer button.
Francisco
@ Chr.Mogel
Wowwww!! the tip 05) is fantastic!!!
@web designer, thanks for the post.
mike.
super ding. werd ich auf jeden fall weiterempfehlen!
Farid Abdulhadi
I’m glad you linked to this post from your new “Illustrator” post. I’m new to this blog and probably hadn’t noticed this post otherwise.
Thanks for a great list.
nomi
Same as Tip#2. Vertical scrolling can be done by holding shift key with mouse wheel. Also, Cmd+Shift+Scroll will navigate to extreme Left or Right.
M.joshua
Wow. That’s one of the most helpful posts ever. I still have one shortcut I desperately want to find out:
Text Deselection
Every time I add text or modify it, I have to select another tool on the tools palate to de-select it. I desperately want a smoother, faster option.
Carl
Excellent post. Very, very useful. I use Adobe Photoshop on a daily basis, so this will certainly help cut off a few extra minutes. Thanks a lot Nick.
John Baumgartner
In response to 280 (M. Joshua).. ctrl + enter commits changes to type and deactivates it (Windows, I guess Mac would be cmd + enter).
Great post, useful stuff, thanks!
John Baumgartner
Not sure if this one is documented in the program itself, but you can sample colours outside of Photoshop by doing the following:
(1) reduce the screen area taken up by Photoshop (i.e. don’t run it maximised);
(2) select the colour eyedropper (i);
(3) click and hold the mouse somewhere on a document open in Photoshop and drag the cursor out of Photoshop to the part of screen you want to sample (then let go!).
david
Awesome. Thanks!
alp tugan
Thanks for sharing your experience .)
I am working with PC. But, you know, shorcuts are the same except for you should use “option” key on MAC instead of “Alt” key on PC.
– Ctrl + E ; Flatten document
– And this one is really useful in my case,
First, create an empty layer
With brush tool, make a dot(whatever you want),
Press Ctrl + Alt + T, and move your new, “Free Transformed” layer,
Press Enter,
And then, press Ctrl + Alt + Shift + T :)
See what happens.
Hartman
All good in the hood……….. a couple of sneaky ones there ha
Cheers for that
Syed Afifuddin
Nice tips buddy keep up the good work
neeraj kumar sharma
This is a very great full web site and i have no word explanation in my dictionary.For the comment of this web site
Jens
Last week i learn some shortcuts and now i see the next.
Putske
Response to 280.
I think this is what you wanted.
When using the type tool you can ok it by pressing CTL + Enter(CMD + Enter on a Mac) instead of clicking on the check mark on the options
neeraj kumar sharma
hello
Iain Anderson
Wow, commenting on an old article: waste of time or not? :)
Let’s give it a go anyway.
You probably know that command-[ and ] move a layer up and down in the stacking order — and it’s in the menus. However, option-[ and ], while you have a single layer selected, moves your selection (not the layer!) up and down. Handy in recorded actions when you don’t know the name of the layer you want to select.
Another: backslash makes the current layer mask visible as a rubylith, like a Quick Mask.
Two other techniques, not just shortcuts:
When you’re painting a mask, set the Dodge tool to work only on Highlights and the Burn tool to work only on Shadows. That way you can paint straight over edges to sharpen them up, without destroying them.
If you ever need to fill text with your own painting, don’t rasterize the text! Instead, create a new layer above the text and use Layer > Create Clipping Mask. Why Photoshop doesn’t do this for you (instead of admonishing you) I just don’t know.
Plug: I teach a Photoshop Masterclass at Next Byte Charlotte St in Brisbane.
Billybob
AWESOME THINGYMABOBER YEAH yeah chicka yeahyeah!!!! FO SHO! fashizzles
Ozey
this page is proppa matey. some peeps comments bout them knowing the tips above already, why bother telling us that? just feel proud of ya selves and realise that its cool that someones taken the time to document all this for learners.
any wayz here’s another tip that no ones said yet so why not, eh? the more the merrier.
you’ve made a shape with the pen tool, later you need to adjust one anchor point. so just grab the black arrow nearest to where the hand is in the toolbox, click on the whole shape, then hold alt and click on the specific point. while you’re holding alt, the arrow turns white. booooyaaaah!!
oh and sometimes you wish that a shape with an emboss on it or a shadow or glow, whatever….just looked like that without any effects applied. maybe so you can put a filter over it….make only that shape and its effects visible by holding alt and clicking on the layer in the layer window then quickly tap
command, shift,n…………..command shift, e.
This’ll quickly open a new layer then quickly merge your first layer and the new empty one within seconds. It’ll allow you to put effects over effects and make sh*t freakier. it’ll even flatten transparent parts.
my mate here, knows all bout cubase and he’s cussin me for givin away secrets. git! its good to ave a bit of healthy competition.
L to the 8ers P/S Posse.
keep the vibe alive. Your only limit is your own imagination ( at the risk of sounding like a hippy)
David Smith
In response to 280:
After you have typed your text, to Deselect it, the fastest way is to hit the ‘ENTER’ button on the ‘numbers’ pad on your keyboard.
Hope this helps someone !
Really appreciate the tips on this website. Keep it up !!!!!
Melonpeel
The one I can’t live without is….
CTRL + Right Click …anywhere on an object you want to edit, this will reveal a list of layers where one of which will be the layer containing the object you’re after and the rest of the list will be layers containing other objects that are also present where you clicked. Say goodbye to navigating that layers palette as you can breeze around all your layers right from the objects themselves.
akanat
to 295
thank you. thank you. thank you.
sachin
nice
Hans
Some neat tips here – thanks!
Anyone know how you can make a layer duplicate (Apple + J) appear underneath the layer which is duplicated? It’s SO annoying that it’s stacked on top of the active layer!
Bluekite98
Superb shortcuts. I had already been using several of them but there some that I didn’t know, which will be very useful!
Mahesh
Lo-J
nice list, thanks!
+this one (windows only):
double-click on workspace background (not the image outer canvas,but the actual application background) brings the open file dialog.
I hope adobe will put a backgound on the application workspace for macs, as more and more applications tends to. This is more efficient because you keep focused on the app.
Josemon
Oh Thanks…. These shortcuts will make work easy.
ga3s
CTRL (CMD) + RIGHT CLICK ON CREATE NEW LAYER (small icon on the layers tab) and it will create a new layer below of the layer u have selected… instead of creating above.
Tilly
Thanks for all the amazing and very helpful info!!
Shobhana
Nice tips. Some of wich i have already been using..:)
CastleSteps
Thanks so much for this. I found it really helpful as I have been learning Photoshop on my own time so I can use it better in my job at a hotel in Prague. Now that I found these shortcuts, I can save myself a lot of time. This is a great resource for anyone serious about Photoshop.
ositaka
Hello!
I have a question… With my experience I found some shortcuts like that, as everyone.
But my question is: why Adobe don’t show this shortcuts? And what the people think about it? I’m shore that this shortcuts are not bugs in photoshop…
Anyway, the shortcut to change the blending mode was super!
:D
Satya praveen
Very Very Nice im working on photoshop since 3 moths but i dont know anyting
subhash khatri
Mostly key I did known, 1, 14 , 15, 24 is useful for me.
Thanks
EJ
SHIFT+OPTION+CTRL+K= SHORTCUT KEYS LIST ON PHOTOSHOP.
SHIFT+Alt+CTRL+K
EJ
Shift+Ctrl+Alt+K= shortcut key list
EJ
for more questions here’s my e-mail ad: [email protected] I’ll teach some basic. ahehehehe
usb
Great tutorial thanks. Here is drop shadow generator: http://www.dropshadowz.net
virtualgadjo
hi, another one, must be very secret as i’ve never heard of it
! increases the brush size
: decreases it
really handy when painting…
have swing
Kamil
Hi friends,
another shortcut for open a “New window” is ‘CNTRL+Double click ur mouse’. If this one is old tip means just ignore.. Thanks.
Paul
On 28 the pic is wrong but the text is right. Say you’re in transform mode, alt/option+shift will scale proportionally from the center but the pic says command +shift. I know it’s being nit-picky.
SACHIN JADHAV
dear sir,
pleaes send me the “ultimate photoshop effects with method” in my id
Alanya
Another great post from this page, thank you!
michael
Paste in place secret
(the item you want to paste in place on another document must be the same canvas size, as it won’t work. if it is a few pixels off)
You have a document open lets say 21cm x 29.7cm and you have a circle on the page, and you want that circle on a different document (which must be the same size – 21cm x 29.7cm)
Have the move tool selected & also the layer selected, hold down shift and drag the layer onto the the new document
Pasted in place!
debdulal dey
This page rock and this post rocks too. Brilliant suggestion by a brilliant. A thump up to you man
aomsin
i think the same with 307ositaka
Nick
Hold alt and double click on a background layer to convert it into a normal layer.
mikemathew
Software shortcuts you can boost up your work. At Webdesignerwall you can see some secret Photoshop shortcuts which are not documented in the menus. All shortcuts are quite useful for speed up your works. To scale the font size – increase or decrease, press Ctrl + Shift + > or <. To set the Layer opacity or selected Brush opacity, press the number keys (1=10%, 2=20 %….) to adjust opacity.
—————————————-
mikemathew
Link Building
gabe sventek
if you want to paste in place, simply make a selection and press Cmd+V and it will paste in the selection.
Ralph F
hey guys I find the best shortcut for the first time, just i can tell thank you for that
hanzo
I knew most of them… still there’s always some one misses… and there’s a couple of great ones here! Thanks a lot!
Maggie
These are awesome! I will defintely be taking advantage of these shortcuts.
j
how do you view layers side by side? can sum1 plz help…
ntas
kaydettim sayfayı öğrencem hepsini teşekkürler
jota
duplicate layer: i simply drag the layer over the “new layer” icon at the bottom of the palette (and release). Fast as light!
George
Great list.
With the layer selected :
Alt + any arrow key = duplicates that layer
works with multiple layers selected
Darren
Option-Delete …..fills with foreground color
Command-Delete …..fills with background color
this of course is on Mac
vharodark
Site wonderful!!!
Art… imaginacion…
Remember the art and music 80s…
http://www.uruguay80s.com.uy
Stu Collett
Loving the collapse all layers one. The amount of time I burn by manually collapsing all my layers before handing over to clients is amazing.
Thanks very much!
Stu Collett.
Nazar Hussain
Collapsing all groups, and changing visibility of multiple layers i great.
Thanks
bebo music skins
nice one, i will use the zoom one not sure about nay of the others though
Tiana
Wow. I’ve been actively using [ and ] to change my brush size and irritated that I had to change the softness of the brush by right clicking when I can change the size manually. Likewise, there was no opacity shortcut that I knew of.
Turns out, there is! Thanks for this! Great list! I knew several of these already but the ones I didn’t were worth discovering!
You almost don’t need a mouse or tablet with Photoshop anymore…
Rishi Luchun
Nice post, learnt some new ones!
Thanks
Sander
If your using the brush tool, shift + { } changes the brush hardness
Kartik Jasti
In the 5th tip that you explained, (Zoom with the scroll wheel), you can do without the “Ctrl” key. Just keep the “Alt” key pressed (windows) or the “Opt” key (Mac) while you scroll up or down in order to maximize or minimize.
neeraj
I am neerajkumar holl
neeraj
Learn basic adobe Photosop cs2 Video Tutorials
manisha
Decrease type size 2 pxls ctrl+shift+less than(<)
left align text ctrl+shift+L
Center align text ctrl+shift+C
Justfy align text ctrl+shift+F
display Paragraph Palette ctrl+m
Kartik Jasti
Thanks Manisha! Just learnt a new shortcut… courtesy you! :)
Steven
Too bad there’s no keyboard shortcut to lock ALL layer properties… instead of just transparency (/). Sure, it will toggle the previous layer lock setting. But why not lock ALL the properties?
Massoud
Wow, very nice. but i expected more…
sanat
thanks admin
M.H
fantastic!
I knew almost 70 percent of these hints but the new hints was really interesting.
there are some more notes you can add, for example:
shift + scroll = the page will be moved a lot vertically (if you hold ctrl too, it will move horizontally)
ctrl + 0 = fit to screen
ctrl + alt + 0 = fit to 100% size
f = fullscreen mode forward
shift + f = fullscreen mode backward
and …
:D
Louise Kiernan
how do you reverse the ‘make selection’ after you have used the pen tool in Photoshop?
Ahmad jahid sarmed
Thanks
it helped alot
mr_smile
hey saya mau berbagi shortcut (sory i can’t speak english)
if you press shift + D, Back ground and fore ground is back to default(black and white) thx
mahesh
thank q
very useful to meeeeeeeeeeeeeee
this short cuts
Ovi Dogar
Nice post…
Keep up the great work! ;)
Ovi Dogar
AbsoluteCovers.com
imomu16
useful for real..thank u very much..but we wish more from your honorable..God bless!
imomu16
…I would like to ask “are these shortcuts work with all editions of Adobe photoshop?? ”
My Email ( [email protected] )
Thank you again
sivas
very good, thanks…
ortak miras
Thank you. Great
mishu
Hi guys,
Does anyone know a shortcut to duplicate the folders in photoshop ?
mishu
Invert selection: Ctrl + Shift + i :)
karan
comand photo shop
karan
a nice post you
tedjo
nice post
thanks
senthilkumar
i want photoshop secret shortcuts.
mars
wow. this is fantastic! thank you for sharing this :D
ramesh
this very good shourt cuts
onon
How can prompty to shift activate among two layers!
Thanks!!
Éric
Hi! I wonder how i could have the free paths (curves) in photoshop
element 7. Thank you.
Annalien
Point your mouse to the layer effects icon, hold in alt and drag with your mouse to the next layer to copy the layer effects to that layer.
Holding Ctrl will move it to the other layer.
SACHIN
please send me more photoshop “secret effects (with method) & key board shortcuts”
andrea
while drawing a selection with the Lasso Tool, and you make a mistake to
go back with the previous Lasso shape, click Backspace <—
every time you click is like an UNDO for the selection..
not sure, but there should be a REDO too..but cant remember that !!
Very useful, when u are manually cutting out something and say, it took you 1minute or more…and then you make a mistake…
paanch
thaaaank you very good short cuts :D
Shyam
I knew about 20 of these shortcuts. 10 are new for me. thanks for useful shortcuts
sajid
i want to study illustrator and photoshop tricks
sajid
i want learn more from u
Steve Solomon
Greetings!
I use PS CS, and occasionally run into this scenario: After editing about 20 11 MB images, when selecting another tool (control) from the PS toolbox, the mouse remains in the previous tool shape (icon), and does not engage the newly seected tool.
Restarting PS did not help. Any ideas on the cause/cure for this would be greatly appreciated!
Thanks,
Steve
pup
Here’s another useful tip — actually a bug (found in CS2, and others?) — that had me annoyed for years…
When resizing a text area with the text tool, you’ll get the *text* cursor on the 4 upper-left transformation handles:
[IMAGE: Misbehaving text-transform tool.]
Just hold your mouse *completely still* for ~1 second and it turns into the appropriate resizing cursor.
Guild Invite
Excellent post, really appreciate it! This is a great website!
JaredKC
Opacity with the number keys! My new favorite. All this time and I never knew.
Ashely Adams : Sticker Printing
I’m sure that these shortcuts will help many Photoshop users increase their productivity. Well, I can think of about a dozen more that you could have mentioned (like Alt+Ctrl+0 for 100% zoom or Ctrl+T for Free Transform), but I guess you have to draw the line somewhere. Thanks for the useful post.
Joel Bechtolt
Great tips. I work in Photoshop all day everyday so I really appreciate this!
sawahyutow
I want secret
flashfs
Nice tips on the Layer Styles.
jahh
Excellent post! I follow almost 85% of the shortcuts listed here; and I agree that productivity is at optimum usage – especially, with actions that are repeated the most. For instance, whilst preparing wireframes/prototype layouts – with guidelines in place, the shortcuts help in wrapping initial phases of design at a good pace!
Nice one!
WDC
Cmd + Opt + Shift + N for new layers, wihout ‘New Layer’ dialogue box.
Calz
The opacity shortcuts are great but if you press 1 and 4 rather fast without stop you get the opacity to 14%
Anthony Proulx
Sweet article, tons of stuff I would of never known but definitly has helped out a lot! Thanks!
zack
nice.. my work can do very fast.. i want more Photoshop shortcuts.
Angela Rodrigues
When painting on a mask, if you press Opt + | (vertical bar) shows/hides all your painting directly on the image, in the color defined in the Layer Mask Display Options (which you can access double clicking the thumbnail of the respective channel).
I have another shortcut that I don’t see documented anywhere, but if it’s not secret, please ignore: Opt + click on the layer mask thumbnail to edit the mask. Repeat to back to normal.
srinathaakireddy
this keys so useful
Jin Young
It’s very useful tips in my works!
Thank very much~^^
preeti
nice……..formlua……..
Anthony
Pressing “Shift + Backspace” or “Shift + F5” will bring up the Fill dialog panel. This panel remembers your previous action and therefore is very efficient to fill your document with a pattern.
Anthony
“Cmd + Option + Backspace” clears everything in your selected layer but keeps it in the palette.
rn
cmd + “0” = zoom extent
cmd + “-” = zoom out
cmd + “+” = zoom in
sabith
“`” or “~” switch under “esc” in windows keyboard can switch to a view with only paths while drawing paths on coloured images
useful while using pen tool and cannot distinguish lines to understand its shape correctly.
Artur
Thank you for posting this, I’ve learned a lot. Especially that brush opacity one, that’s brilliant. This will help me so much.
supremegfx
very very good tips. great!!
solomon
thank you for these shortcut tips,
will really help me speed up my work,
cant really express my gratitude for all your hard work,
thank you so much again.
Ejaz Ahmad
nice and tutorial
thanks
Design Dazzling
very helpful information .. i like it
soumya
great tutorial….really helped me……..
sidd
super and usefull. i love this
Brett
Great resource, and thanks for the screenshots.
Anyone know if there’s a keyboard shortcut for ‘zoom to 100%’
Illustrator is useful with this being ‘command+1’
jeff fisher
Thanks so much. Is there any other way to resize brushes besides the bracket keys? They’re a bit remote on the keyboard : (
Alec
jeff fisher, Alt + Mouse2 and drag right or left.
renata
i loved this tutorial about photoshop. tks a lot.
zenaire
It will definitely speed up my works..Awesome work and of course. And by the way your blog looks cool too..
Thanks a lot..
pychap
Comment on tip #24: generally it’s best, especially if you work with images, to set your photoshop background to 50% gray using this technique.
Do this by clicking on your color picker, and in the “HSB” fields enter for
H-0, S-0, and B-50%. Close your picker and then use this technique to change your background color.
Jhon
thank you for these shortcut tips,
will really help me speed up my work,
cant really express my gratitude for all your hard work,
thank you so much again.
Moritz
I got some interesting new techniques thankd you!
bagsin
really useful tips.
josh
Mac sucks … need more steps to do the same thing
Rahul - Web Guru
OMG so many of these hidden secrets PS shortcuts… :)
This’ll save a hell lot of time for me.
Govinda
This is awesome, these shortcut really improve both speed and quiality of work.
Thx 4 sharing m8
oslo
why do all these useful shortcuts have to be ‘secret’? why aren’t they just in a manual?
Burger
I have CS2 which sucks.
Problem:
I took photograph of person then cut him out from grey background.
Now, want to attach new background but photograph has a light line going all around it after I place new background???
Help!
Cyrus
Great , Photoshop Secret Shortcuts
Great article. CSS saved web design
Cyrus
Visit http://www.psdtoxhtmlcoder.com
purplerain
Thanks so much for that! Great tips :)
Lau
That first shortcut just made my life so much better… Thank you!
manisha
I like all the shortcuts. U can check more shortcuts by day to day update here : http://www.amkaysweb.blogspot.com/
Thanks
panel radyatör
great shortcuts thanmks for everything
Lisa Noble
So very useful! Thanks. So much time has been wasted fumbling around. Wow!
Paris Vega, Graphic & Web Designer
Very nice. Thanks for the knowledge, Morpheus.
amy
Cmd + ~ will also switch between windows (#26)
Amkaysweb
Great Post.
For more photoshop Cs4 shortcuts posted on a daily basis check
http://www.amkaysweb.blogspot.com
Thanks!
Amkaysweb
Great Post.
For more photoshop Cs4 shortcuts posted on a daily basis check
http://www.amkaysweb.blogspot.com
Thanks!
Mike
hat first shortcut just made my life so much better… Thank you!
pax
thanks for 13. Navigate layer blending mode – i was looking for it for a while
other useful shortcuts i use.
while having the Move tool (V) active, pressing Cmd(Ctrl) and clicking on a layer selects that layerhaving a layer selected, pressing Alt and moving your cursor duplicates the layeryou can do a similar trick (duplicating) with the style sub-layers in the layer panel, (move them around while pressing the Alt key)
Nicolaj Græsholt
AWESOME GUIDE … thank you sooh much for collecting all those nice things.. i have a secret of my own to share as well..
if you have a layer selected, pressing the numbers 1-9 sets the Layer Transperancy/Opacity in tens, eg. 1.. = 10 .. 2 = 20 and so on… and a combination of two sets it even more precise, eg. 0+1 = 1, 5+5 = 55, 7+4 = 74.. and last but not least 1+0+0 = 100 :)
my nickname is, Figaw
José Carlos
it’s amazing how these simple commands can cut so much time out of any work, thaks a lot ^_^ !!!
panel radyatör
nice tutorial i will translate my country
Puneet
Hi,
I m Puneet. There are more sortcut of photoshop but there is not sercet sortcut. so pls forword me. my emai id is…………… [email protected]
Thanks
Puneet
Vikas
Hi,
I m Vikas. There are more sortcut of photoshop but there is not sercet sortcut. so pls forword me. my emai id is…………… [email protected]
Regards,
Vikas.
vincentdresses
The designs showed here show what simple and tasteful design is all about. Another one to consider
Shane
Its prob. documented or in the 44 pages of comments by now, but this changed the way I use photoshop…
Ctrl + Alt + Z will move you back in the history pallete, essentially works like multiple undos.
Many props to these, and also dig holding Alt or Option to get the reset instead of cancel in dialog boxes, since 90% of photoshop usage is experimenting with settings. Saves you from canceling and reopening the styles dialog box for instance….
Joseph Knight
Another way to scale the brush or it’s hardness:
Hold down control+option and click and drag for an interactive size circle.
Awesome!
Hold down control+option+command and click and drag to interactively adjust soft/hardness of brush.
Awesome again.
Now for the coolness. Wacom users who paint alot:
Set your pen’s upper click button to the modifiers control+option.
Set your pens lower click button to the modifier option.
Now you have a pen that can pick up any color (lower button) or resize the brush (upper button) and you don’t even need to reach for the keyboard. Now I can kick back in my chair with tablet in lap and paint away.
Happy digital painting.
Nilimesh
no word to say!!!!
nothing is left…….
a complete article,i got lost myself……
Nikoras
If you press Shift + Backspace, a window will pop up and let you fill the layer with any color you chose. I find it’s easier to do it this way, because I always forget which key will chose foreground or background color. Plus it gives quick options like white black, and 50% gray. It also gives you blending options.
Lloyd
What is the shortcut keys in lowering the size of your brush?
sikat ang pinoy
Vandana
sikat ang pinoy
The shortcut keys in lowering the size of your brush is ctrl+[ .
waqas
Thanks a lot for those tips!
George Garchagudashvili
Really great tricks…
Thanks
doug
F5 + space bar then click and drag this enables you to move the entire image so you can get to the corners.
Bong
Thanks for some secret shortcuts. I will tell my friend about this.
Toronto Web Deisgn
It’s articles like this that make life a little easier…
ParveshK
…is there any shortcut to LOCK and UN-LOCK a LAYER?
Bong
To navigate the document from left to right or right to left (in windows). You may use the Ctrl + Scroll of your mouse. I hope this one helps.
adri_rory
Thanks for sharing with us ! I didn’t know many of them :)
Rob Cubbon
Shift-M to toggle between rectangular and elliptical marquees – I wish I’d known that 10 years ago…
Mandie
amazing information … thank you sooooo much!
Shala
Okay you have an image/shape/object in Photoshop that you need to crop, for example a rounded rectangle. You want to select the bottom portion of it to maybe change the color or cut some extra elements you don’t need for the final product.
Example:
1.
Loosely select the portion of the object you want to alter. Do not worry about the selection box extending below or to the sides of the object. Just make sure the portion you are trying to alter is within the selection box. Also, make sure that you have the Layer with the object you are manipulating selected in the Layers Panel.
2.
Select the Move Tool, and then press the Up Arrow on our keyboard. Now the selection box should fit around the object you are altering like the example below.
Conclusion
Comes in handy to color parts of objects like so:
It is also useful for cropping out any elements hanging off the final product as well.
Hiren Kataria
Thanks A Lot For Such a gr8 tips.God Bless All.Keep Smiling
Marius
Reeeaaaaally nice!! Thanks a lot! Learned 8 new very helpful shortcuts today =)
francesco sek
For zooming with scrolling wheel, just hold ALT and scrol.
If you hold ALT+CMD and scroll, it seems zooming a little slower.
Ruingaraf
Shift tool while using the rectangle selection will make it a perfect square. Option + dragging almost anything will duplicate it. And although they’re on the official list of keystrokes, I constantly use apple+A, apple+D, apple+ -/+ B, I, G, and using the spacebar to move, so they’re good ones to learn.
Thanks for posting this, though, I learned a bunch of useful commands.
Tom
I just happened to press the \ key instead of enter and it turns out it shows your layer mask in red. It was a good accidental find.
Oldman
anyone knows the shortcut 2 Switch Between Font tool and Selection Tool …?
Daniel
You could move selection during proces of selecting by holding spacebar.
lmchamo
oldman hit cmd then enter, to get it off text. Then press V to get the selection preview
Oldman
Thnks a lot lmchamo, lovely!
U r the f**kin’ best!!!!!
Cool-UAE
how to return the layers and everything else that up of it ?
How to put 2 picture in a picture ?
becuase by accident my sister delete it and
alexander
nice and thanks
bob sherman
nice one , good list of helpful shortcuts.
ekdor
I would like to know if there is a way to switch the front and back colour swatches?
Also, I noticed that when I have the eraser selected the number keys change the flow instead of the opacity which is frustrating to no end. See personally lie to hit [ or ] to adjust size, shift [ or ] to change hardness and numbers to change opacity. This is ordinarily efficient, but I forget I can’t do this with the eraser and end up changing the flow which I don’t want to change. Any thoughts as to why this might be, in case it’s just me? Also I tried using the eraser en of my wacom pen but the opacity (or flow as it were) doesn’t work, it just changes the brush opacity even though that is selected but inactive. Think Adobe should make it so the eraser end of the pen actually switched the tool selection, a bit confusing and pointless to use otherwise since to make other changes to the tool I still have to manually change it. Inefficient.
Thanks for your list and time. Cheers,.
ekdor
I’d like to add to my last comment and say that I realised what was causing the differentiation between the opacity and flow when using the numbers to change them. I had the eraser with airbrush turned on which seems to switched the number controls over to flow. Turning it off fixes that. Makes sense. On that note I stand corrected.! Cheers,.
aShocka
very nice, thank you. some of them were so helpful, as one with brush size in/decreasing :)
ekdor
Ahh I found the key to toggle the tool bar colour pallet, (black & white by default). Press X, to toggle. It doesn’t appear to have special requirements. Cheers,.
John
awesome list, these definitely would help me out… I’m using Windows, though, does anybody know a list such as this for win xp?
Memag
CS4
Alt+right click+ drag to change brush size.
Shift+Alt+ right click+ drag to change (standard) brush hardness.
Memag
D to reset colors ( foreground and background) back to B/W.
Web Design
wonderful thanks for sharing
Bruce Stradling
Somewhere I read about a shortcut key that allows you to switch between the current tool and the last tool used. I was tired and didn’t write it down and then forgot about it but I really would love to use it. Anybody know what it is?
Phan Huy Quyen
Tks Alot! You save my live!
maz-o
Thanks for a great article! I have a problem though…. Help!
I’m on a nordic (finnish/swedish) qwerty keyboard, and I can’t for the love of what is sacred get the shortcuts for brush size increase/decrease to work. That’s the main reason why I looked up this site anyway… I have the “[” and “]” keys located under “Alt+8” and “Alt+9”, and these do nothing whatsoever.
If I look at the US qwerty layout, I have keys “A” (umlaut, I think it is) and “^” located where you US guys have “[” and “]” (as you can see here: http://bit.ly/dx3F8k). And I can tell you that these keys don’t do anything either.
I found a very cool way to increase/decrease brush size and hardness by pressing Ctrl+Alt and at the same time click-dragging the mouse; vertically up/down to adjust hardness, and horizontally left/right to adjust brush size. This would probably be the best solution for me if using a keyboard+mouse combination, BUT when using a macbook trackpad I’d absolutely want the keyboard/key shortcuts instead… Knahmean?
Boy did this message get long. Thanks anyway in advance! Any scandinavians in the house? Or anybody else who would know the trick…
isaac
very helpful, thanks.
imre
very useful is, that if you click twice to the background layer and hold alt, then it turns into editable layer and are not locked anymore.
otherwise you always have to start same process to make your scanned picture edible.
Kent Driscoll
OK I found one while trying these holding Alt and hitting and up or down arrow gives you a duplicate computer. Also a quick waay yo get reid of the lock on the background layer, not a short cut but an easy to make short cut, I made an action so when the F2 button it hit the lock is trashed, to do this just record and action that works when F2 is hit, and drag the lock to the trash can
Kent Driscoll
I screwed up it is Ctl Alt Up or Down arrow
n
Double clicking the zoom tool isn’t a ‘shortcut’ … cmd+0 is however.
Alan
I grew up on Photoshop, so I’ve used just about every version from 5 – CS1. At work, we just moved from CS1 to CS4 and my CMD+Click is gone. Adobe screwed the pooch on a heavily used shortcut. What is it in CS4? (Never tried CS2 or CS3, so the shortcut may have changed in them too.)
Any ideas?
Rushi
nice and useful thank you for share now feel great
Krykin
In CS4: When zoomed in hold down Spacebar + C (works also with V, B, N and M) and click with left mouse button: the image will temporally zoom out to fit in the window (until you release the button), the frame showing zoomed proportions will appear allowing you to move quickly to any other desired corner of your canvas without using zoom tools or navigator panel.
SvenjaF
thanks so much for these tips, didnt know a few of them but they r so useful!
for 21: i am using cs4 and when i press the number buttons I adjust the flow parameter of the brush tool rather than opacity. Pressing shift+number gives me the opacity. But the more I can type in any value. For example shift+type 5 two times gives me an opacity of 55%.
zzzazazzz
Hello,
I was passing by on google reading ur blog and noticed that there is a mistake with TIP #28 which you wrote OPT instead of CMD,
Keep Going,
Referring SouRC: https://webdesignerwall.mystagingwebsite.com/tutorials/photoshop-secret-shortcuts/
Alex Horwood
hi,
does any1 knoo blend words in photoshop? I made a text box and was wondering if i could blend it..
icute
Thank god i found this page! i was new in photoshop and this secret keys absolutely help me much~ thanks :*
naeem
can any one tell me difference in mac shortcut keys and desktop pc actually Im using desktop so how I can use these commands for my desktop pc…?
and please send me secret shortcut keys….
thanks
lashari
roderick
nice shorcuts!!!
im wondering if there still exists the ctrl+alt+click’n drag to resize brush¿¿¿
thanks!
chuck norris
sorry for being a grammar freak, but the line where it says, ” Here are 30 secret Photoshop shortcuts that I’ve learned from years of experience.”
it should be LEARNT.
past tense of learn is learnt and not learned.
Dumbass.
Chris
Actually Chuck Norris, the words learned and learnt are the same thing, just that learnt is more common in British English. But, either spelling is acceptable.
selva
amazing stuff .am one step greater in cs3
CS5 User
Thanks for this awesome article. I think the most useful thing I learned was #12, thanks for that one!
A shortcut I find very useful is alt/option + scroll wheel on your mouse to zoom in/out.
Also, @Chuck Norris, you’re the dumbass. Both usages are correct, but mainly used in either America or Great Britain. You crossed the line by calling the author a dumbass.
11111111
qwqqweqwqwqeqwe
Rick
@naeem Mac to Windows:
CMD = CTRL
OPTION/ALT = ALT
BACKSPACE = Delete
Return/Enter = Enter
Iznenada
I used most of shortcuts but few of them are more than useful thanks for the post!
Sarah the Student and Newbie to CS3 :D
Thanks for this! It’s a lot easier to use CS3 now without being muddled constantly! XD.
Ta’
Sarah~
yash rajpoot
sir please send me list of keybord shortcuts of photo shop cs 8 on my e mai id
shahid
sir please send me list of keybord shortcuts of photo shop cs 3
Fiona Eng
Thanks for the thorough illustrations of all the shortcuts – very useful. Now I just have to remember it all!
Susan Roberts
Thanks!
Vector Lady
ctrl + shift + backspace will recolor object (not all layer) in background color
alt + shift + backspace will recolor object (not all layer) in foreground color
ranggaw0636
wow, thanks for this great tips, it really help to increase my skill
varam
hello sir
i viewed ur site it is very very useful and mentioned important information to gather and design ourselves in future really it’s worth mentioned site thanks to the designer kindly send the working samples with techniques with how they are done to my mentioned mail id.reply
menaka
increasing the circle size proportionatly is working fine.. but is there any possibilities to increase the size of the rectangle proportionatly, such that it has same amount of space vertically and horizontally? any suggestions? i hope the reply would be useful to all the designers..
thanks
menaka
menaka
hello burger
here is the answer for your ques.
to avoid the light line around the photo, u need to smoothen or blur the edge of your photo.
steps to follow:
1. ctrl click on your photo
2. press ctrl+Alt+D
3. Give the feather radius between 5-10 pixels
Now the light line around your photo will disappear..
Kojeje
You did such great tutorial..
thanks a lot… :)
Kojeje
I am grateful to find this site :)
Wish you luck :)
eric
sir thanks for share about photosop..
i will try that.. :)
eric
sir thanks for share about photosop..
i will try that.. :)
thanks
ilham
very clear tutorial, thanks
Momo
Nice post..
Good tutorial, keep sharing..
i’ll use it for my project, thanks.
=)
aiva
WOW! That is inspiring and outstanding tutorial. Thanks!
Ruturaj Patil
Hello,
Nice post…..
Good tutorial, keep sharing………….
Thanks,
Ruturaj
Nital
Woww!!! its Awesome shortcuts keys
Gud its very useful me.
Thanx…….
NITAL
Mohd. Irfan,India,LKO
By pressing Cntrl+Shift+[ or ] move your layer position in the layer pallet.
Mohd. Irfan,India,LKO
By pressing Cntrl+[ or ] move your layer position in the layer palette 1 by 1.
For merge Layers in the layer palette select those layer you want to merge in the layer palette and press cntrl+E.
jineshri
hi! thank u all friends who share shortcut keys.
ABDUL
exelt sir this was a perfect site to brows sir your web site make me inspire
sarika
HI,
THANKS FOR VERY USEFUL L TUTORIAL………….
Patrice
I havent read all the comments, but one of the most uselful hotkeys I use which doesnt appear as a tooltip is:
[b]Load Selection from Path[/b]
Opt+Cmd+Return
Not sure if it was covered or if it’s that useful to others, but it saves a ton of time.
abhi
good information good tutorial thanks
http://manashosting.com
Claus
How about nothing less than “The shortcut from HELLLLLLL” it´s copy merged + make new layer. Hold down shft+alt+cmd (ctrl), type n and then e, not at the same time, you have to let go of n before you type e. Very good if got a ton of layers and just to make them in to one, but dont want to merge them all.
Andy
you dont need to create a new layer before doing that- just press shift control alt + e.
Very useful
kalai
Hi,
Its really great and very useful…thanks
manas
thank u for the information regarding the tutorials
http://www.manashosting.com
raja
i have read all the comments and i like the all the comments.
http://www.manashosting.com
steve
how about all the basic hot keys that have been forgotten about like the simple i for eyedropper m for marque b for brush c for crop l for lasso w for magic wand e for eraser so on and so one very useful also. like original poster said there are many ways to shortcut menus and options you just have to find the right one that fits you best.
Whorm
My personal favorite:
SPACEBAR (hand tool) + R + Click and drag
While zoomed in, will zoom out to “fit to screen”, showing you a box with your screen size. Drag to the area you want to pan to and release. You will zoom back in to the same %.
Naimish
Hi,
Thanks a lot for Photoshop Keyboard Shortcuts
It is very useful.
Sincerly thanks again
mike
#13 is awesome! I’ve been trying to work that out for almost a year after switching to from PC to Mac.. On PC you can simply click on the filters drop down and scroll down through them quickly with the up/down arrows.. but I couldn’t do it on the mac.. until now.. Thank you so much! :D
Gold Coast Web Design
Lise
Hi!
Does anybody know how to switch back between document windows in Photoshop?
I know how to switch forward (Ctrl + Tab).
فيس بوك
i count my self as a good user of photoshop and i useing it long time ago but i dont know most of these shortcuts
# 530 Lise : try ( ctrl+shift+tap )
Lise
# فيس بوك – Thank you so much :)
falguni
hi ,its a very useful for me,thanks
Scott
I think you should add in more social sharing options. I would love an easy way to share this on Twitter and FaceBook and with WordPress as your CMS they have a ton of great ones. Great tips!
Aristedes C. Leutetio
thank you for this wonderful and secret photoshop shortcuts. I can speed up my works now!
Faud
Thanks dude for photoshop shortcuts
Kevin Richards
double click the hand tool and the document will zoom to a size that fits the window.
Ravi kumar
Hey superb collection dude. thanks for sharing your experience.
Ravi Kumar
Graphic designer,
Banglore76. India
Alex
I would love to know a shortcut to ‘toggle’ between ‘auto select’ on / off. Also toggle between auto select ‘layer / group’. That would change my life for the better. This list is awesome though. I know most people know this one, but in case they don’t, it is my fave shortcut of all time, in all design software: Alt + drag= duplicate layer and drag it. Also works for Flash frames!
Dipal
Thnx :)
Nice tutorial!!!!!!!!!!!
to switch back we can use ctrl + shift + tab
chris
The Stroke Path shortcut is a lifesaver. I’m currently inking a picture in Photoshop and this really speeds it up. =)
Saeid A.K
hey this article was so gooood ! tnx alot.
I’m a web designer, I thought to a way for copy the hexadecimal code of a color by jyst a shortcut key ! that was may sake for googlize and find your page. if you know how I can do this please tell me by reply comment here.
COPY THE HEXADECIMAL COLOR CODE BY JUST A SHORTCUT
tnx alot , best Regards
Jon
COPY HEXADECIMAL CODE SHORTCUT:
With the eyedropper tool, “ctrl + click” over your desired colour and choose “Copy Color as HTML” from the menu.
I think that’s the quickest way
shereef
Thank a lot…..
very useful tutorial
Nancy
Hell yea THIS is what I am talking about!
MartinDoersch
Very nice list!
Thanks for sharing – and thanks for all the great comments!
Martin
Mohd. Irfan
if u r on any zooming level u can get the actual size of the working document by spacebar+rightclick on the working canvas u get a a menu wich have 3 item 1.Fit on screen 2.Actual pixel and 3.print size. u can navigate easily through this menu
Zeth
Hey
I have this problem. In Photoshop the background of my artboard/workspace (whatever it’s called) is the transparent color (white and grey squares), but the document size is smaller, so if I move the image out of the frame, then it just disappears into nothing. Has anyone experienced this before? Can anyone help?
Apnataunsa
this is very nice shortcut kaeys i like this post
melissa
my biggest timesaver shortcut is clicking “D” to set the colors to the default palette (black foreground, white bkgd) or “X” to swap which is the foreground and which is the background. I think this works regardless of what tool you have selected.
Shehzad
really great and awesome shortcut i got from here. but i have one question, if i have applied blending effect on a layer, after this, i want this blending effects to merge with the layer they are on. one method i know is, creat new layer up on this effected layer, then select new layer attached with effected layer, then merge linked. if anyone have better trick, kindly tell me…..
Zeth
This is so cool! Full of useful information. I’ve been looking for ages for something like this! Especially number 14, the set blending mode – awesome.
Great blog.
irfan
Thanks to “web designer wall” and all commenter
i’m being advance now
darren
Very cool. Now I can actually USE photoshop…. I couldn’t figure out how to zoom and move around properly–it was driving me crazy. I was beginning to wonder why everyone says photoshop is the best. Now I know!
Most useful tutorial I have found by a long shot. It’s as useful as learning how to type properly, so thank you!
Health
Thanks for the Photoshop shortcuts! I’ve been using the software for years and never even read a book about it. It’s nice to find sites like this and get some hot tips :)
I’ll be bookmarking this page!
Modular
Great BloG!
Photoshop is the best software for editing. Sometimes I wish that Photoshop and Adobe Illustrator were grouped into one package… That would make my life simpler too!
I’m sure I’m not the only one :P
Balaji Sane
so easy
Eight Chen
Any idea how to navigate through and sample a zillion styles without having to click to through them one at a time like you can with fonts?
Zeth
Does anyone know how to unlock the default layer lock (the grey one – lock position)? And the / key does a fair few of things, I can’t seem to get my head around it..
sindhu
This site is very useful in all Human Beings.
Devall Krem
This is so cool! Full of useful information. I’ve been looking for ages for something like this! Especially number 14, the set blending mode – awesome.
Great blog.
vijay kumar
plz send me short keys of photoshop
Henry Peise
With the most fashion designer, White iphone 4 Conversion Kit can be your new autumn/winter fashion piece for your favorite iphone 4. Why not make a little change for your iphone 4.
mikwillson
That is to be expected in a long-term, high-risk project like ours. So, we turned to the blogging community for help – and got it! We have published our problems, and the community responded with results!cheap ugg boots
Mannu P Muhammed
Thanks for shortcuts!!!!!! Good… keep it up
saeed
i am iranan
your web site is very good .
Jair Martinez
@ Balaj Sane
Right click on the layer in the layers palette, then select the first option (Layer from background) that unlocks the background and treats it as a layer.
Jair Martinez
Repost, the previous comment was for Zeth. not Balaj, sorry.
tütüne son
en iyiler burada hadi gel birak anani, öyle git.
Uçak Bileti
photoshop farki süper olmuş
Uçak Bileti
deme bana bunu deme
Uçak Bileti
yurdumuz burası
Uçak Bileti
kurtlar vadisi çok baba film
Uçak Bileti
biliyorum deli gibi sevdin
Uçak Bileti
bütünüz bizz :)
şok diyet
diyet
uçak bileti ne saçmalıyonki gardaş yaw :D
BUslie
No New Shotcuts …!.,
Hyo
cool article! thanks.
altın çilek
FINALLY!! Thanks for this info…after days of struggling this hit the spot!!! You are appreciated. Blessings. You have a beautiful site!
satish
THANK YOU VERY USEFULL SHORTCUT
CTRL+D DESELECT
ALT+I PRESS TWO TIMES IMAGE SIZE
شات صوتي
thnks
goooooooooooooood
min:(
شات صوتي
thnks
goooooooooooooood
min:(
taem
Phil Barnes
Thanks for the great post.. Just the duplicate active layer tip has just improved my productivity.
Thanks again. When Im no longer behind a firewall I will be sure to Tweet a link out to my followers.. @phil_at_101
Cheers,
Phil
Vamshi
thank you soooooooooooooooooooooooooooooooooooooooooooooooomuch
Ali zahoor
if there are hundreds of layers in one document..
to select a particular layer with in the canvas..
CMD+OPTION+RIGHT CLICK on that layer.. it will directly select tat layer in the layer menu…
during making selection while drag-in…… pressing and hold the SPACE key will let you to move your selection with in the document,
CMD+OPTION+F will open the filter dialouge with the last setting applied,
CMD + click on new layer icon in the layer pallet will create new layer below the selected layer……
dfggfdggfd
mac fag.
satish
HELLO shortcut delete layer is alt+L +L
Florin
Does anyone know how you toggle between first (the open state) and last step of the history pallet?
I know the Cmd + Alt/Shift + Z stuff I was just wondering if there is such an option.
Regards
vinod
awesome ray thanks………….
P.mahalakshmi
photoshop shortcut don
P.mahalakshmi
give more shortcut keys
Joyce
Love these. Very helpful.
Joey
This is great, thanks a bunch!
satish
image size alt+i press two times
How To Put On A Condom | How To Get Taller
I love your article!!! Keep it up…!
How To Get Taller | How To Put On A Condom
I am now convinced that you are a wizard!:)
Henry
Great info… Thanks…
sandy
please any one tell me how to increase workspace in photoshop
shah
that’s great dude thanks all the best
dexx
Another questionnaire, the participants’ problem identification and structuring, idea generation, problem elaboration and clarification, such as creativity, problem solving insertion sezkin idea which one’s preferred styles are evaluated. While participants preferred the style of non-disclosure and intellectual development of ADHD, with ADHD, participants chose to produce ideas.
Sergium
There is also a quick and nice color picker when you press Alt+Shift+RMB while using Brush tool. Discovered it accidently. http://i.imgur.com/SvkZo.jpg
Brandon Seleg
I like the helpful information you provide in your articles. I will bookmark your weblog and check again here regularly. I am quite certain I’ll learn plenty of new stuff right here! Best of luck for the next!
raasa
this is one of good artical i love it cheers
Emile
You can also crop a selection by holding down ALT (option) & then pressing “I” & then “P”
CYB34
Thanks, but you could have been a bit less biased and post the Windows shortcuts too, even though it’s pretty intuitive for me.
The only webdesigners I know that use MAC are freelancers….
Did Apple fix that mouse lag yet? Because it was a pain in the ass with 2x 24″ desplays.
Ares Saldaña
You can also switch between open documents with [command + ~].
Great list! Thank you.
Ken
One shortcut I love using for almost every program including photoshop on MAC is the “esc” button to cancel out of a dialog box. There are so many times when an annoying dialog box pops and just slam on esc to cancel instead of dragging the mouse to the cancel button.
Urviho
Brilliant article, thanks for sharing :)
fabricio
Alt+Ctrl+G Creates/Releases Clipping Masks. That’s not much of a secret. But try positioning the cursor in between the two layer and hold the Alt (Command) Key. The cursor should turn into a, well, clipping mask icon. :)
jen
Does anyone know the shortcut to toggle between width and height when resizing an image? I have PS 6.0 and it doesn’t have the toggle button.
David Smith
I saw a tutorial once where the provider used a shortcut to duplicate and rotate a layer. It was an eCover tutorial and he was showing how to quickly make a ‘fan’ spread of CDs.
Does anyone know the video or the shortcut? It may have even been a combination of two shortcuts, but I think it was one.
Thanks for this excellent post!
David Smith
UPDATE: I could not find the video, but I did find the trick.
The shortcut is documented: Ctrl+Shift+Alt+T
But I had to rotate the image manually before using the shortcut.
jen
Thanks for looking David. I didn’t explain myself well. What I’m trying to do is crop photos. Sometimes I have a hor. image sometimes a vert. And I don’t want to have to manually switch the 4 x 6 dimensions in the crop tool.
Luce
Cool :) Good job!
Lilly
Love this list! I work from home and some of these shortcuts are going to save me a ton of time. I love the visibility drag, using the number keys for opacity and alt+backspace to fill with foreground… Thanks bunches!!
Mujtaba
Thank u so much for such a wonderful info. Most of them I already know but some really now speed up my work. You are awesome !
The best short cut is workspace color and blending modes.
Molik Jain
These shortcuts are very useful for freshers who want to make their future in the field of web designing.
alex
Wow! Very useful shortcuts! I`ll use them.
Bojan Živković
Alt + double click on Type, shape layer will open Blending Options (Layer Style) dialog
Bojan Živković
Ctrl + click on channel at CHANNELS palette will select highlights only
Bojan Živković
Ctrl + Alt + T to duplicate layer in free transform mode, move layer then press Ctrl + Alt + Shift + T to repeat last operation (step and repeat).
Bojan Živković
Ctrl + Tab is shortcut for next open document and is listed, Ctrl + Shift + Tab is shortcut for previous open document
Bojan Živković
Alt + double click on layer effect name will open Layer Style dialog with that effect selected (effect tab will be active) so You can change settings for effect like Drop Shadow.
Bojan Živković
Shift + Tab hides only palette on right side of screen.
Bojan Živković
Alt + click with Type Tool active opens Paragraph Text Size dialog
Bojan Živković
To copy single layer effect Alt + click and drag, release above layer to be copied that effect
pradhyu
ctrl+q – tab – enter. enjoy!!!!
nagaraju
sdxa
Bojoura
Thank you sooooooo much. This page is a little treasure on the web.
ajay kumar yadav
adobe photoshop 7.0 short key
Ryan
For PC Photoshop, hold CTRL + Click layer icon in Layer window to select everything in that layer.
yogi
hey thanx for such a useful info
Walkman69
By holding down ctrl and double click with left mouse button outside the image-window Photoshop will open up the New-window.
Doing the same with Ctrl-Shift or Shift-Alt opens up Save As, and doing it with only Alt opens up Open As.. One could wounder wich is easiest, the ctrl-n command or this. But for people like me who likes to play with the mouse this is great.
Ben
Thanks for sharing these tips. While I was aware of many of them, there were a few goodies in there that will save me some time and frustration. Cheers!
Sana
Wow it’s very easy and thanks for helping me
i want more shortcuts for photoshop cs3
Eni Bassey
This information has really helped, thanks to all!
NISHA
really its very useful.thnku
Ray
Thank for these, that greatly speed up my work in photoshop
Abdullah Bin Laique
Ctrl + Enter to make a path shape to selection
Using Magnetic Lasso and Polygonal Lasso tool DELETE button use to go one step back
Thanks for these shortcuts guys its really useful thanks everyone
ronakjain1111
+ – Add Shape
– – Subtract Shape
/ – Preserve Transparency (toggle)
[ – Decrease Brush Size
] – Increase Brush Size
Shift+ [ – Decrease Brush Softness by 25%
Shift+ ] – Increase Brush Hardness by 25%
– Next Brush
Shift+ – >Last Brush
1 → 0 – Tool Opacity 10% → 100%
Shift+1 → 0 – Flow / Airbrush Opacity 10% → 100%
A – Path / Direct Selection Tool
B – Brush / Pencil / Color Replacement Tool
C – Crop Tool
D – Default Colors
E – Eraser Tool
F – Cycle Screen Modes
G – Gradient / Paint Bucket Tool
H – Hand Tool
I – Eyedropper / Sampler / Measure Tool
J – Spot Healing / Healing / Patch / Red Eye
K – Slice Tool
L – Lasso Tool
M – Marquee Tool
N – Notes / Audio Annotation Tool
O – Dodge / Burn / Sponge Tool
P – Pen / Freeform Pen Tool
Q – Standard / Quick Mask Mode
R – Blur / Sharpen / Smudge Tool
S – Clone / Pattern Stamp Tool
T – Type Tool (Vertical / Horizontal)
U – Shape Tool
V – Move Tool
W – Magic Wand Tool
X – Switch Colors
Y – History / Art History Brush Tool
Z – Zoom Tool
Space – >Hand Tool (toggle)
Ctrl+Space -Zoom In (toggle)
Alt+Space – Zoom Out (toggle)
Shift+A – Cycle Path / Direct Selection Tools
Shift+B – Cycle Brush / Pencil / Color Replacement
Shift+E – Cycle Eraser Tools
Shift+F – Menubar (show / hide)
Shift+G – Toggle Gradient / Paint Bucket Tools
Shift+ I – Cycle Eyedropper / Sampler / Measure
Shift+J – Cycle Spot / Healing / Patch / Red Eye
Shift+K – Toggle Slice / Slice Select Tools
Shift+L – Cycle Lasso Tools
Shift+M – Toggle Rectangular / Elliptical Marquee
Shift+N – Toggle Notes / Audio Annotation Tools
Shift+O – Cycle Dodge / Burn / Sponge Tools
Shift+P – Toggle Pen / Freeform Pen Tools
Shift+R – Cycle Blur / Sharpen / Smudge Tools
Shift+S – Toggle Clone / Pattern Stamp Tools
Shift+T – Cycle Type Tools (Vertical / Horizontal)
Shift+U – Cycle Shape / Line Tools
Shift+Y – Toggle History / Art History Brush
Alt+Shift+P – Airbrush (Brush Tool)
uly
While using the brush tool, holding down Alt+rightClick and dragging up/down or left/right will let you quick adjust the brush hardness and size.
This helped me a lot. Enjoy creating!
Pkraai
This helped me alot, alot of things I never knew, I can photoshop much faster now :D
And thanks for the hint Uly ;)
Denise Passaretti
WOW..thanks!
Valentin
(alt + cmd + i) opens the resize image dialog
(alt + cmd + c) opens the resize canvas dialog
ravikumar Divi
photoshop shortcut commands were exellent suggestions to me and more learning and very simply using these commands. So i request yu sir i know more shortcuts
Thank yu sir
siva
To fill by more same copyies
fist = ctrl+t
second =shift+ctrl+ alt+t = makes more duplicate
– sculptor siva
Hannes
Move the selected layer to be the first or the last one
Ctrl + Shift + [
Ctrl + Shift + ]
ravi
keke nice sir send more like this thank u very much
k.radhakrishnan
shortcut keys
Eduardo
Usefull tutorial! And no. 28 on Windows is: Shift + Alt.
Muddaser
Very Good Tutorial
mahesh
tell me shortcuts for spot heling brush
Kent
Ctrl+E Merge Down
Ctrl+D Select Black FG and white BG colours
X switch fg-bg
Ramesh Poonia
Helping Mantra….
Ramesh Poonia
What to do,for unlock the layer, in case of GIF file in photoshop.
Håvard Frøland
Double click the background to convert it to a normal layer, or right click it and chose “Layer from background…” from the context menu
yathartha
simple change to RGB mode from Index
Rachel
I think it’s quicker to hit “cmd + 1” to view at 100% rather than move your mouse over to double click the zoom tool. But quite a few of these are helpful, thanks for the post!!
roku
you posts are very good thank you for posting
pd
Thanks for the list of shortcuts, couldnt remember how the heck to
change the brush out of ‘precise’ mode.
Ruben
Pressing CAPS LOCK key toggles between precise and standard while in brush tool
maimoona iram
you did really amazing work on this site. you are sharing your knowledge with people free u r great.
yathartha
what is the shortcut to open the locked layer ?
plz answer me in my email
From Nepal
Kyle Lua
Wow..nice! I enjoyed trying most of it…i
Steve Swift
Excellent tips! Thank you for posting this! I tried to develop a great Photoshop shortcut sticker sheet for those looking to speed up production too: http://www.shortcutstickers.com/graphic-design/adobe-photoshop/adobe-photoshop-sticker-set-color
I hope you find it useful as well :-)
Santosh
Very excellent tips. Thanks for sharing :)
แฟชั่น
Thank you for sharing, even I am a designer for 6 years some tricks I had never known.
Tarryn
If you hit ‘f’ you will adjust the view in which your area is displayed. press f again to get a different view and finally press f again to return to the original view. You do NEED to have a file open for this to work. I found it by accident, but I love using it to show people my work on the back background.
Sara
Good collection of shortcut keys. Do you know how to fit the selected image to the new layer of different size without using the mouse.. I mean using the shortcut keys?
zayıflama
If you hit ‘f’ you will adjust the view in which your area is displayed. press f again to get a different view and finally press f again to return to the original view. You do NEED to have a file open for this to work. I found it by accident, but I love using it to show people my work on the back background.
m.waqas
Please !
Your method is so excellent. Sent me all photo shop shortcuts keys for learning photo shop cs5.Kindly help me .
m.waqas
Please !
Sent me all photo shop shortcuts keys for learning photo shop cs5.Kindly help me .
Your method is so excellent.
lddjdke
more short keys upload please
lddjdke
more keys uplaod
Matt McDaniel
Holding shift while hitting the number keys changes Fill opacity. Also, with CS6, you can hit 00 to change to 0% whereas 0 is 100%.
yathartha
select text and hold Alt key with right and left arrow for spacing and kerning the text
yathartha
press f thrice and Tab in ur key board for expert mode
From Nepal
Steph
Ahh! You have NO IDEA how long I’ve been searching for an easier way to stroke path. (Rather than continually clicking on that button in the palette or using a dropdown menu.) I do a lot of line-art using the pen tool, and I couldn’t believe that nobody had thought of a better, quicker, easier way to do it. (I’ve been searching google for ages.) To think it’s as simple as pushing enter! :D Thanks, buddhistMonkey!
SHANTI GOPAL
maximam help me and you so good……ok bokachoda
Amelia Tania Tan
I found some, here it is! :)
Holding down Cmd + Shift + [ or ] moves your brings your layer to the front or back. For example: Cmd + Shift + [ = Send to Back and Cmd + Shift + ] = Bring To Front.
Navigating through layers: Opt + [ (down) or ] (up)
Selecting multiple layers above/below: Opt + Shift + [ (down) or ] (up)
Hope it helps! :)
MBM
Don’t mind posting this for windows, after all it is not the most used OS
MD NAZIR HOSSAIN
I Want to know about photoshop scret code……….
sarathy
Thanks a lot…. it’s very useful..
MAO
it helps a lot, thanks for sharing
subbareddy
IAM Learning Photoshop.
These Tutorials are very much useeful
Thanks for making this artical possible
Rainy
Awesome tricks. :) Love them and thanks for sharing such a unique collection.
kamakshi
thax for good suggestions
Dhinesh
Its very helpful to beginers.
Thks for your good work.
Marc
thanks for sharing. These Tutorials are very much useeful
Thanks for making this artical possible
j.ravi
photoshop short key wort
j.ravi
photoshop short key word
paskalip
nice sum. Here’re three more
alt + [ and ] = navigate through layers
with brush: alt + holding right click (in document area) + mouse movement =
vertical changes brush hardness
horizontal changes brush size
shift + backspace = opens fill dialogue box
Ruslan
Thanks a lot!
Theo
Ctrl + F5 = Merge Visible
An alternative to the shift + ctrl +E.
nianto
wow. thanks so much for this! so helpful
Aftab Alam
great app.
Nico
Double click on the vignette of a Text Layer (white square with a “T”) and it will let you edit directly the text.
Can be useful when the actual text is not very accessible in the working area.
ramesh
i want to photoshop easy work. pls sent to how learn to photoshop.
Guillerming
Hello!
There is a nice way to modify the brush size and hardness.
In photoshop for Mac:
Select the brush tool and ctrl+alt+holding click : horizontal mouse move increases and decreases the brush size, vertical mouse move increases and decreases brush hardness.
Zoom:
alt + space : zoom out
cmd + space : zoom in
Any of this, hold mouse clicking and move the mouse horizontally.
Workspace bg color:
Spacebar + F : screen workspace bg color will be changing within a list color.
Rajiv
good tutorial
obozypilkarskie.weebly.com
I absolutely love your website.. Excellent colors & theme.
Did you develop this site yourself? Please reply back as I’m wanting to create my own blog and want to learn where you got this from or just what the theme is called. Cheers!
D Bryan
Hi there,
I have a problem when I’m trying to delete selected field and trying die cut a photo. I could do it easily on Windows by pressing ‘delete’. However, been struggling to do so when I’m using Mac. An advice on how to do is much appreciated. Thanks
Epic stuff
Thanks for a great tutorial. Still works good!
AdultFairLinks.com
Hello There. I found your blog the use of msn. That is
a really well written article. I will be sure to bookmark it and come back to read more of your
useful info. Thanks for the post. I will definitely return.