Someone emailed me and asked how did I do the illustration background on Next2Friends. It inspired me to write this article. He asked "Did I do it in Photoshop or Illustrator?" Well, it is a mixture of both. First I created the artwork in Illustrator, then polished it in Photoshop. Here I will unveil all my secret techniques. This tutorial includes 9 Photoshop techniques that will show you how to add more depth, color, contrast, and texture into your vector art.
Why do I need to polish the vector art?
Vector artworks are usually very flat, dull, and lack visual effects due to software limitations; thus they look very boring. Unless you want that "flat and dull" appearance, otherwise you should polish your vector in Photoshop. By polishing vector art, you can: make the color more vivid, bring up the contrast, texturize the artwork, and add more life and depth to the image. Here are some of my work samples (before and after polish).


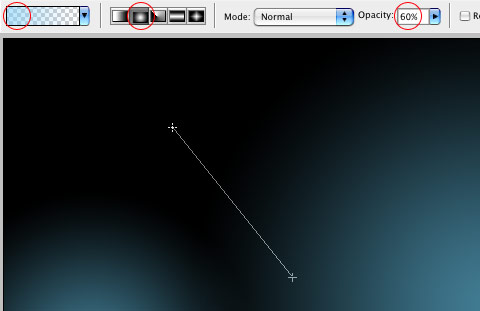
Technique 1: Lens Flare Effect

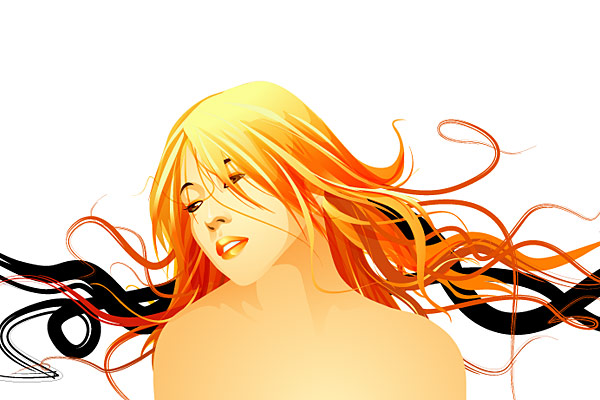
First technique, let’s start with one of my recent work on Next2Friends. I will show you how to create a stunning lens flare effect in two simple steps.
I assume you have the vector artwork ready and you want to add a lens flare layer on top. First create a new layer on top and fill it with black color. Go to Filter > Render > Lens Flare. Then, set the layer’s blending mode to Screen. Done. Isn’t that nice and easy?

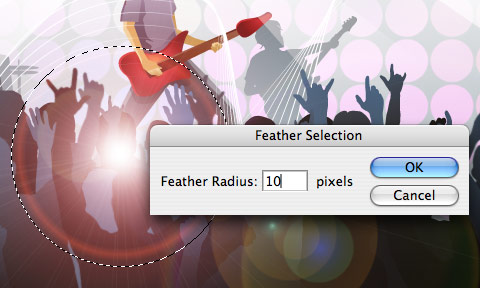
If you want the lens flare to focus on specify area only, you can delete the unwanted area. Make a circle selection, feather the selection (Cmd + Opt + D) by 10 to 20px, inverse selection (Cmd + Shift + i), and hit Delete key.
Sometime just the Lens Flare filter alone is not good enough. You can make it even better by manually adding more colorful circles and glows.
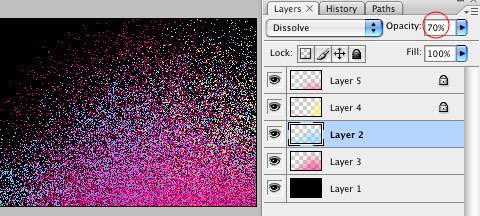
Technique 2: Colorful and Dusty Effect
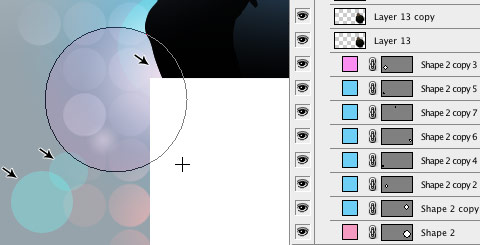
This is one of my common styles that can be found in most of my design work. Again, it is very easy. It can be done in two easy steps.
Use the Radial Gradient tool, randomly draw some soft edge glows on a layer and set the layer blending mode to Dissolve.
Repeat this step and create different color overlapping layers. Try to use bright colors such as yellow, megenta and cyan. Tips: you can control the dissolve level by adjusting the layer Opacity.
Technique 3: Rainbow

If you ever wondered how I did the rainbow effect on my Phoenix illustration (currently displaying on N.Design Studio). It is done by a Photoshop plugin, Polar Coordinates.
Create a new square dimension file (ie. 800 x 800px). Make a spectrum gradation in the middle of the document using the Gradient tool with the default "Spectrum" preset. Go to Filter > Distort > Polar Coordinates. There you go, a perfect circle spectrum!
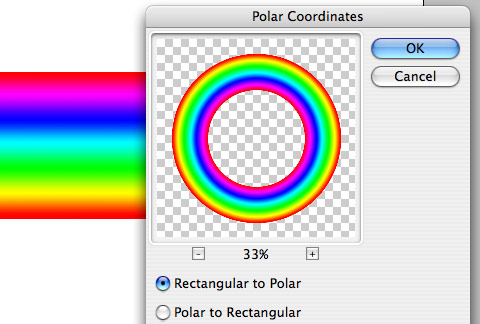
Now, you have to blur the sharp edge. Go to Filter > Blur > Gaussian Blur, apply 5 to 10px radius, depending on the size of your document. Bigger document size will require more blur.

If you only to show partial of the rainbow, you can use the layer mask to hide the unwanted area. In the Layer palette, click on the "Add layer mask" icon. Use Gradient tool, select the "black to transparent" swatch, drag from left to right to mask out the unwanted area.

Technique 4: Glowing Lights – Background
This is the quickiest and most easiest way to create a colorful light glowing background for your vector work.

First fill the layer with any dark gradient you desire. Use the Radial Gradient tool and start making soft (transparent) glows on separate layers. This effect works best with cyan, magenta, and purplish colors.
Experiment with the blending modes and drag the layers around (you will get unexpected results): Overlay, Color, Multiply, Screen, and Color Dodge.

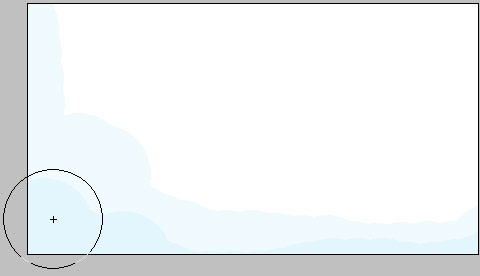
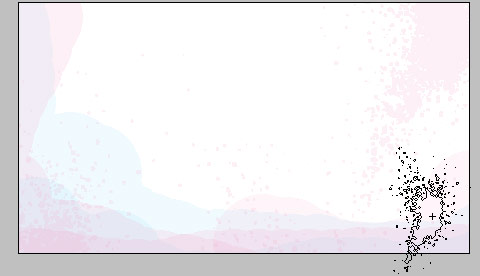
Technique 5: Particles

Particle Tail
Here is a technique on how to create a tail of particles as seen in my Flow artwork. This technique is also commonly used in the fairy tale books/movies (you know, the typical magic wand effects).
Select the Pen tool, and draw an opening path. Select the Brush tool, set any brush size you want (ie. Brush size 3px). In the Brush panel, turn on Scattering and Shape Dynamics (you can play around with these settings to get different results).
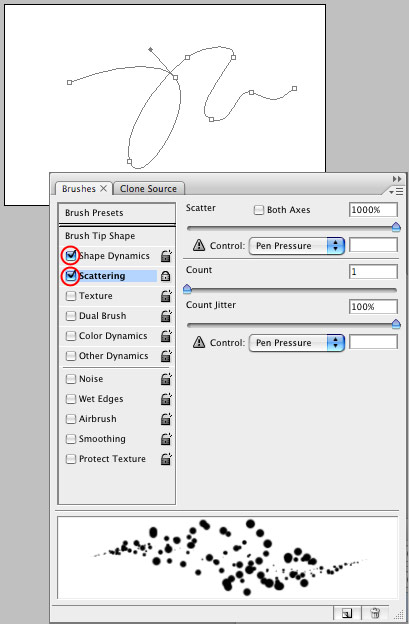
In the Paths palette, right-click on the path layer and select "Stroke Path". It will fill the stroke with your active brush setting.

Tablet Drawing
Of course you can manually create the particle effect by brushing with various brush sizes. If you have a tablet, this will be fun. In the Brush panel, turn on Shape Dynamics, Scattering, or any other controls to Pen Pressure and experiment the results. If you don’t have a tablet, have fun clicking and dragging.

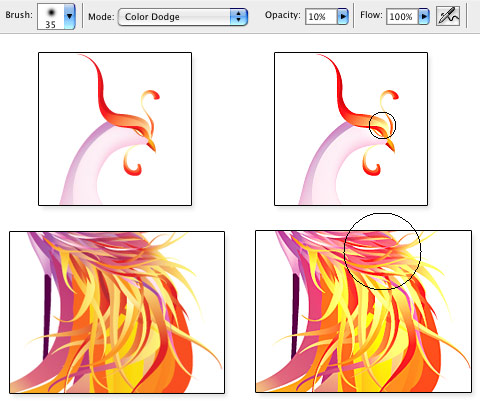
Technique 6: Color Dodge

Vector artworks usually look very flat, by color dodging, you can bring up the contrast and create a focus point.
Paste your vector artwork in a new layer, use the Eyedropper tool and pick a bright color from the original image. Set your Brush mode to Color Dodge and brush Opacity 5 to 10%. Gentling click on the area where you want to be dodged. Be easy and try to over-dodge the image.
Technique 7: Blurred and Darkened.
As mentioned earler, vector artwork is usually very flat. You can add more depth to the image by blurring and darkening the background objects. Examples can be found in my Flow illustration. Notice the floral patterns in the background are blurred and darkened?

Just duplicate the foreground objects and apply 3 to 5px Gaussian Blur.

Technique 8: Watercolor
As seen on this site, watercolor texture and vector can mix very well together. Here is how I did the watercolor effects.
Choose any pastel colors, such as pink, green, purple, orange, etc. Select the Pencil tool, set the brush size to about 100px, Opacity 10%, and randomly draw on the layer.
Repeat this step for different colors. This technique is also posted in the previous tutorial, Watercolor Effect Menu.
Technique 9: Vintage
Here is a technique on how to create vintage effect to give more texture to your vector work. Although I have never used this technique in my illustration work, but I have seen it a lot. So, here is it.

Paste your vector artwork in Photoshop. Select the Erase tool, set the mode to Pencil, select one of the grunge/splatter brushes, and gentling erase partial of the layer.
Credits: The brush sets used here are splatter and watercolor, from Bittbox. The icons are from my free Christmas Holiday Icon Pack.
See more
You can browse my design portfolio to see more work by me. Some of my works are available for download as desktop wallpapers.
Darren
Great examples. I love vector illustration and I think with a certain amount (lots) of time you can create vectors that aren’t flat but for that strong finish a bit of tinkering always does well.
The particle trail is my favourite. Simple yet elegant. Thanks.
Felix
Magnificent step-by-step walkthrough! Thank’s a lot. Watching expert giving example is great yet entertaining. But when it times to do-it-yourself, the quality is far behind the example lol.
fatihturan
You have good techniques Nick! :) Thank you for share its with us.
Tobias Roediger
Really nice, very clean and clear examples. I love the contrast between the ultra glam and the very worn looks, so much depth and value can be added within the last couple steps.
sw
Great tutorial! tanks a lot!
Arctic
Again, thanks for your great tutorial!
stewie
wow… really great work. I’m not a vector artist,, but im really loving ours
www.maxbmx.ownlog.com
very nice article, as always :-)
violinista
Thank you for simple and amazing article, keep up good work!
Best regards from Serbia
thom
Yeah, the particle trail is my favourite too, easy to do and versatile.
For those of you like me who struggled to find the Brush Panel, when you have the brush tool selected, hit F5 (on the PC) and it’ll show up.
Getting to terms with the Brush Panel is quite useful, as it’s a great way to get a lot more out of your brushes.
felipe
Wow!! i always wanted to know those “little” things about your designs.
thanks a lot.
Andrei
love it love it! soon i’ll start workin’ on them. thanx a lot for sharing :)
Andris
Thanks!
That was the missing piece between photoshop and illustrator!
Great post!
KingoX
Thank Very Much. Great tutorials. A lot of thanks.
Stevie K
Hey Nick, good to know you use certain effects that are often frowned upon by some designers. Shows that true designers use all the tools that are available to him regardless of stigma.
Nathan
So informative and brilliant! Very great!
I am going to have to get into this whole vector thing…. but its so hard and time consuming! Though, jobless and lifeless usually means I should pick a hobby that will consume my time!
Zeb
So huge tuto Nick like usual ;-)
Brian
Excellent tutorial. Really great tips plus the artwork is amazing.
veerendra
great tutorial ..zillion thanks
Joefrey Mahusay
Cool. i love it nick…Great post
Harmen
Wow, beautiful.
Thanks!!
Andrei Gonzales
Errrr…
I’ve got major respect for you Nick, but how many sites of yours have used the same layout? ndesign, webdesignerwall, and now next2friends? People are already starting to rip it: http://www.malenehald.dk/blog/ (although that’s an excellent rip)
Nazel
Thank you for this. Very insightful. :)
@ Andrei:I don’t think the website you mention is a rip off. You could say that it was inspired by the Web Designer Wall’s layout.
Pablo
exelent, you’re a master
paulo ledesma
Excelent work…. thanks from Colombia!!!!!!
Ismael
Thanks Nick.
rokryan
Dam, you really excel at inspiring with your artworkz and tutorials man..
Niice one!
Kiman
This is absolutely amazing. Thanks!
David Hellmann
Great, really nice!
last week i bought me a wacom intous3 A4 Tablett, i think thats a good interesting tutorial for me, thanks a lot – you making great stuff!
yvan Gaillard
It takes a lot to impress me in photoshop, and I must say those techniques work quite well !!!
Harry Roberts
Wow, really nice work there. I wish I was an arty type :(
Harry
Kevin
Wow, really learned alot again from this article. :P
Keep it up..
Mariano
Awesome! I`ll never sleep without learning something new! Thank you for this!
nagash
really nice collection of tips and techniques
thumbs up
JeffreyG
Great and useful tutorials!
Ahmad Alfy
Awesome!
Thumb up!
Carly
I don’t have photoshop, but your article does allow me the chance to use some ideas and put them into paint shop pro. Perhaps one day I can contribute an article or two for paint shop pro… hehe.
Eric
Wow, this is great! I hoped this post would never end!!
Malene
As Andrei Gonzales mentioned above, I was heavily inspired with webdesignerwall when making my own site – I hope you don’t find me a complete copycat, although I admit to having copied the overall layout. But, sadly for me and happily for Nick, I am not as skilled in WordPress as he, so I couldn’t copy all the really cool features, like the menu, the post dates, tag cloud, the comments and the other killer stuff that makes Webdesignerwall:) But thanks Nick, for great inspiration, and for sharing your knowledge! The only thing I knew about in this post, was the “vintage” thing which I myself heavily use, so I’m looking forward to learning the other techniques you tell about in this post;)
ily
Thank you for shedding some light on this topic! It’s really inspiring!
Nick La
@Malene,
I don’t mind “heavily inspired” at all. It is my honor that my design inspired you. FYI – Cameron Moll once mentioned in his article, Good Designers Copy, Great Designers Steal.
shafy
hey that was some great tutorials….thanx
Andrei Gonzales
@Malene – I may have been a bit harsh. I actually slightly prefer your artwork to the one Nick used on this site (sorry Nick, but I have a soft spot for Malene’s “aged clay” effect.), although I still do feel you could have used another layout.
@Nick – *scratches head* …I wonder what you meant by that last post…
Nick La
@Andrei Gonzales – my entire point is: it is ok to copy ideas (seriously, who doesn’t copy?), but do not rip. Malene does have similar style as Web Designer Wall, but her illustration is original and stylish. So I don’t consider a rip.
idezmax
I like rainbow effect. Cool.
Libby
BittBox, I love the work you do and am in awe of your generosity. Thank you so much!
NobsTutorials
Great stuff and great explanation, thank you very much! Really loved the rainbow and glowing lights effects…
Davey
Great stuff! Thanks for these, Nick. :-)
Veeto
Classy Tips
erez
F**KING GREAT!
Keep it coming.
Jauhari
Just Perfect… really useful ;)
JIN
I love you guy…u help me alot!!!
kondas
Nice tutorials.
Matthew James Taylor
You have beautiful work and this is a great article.
Ahmed Murtaza
thank you so much for sharing such wonderful tips… *bow*
Sailesh
Hello,
Seems like some awesome tips are on this entry, thank you very much.
I was trying some of them and wondered what version of Photoshop are you using as I cannot seem to find those brush options on CS2.
Great site!
Sailesh
Herman Tho
another gud tutorial! thx nick
wah Wacom intuos for expert design.
need save money for bamboo fun.
David
Brilliant, Great Technique
Well Done :-)
b00m
That’s perfect
Christina
Fantastic tutorial, thank you so much!! I don’t quite understand the color dodge but I will try it out.
Alp
Best tutorial i ever seen. Lots of thanks from Türkiye (Turkey).
Mohammed
thank you!
Michael @ Freshome
Posts like this are pure gold, a suggestion …post more like this and your blog exposure will grow harder and harder.
Dicky Normous
gnarly!
DannyNoSleeves
awesome tutorials. have you tought about writing for PSDtuts?
robgarbo
Nice tips post. Keep them coming!
uta
Wow, all the techniques are very useful. Thank you very much! You rock!
Alex R.
Thank you, Nick.
Ricardo
Nice tutorial.
Thanks for sharing your techniques.
Sebast
Buenas! I´m from Argentina GRACIAS!! por lo que me enseñas te agradezco un monto..
Mis saludos y mis respetos para vos
NetraKID
Nice tutorial, i bookmarked this page for ever :-D
Bert
Thanks a lot!
pheng
you’re the best thanks for the significant information
Arfizah
u r the best… thanks so much….. love u alot…!!!! hw can u b so geniuss???
cn help me wif my sch project???plzzz
Jia Jin
Hi, thanks for sharing those great tips with us. 1 question though, do you import a flat image of the original artwork or the source file. I cant seem to import my layer ai file into photoshop
Joycee
Your are totally awesome… always an inspiration to me!!!
Thanks for all your posts.
fresh fruits
you’re my Ps and Ai GURU
Mike
I love your work Nick! This is fantastic. :)
Michelle Durrant
Absolutely brilliant, i’m going to try out these techniques straight away. Thankyou!!! : )
Laura
Fantastic! Amazing! Fab!
Eighties
Great tips, thanks.
Stumbled!
sue
Thanks for these tips. Now I can take my work to the next level.
GotFrap
You’re awesome.
WWE Lita
Hello…Man i just love your blog, keep the cool posts comin..holy Saturday . WWE Lita
Andrew Echols
Your artwork is awesome, but I have one question do you rasterize the artwork or
import it as shape layer to preserve it’s vector based nature?
aydınlatma ankara
Thanks for all your posts.
Sancho Panza
Man you’re plain awesome! This is the sort of stuff i was looking for so long. Keep up the good work – and be sure, that i’ll tell all my friends :)
zakirah
inspiring.. Digg it!
anil
thank you sir.
Tidus
you could choose not teaching this to anyone, but still you share it with all the internet.
I’m great full for that you know!
thanks a lot mate.
Pavel
Amazing, dude
Allen
Digg! Thats awesome. What amazing
Rafeequl
What a post ! its awesome ! 4 thumb up !
Kluke
Thank you so much! You are great!)
cto
One of the most useful and revealing posts I’ve seen.
cto
One of the most useful and revealing posts I’ve seen on any tutorial site.
Your sites never cease to amaze me, please keep up the good work. Please keep sharing your ideas and techniques, they’re making this world a far more beautiful place.
neoraw
Great article!
Verry helpfull!
thank you very much! :D
mohit
great work.
sai
Thank you sooooo very much for sharing your techniques with all of us.
Sega
Very useful ! Thank you!
Brenton
OMG, thats hot
Marcel
This helped me very much! Thank you!
Sander
Unbelievable, you’re so talented!!
Thanks for sharing this with all who are interested!
jung im
thank you so much for your sharing your techniques.
It’s so wonderful.
凯尔
Most helpful tutorial posts I’ve ever seen.
esp the “Glowing Lights – Background” and “Colorful and Dusty Effect” techs are what I wanted to ask about.
Subscribed!
nonso
i just discover this site today, thank God. i love your site been a painter and a designer, i have discover something that will make me go the extra mail.
lovely keep it UP!
phillip
hello, is it possible to get a low cost version of the most uptodate photoshop. and a tablet. i know im asking allot. but does any one know where. or have one of them. PM on youtube at ww2willyjeep. Thank you in advance.
Photoshop Tutorial
Damn useful tutorial. You’ve got the skill Nick.
doba
i lost all my words. its breathtaking how things can be easy and good
Mark Abucayon
Wow this is execellent- I love to use vector always…Im very much Impress in this website. thanks for sharing this to us.
Mickey
HELLO! These tutorials are very useful! I just started using Adobe Illustrator and your site helped me a lot.
Dante
OMG GREAT!!! I used the splatter like its blood, IT REALY LOOKS LIKE IT!!!…. xD:P (4 a GTA IV Background) look at my site if you want: http://www.freewebs.com/poesjuhsclan/backgrounds.htm
(look 4 GTA IV Background)
RP
Excellent tutorials. When do we get to see the tip/trick for something like your ‘abstract background’ wallpaper (the ‘parallel lines’) ?
egypt web design
Excellent tutorials. These tutorials are very useful!
Comments Dude
Thanks for the terrific tutorial. I dare say that you probably have the best looking blog I’ve ever seen. Your layout is stunning. Congratulations!
Ashika K. Witiwalarachchi
It’s very useful, by seen those creation it gives me a new life for my creativity. So I have change my way for a new path. Thanks a lot the people how have built such.
Thanks once a gain god bless to all,
Keep it up,
If you guys like to see my creations I can give those to uplode in your site.
val
yes please please o please let us in to your secrets for that “parallel lines” thing that you do!…. :)
thanks so much for your site, it’s truly great.
Roy Kremer
you don’t know how long i’ve been searching for info like this.. Thanks very much!
meilinPR
I’ve always wondered how you did the “particles” effect – now that I’m in on the secret, I’ve regained a little bit of peace of mind. Really.
This is immensely useful. I’m sure I speak for my fellow worshipers when I say I’ll be eternally grateful for this. Arigatou!
steveb
Am an amatuer web disigner wanna b – thank you for this tutorial am learning tons of new tricks- KUDOS.
madéwira
wow cool! very inspiring :)
Mack
This tutorial is awesome! and so is the layout of your blog :)
aldo
Excellent tutorials!!! very very cool!!
Junior
Nice blog
Luv your template ;)
L.a.Z.
amazing tips! thanks!
Emyr Tabrizi
Thanks for this! Fantastic.
liezmaya
wow Thanks…
Tiago
Super great work!!
detour
fantastic tutorial!!! this is what tutorials should look like! keep up the good work.
lanx
this is very useful to me…thank you very much….i hope you can give more tutorials…guru…
esther
i love your site its beautiful
and thanks for your tips they´re awesome
SD Chargers baby
You are a good person, one day I if I have the opportunity I will give to others the way you have given your wisdom and love to us.
5ivedance
Fantastic.Amazing…Go with god!!!!
aoxilis
Nice work,Dude!
Denzel
waaaaaaaa!!!!
THANKS, THANKS A LOT!!
(i don’t speak (or write) in English very well, but i’ll do my best in this post…)
This tutorial is amazing, I visited this blog a few times, i love its design, and I always wanted to know how to do digital illustrations like that… and you have helped me a lot with this! =)
Once again, endless thanks! ^^
camille
Wonderful work! I love this site :D im a big fan of your wonderful colors :)
cheers from manila!
Jason
Diggin the tutorial, may have to try it myself.
http://www.gosdd.com
vanoin
so good! I like the site!
Mathu
Fantastic! simply cudn’t think of a word that describes my appreciation for your designs and this tutorial.
Keep it up!
Skenns
Thanks for the fantastic material. Words can’t describe how useful this is. I found your website by accident and now I use it for ideas and to just marvel at the talent. Thanks a million for this.
Megan
I LOVE that you share all these techniques with your readers! I have read some of these on your previous blog entries and they’ve been really helpful with my projects. I can’t wait to try out all of these techniques!
Ed Bar
Wow! It always took me a long time to experiment with vector effects to get a result that feels complete, but only because there hasn’t really been online resources devoted to a FINISHED vector piece. This is a wonderful tutorial.
5ivedance
This tutorial is amazing
Dario
There is not words……………just a letter “X” = Xcellent
Kuwait Pictures
It is fantastic
Steffi
That is all sooo amazing! I am german and do not understand all, but i will try your tips, because I go to an art school and your tutorial helps me a lot!
Respect!!!
Nicolaas
par ‘ excellence!
thanks a lot for your tutorials.
All4Programmer
SOOOOOO gooood i liked this site…. A lot of tutorials… THANKS!!!
PhilFreelance-Web
Wow, it’s my first time here, this is the wildest tutorial i’ve ever encountered.. thanks a lot hope you can share more. :)
PhilFreelance-Web
This is a very world class tutorial.. i can say that.. thanks a lot
dimkaNT
it’s very interesting site.
Thank You.
Rachel Tan
Your vector effects are great, I want to use them too. I make vectors with brushes using different varieties of colours and patterns. But I am wondering where did you get your brushes? Your artwork is very impressive and astonishing! ;)
Kingston
Jus mindblowing effects
RAMKUMAR
Really very nice design
Designer
Excellent tutorial. Thanks for sharing this with us!
kimnabi
Thank You.
Design Director
Good work. We could always use a good talented, self motivated, and learning designer like you.
Travis
Very creative/clever
Honza
good job, i use this tut, thanks ;-)
Honza
perfect tutorial, thank you
Giacomo
It seems so easy..
Maybe technical skill is not enough ;-)
Righey
wow I didn’t even know about most of those things……… thank you!
Tobto
cool! I like you don’t affraid to use bright vivid colors.
SJ
Thanks a lot… ill be using this site a lot to help me with my designing…
i have used some of these techniques before but not in the way you have shown us.
thanks again.. please post more techniques which are helpful :)
Matt
It`s a pleasure! Thanks a lot for your time.
Mercedas
Thank you very much!
Patris
Thanks for sharing it, this was quite helpful!
Dev
tnks ur information keep in tuch, this page very helpfull
Stealth
My god, u’re amazing, tkanks, be happy.
janak chauhan
What can I say. It is just beautiful, beautiful and I really mean this. i am impressed. I am jsut beginner and I am inspired.
Storm
ablsolutley amazing. I’m so excited to try out these techniques! i’ve recently rediscovered the pen tool so i liked reading about it alot :D
hang
thank you
skopas
Man, these are great. Thanks for sharing and hard work put into it.
Dave
Right. Certainly appreciate the great tips and pointers. Keep on. Cheers!
dean Harris
gee! if i was a woman, id ask you yo marry me… :)
Im at university doing some multimedia and your tutorial amazes me, it’d help me with the projects greatly.
I hope you post some more ideas, i’d love to read and learn to be an advanced designer! :D
Stereo&Funk
Geez man. You’re one hella artist. Hands down. Thanks for sharing your techniques. Much appreciated.
Sonia
Absolutely amazing site! Thank you so much for the information.
hairie
Hi…
off the topic question..
what pluggin do you use for image preview in this page?
thanks..
you’re awsome..
pixie-stix
Superb tips – thank you!
Mick
This is amazing i’m going to try and learn all these as your site is beautiful looking, thanks so much.
jac
Thanks for the tips! I really like your site and your tutorials/tips!
Ryan Hoxworth
That was a really good tutorial. Thanks for the great tips.
Lawrence the photographer
Amazing stuff! The pictures really helped the tutorial as well. Now I can spice up my wedding pictures! :)
Leigh Nugent
What can I say…Thanks for sharing these tips!
keith
wow! fantastic! thanks very much. i am so happy you share your knowledge for people (like me) who are starting out and are amazed by these types of graphics, now i can start creating my own… you should feel good about yourself for doing such things for others.
lisa
Yes, I agree. I hope that I can some day close to the work you are producing. Thanks for the free and easy to understand advice!
Schmut
I feel a tad stupid for not having found out about that stroke-path trick, yet. Here I’ve been clumsily trying to draw smooth curving strokes with the mouse-pad on my laptop when really it was as simple as getting out the old pen tool.
I very much appreciate all of these great tutorials. I’ve got to start putting together a website in a couple of weeks time and I can definately make use of what I’ve just learnt.
Keep up the fantastic work,
dandesigns
neat! i like the watercolor and stroke effects tips the most. thanks for being so generous.
Chris
Love your techniques really awesome hey… keep them rolling in.
evans
very fast and good
Joyce N.
Very cool! Thanks for sharing, at least now I can be inspired with working with vectors :)
gothicpsyche
Wow, thanks for sharing these tips! I’m currently interested in vector work and this articles would really be a big help. :)
ivan
i have always wonder how ya done it mate. they kinda easy to produce once you know how, simply gorgeous and i’m a great fan of ya work. thanks for all the tutorials and keep them coming.
Sharon
thanks! im gonna try some of these tutorials right now! you make it look like a snap. :)
Egypt Web Design
thnx. add to favorite i will try all these good ideas
Claudiu
Thank you for the the good material you provide on this site. One of my favorite by far… keep up the good work !
Maybe you can show us also the effect with the parallel deformed lines…
Aronil
Oh my gosh oh my gosh!! Thanks for these tips.. I’m going to try them out now! They are gorgeous!
free temlate
really good tutorial.i will always follow you…
teknoloji haberleri
thanks for this
Girls Games
I saw your works from bildirgec. Really very cool !!!
trybit
just awesome !!!!
Foxinni - Wordpress Designer
INSANE… Best post i have ever read. To the point and superb quality. VERVERYVERY nice! You just keep on amazing me.
polita
Thank you very much!
You are the best.
Leslaw
Awesome, thx!
Dizin Directory
really nice tutorial.i will always view you…
Webmaster Search
Great tips… thank you for such mind openers… I just find your website and will never leave again… thanks again
q
very nice tutorial,really works.thanks a lot :)
Trproxy
ver ggood thanks.
shah
i see u which is quit good and want take some tips to good graphics in the field of pacakaging industry.u will do quit good work in this field ok.
serial
thank you very much.
Program indir
really nice tutorial.i will always view you
Pool Cris
nice tutorial.i’ll always view you
All Kamar Tain
I just find your site and will never leave again… thanks
mirc
thanks
kartus
Thanks…
Blog
nice tutorial.i’ll always view you
Muhammet EMİR
thanks very good
www.forumskandal.com
thansk…
mountainandcloud
You’re awesome. Thanks for sharing these great techniques.
Webdesigner
This tutorial is one of yhe best i’ve ever seen! Thanks a lot!
David
I’m making sites based on CSS-technology for three years already but I didn’t see this greatful resource before! Good luck dear author! :)
mucill
You are so dangerous :D …
Thank you for this great tutorial. Best I’ve ever seen …
Jacob
Yay for dig, bookmarks, and rss. There’s no way I’ll be able to remember all of this the next time I open photoshop.
stephanie rens
Thanks for the nice and clear tutorial ! love your work !!!!!
You are the best!
eden
How to download this….?
BrokenDarkne55
Really useful dude, actually this si the first tutorial to put all the techniques in a pack. Magnificent.
Fissure
Wonderful options, creative techniques, paths panel does not work for Technique 5: Particles. Suggestions? Thanks!
Anonym
Hey,
what brush did you use at Technique 5?
Do I have to download them or how can I enable these brushes?
Thanks for help,
Anonym
PS.: I really love your work and your tutorials, of course :-)
Andezit
Thank you for share…
Şiir
Master Piece !!!!
KJ
Wow. Thanks a lot. It’s great that you share your techniques.
Off to see how I can creatively use them now. SWEET!
KJ
oyun indir
Great work! thanks.
Bedava ödev indir
Thanks Friend. Great job . :)
Hayden
thanx mate this will really help me
Matthew
Very nice, I love to see what little secrets artist use to create there masterpieces.
Thanks
patil ranjit
Hi ,
Very nice instruction in your tute.
thank you for this.
teatimer
I like this ………excellent !!!
Yemek Tarifleri
Thanxs
Tiago
Adoro o site de vocês.. Abraços
Haluk Akin
Awesome guide!
Thanks a lot…
Bill Cucinotta
Thanks so much for sharing your techniques.
Bill
Cameron
Thanks alot! The partical trail was really helpful.
Cameron
Benyelles
Thank you ! you are great
Merci tu es génial . Vraiemant beaucoup de technique .
J’esperre aprendre beaucoup avec votre aide
Simon
Thank you so much for sharing y’re techniques. They where very usefull!
Greets
Simon
linZ
i want to make some of my own graphic art for my condo and your tutorial is so inspiring!!! thank you.
dle
tnks so much dude.cheers.you’re really great and generous.
iyanfabian
thanks..
this is such a great tutorial…really help me to do my work..
:D,
Mike
Great guide. I’ve always wondered how you do those neat effects ;)
Thanks!
Chris
Very nice article. Thank you!
cleon
thanks, your skills are great
Kanal Açma Araçları
this tutorial very good thanks
Katty G.
Hi, this is great tutorial. I’m quite a beginner in Photoshop and all this is really helpful. I suposse you import in someway the AI file with layers divided. I don’t know it is possible and I will be very grateful if you do some Photoshop tips for dummies. Thanks
Katty
anarschi
Thank you.. You are great…
Julius Pewu
I wanted to create a concept with colorful line rings, and your tutorals was just perfect. Thank you
jessica
you’re fantastic. can you do a halftone tutorial soon??
Mr.Ro
I learned a lot from you,thanks so much
andrea
very cute, you´re very good
francesco
great! really useful!
thanks
şarkı indir
nicee…
Timothy Blake
hi there really is some great tips and tricks here you should think about publishing a book or somthing
key
awesome !!!
stabber
Thank You Man !
SupaRobs
This is just awsome!
Brandon Kaylor
Very Nice Nick. I like all of that.
I will have to get to practicing with those techniques tonight.;)
-Brandon
gülay istanbul ağlıyor
see u which is quit good and want take some tips to good graphics in the field of pacakaging industry.u will do quit good work in this field ok
matahari
Very usefull.
matur nuwun.
pheng
cool ur d best nick
ishara ekanayaka
this is really cool mate.thanks 4 da tips.this reallly usefull.and polished ma knowledge.
Bobby Samui
I am dont have good experience with illustrator but after looking at your work just think I am getting hooked man good job amazing magic stuff you do man
Eugene Andryushkin
For faster works I combine Macromedia Dreamweaver with Macromedia Fireworks, it works great for simple illustration or just placing pictures to webpage.
rudy
this is fantstic..i love it…
Yemek Tarifleri
Very Nice Nick. I like all of that.
I will have to get to practicing with those techniques tonight.;)
Egypt Web Design Company
Woww really perfect i like all your works i see it also in your Deviantart
you can say i’m one of your Fans :)
Amy
Very Nice.
I do have a question though. How do you get your background image so small in size while keeping it so crisp?
Thank you.
amy
Paul Velocity
REALLY good tutorials here. Its been a while since I have seen tutorials that are this easy-to-follow in order to produce some stunning effects. Thank you! :)
Niki
I really love the background for this site, haha, did you do it yourself? if so, using what program?
.. tutorial?! *innocentface*
Wasim Mohammed
Amazing design !
Mythili
hie…. wow .. i am awestruck .. i am new to illustrator and just stumbled upon thissite yesterday …. i love the tutorials .. i am going to be a frequent visitor…. and hope to learn more ….
thankyou so much for all the tutorials
Mythili
Flashidiot
Hi :), how to make your beautiful array of line ? I mean array of line like spider
Faraz4ever
Thanks budy you are real graphics designer … supppppppppper dupppppppppper yaar good…
Adam
I went to school for this but my weakness has always been photoshop. You give me some serious motivation to start getting into photoshop a little heavier. Thanks for the encouragement and truly great style!
vkvin.ru
VERY THANKS !! its great!!!
Alka Bhardwaj
You’re so talented. These all are good tutorials, i m working as web designer so your tips will help me a lot. i will expect such a good tutorials form your side :)
Ilse
i have one question. i was trying your technique “particles”. but i have a problem.
i can’t find the settings in the brush panel you use.
i just see my brushes, but no “scattering and shape dynamics” and so on.
can you tell me where i can find these settings? or how i can make them appear?
because in photoshop i just doubleclick at the layer and the options/settings pop up.
kind regards, ilse
Di_Cat
Your tutorials are really great! Thank you for your creative work.I learned and inspired a lot from it.
Elana
u r just awesome!~
Yanna
These are beautiful! I’ve slacked off on my Photoshopping, but your website’s got me all revved up again :)
Jayson
You’re really good. The effects all make the final image look incredible. I hadn’t realized the difference polishing makes. The tips are a little out of the league I was looking for but it’s definitely something to look up to.
z.Yleo77
学习了,, 很棒。。。。
pEDRO
This sucks!!! you should make the tutorial more for everyone,
i hate your website, but love the design
zco
谢谢交流!^_^
Rik
I’m just passing through on the look-out for Adobe Illustrator tutorials, though I have to stop and say – what a beautiful website. Excellent job.
Rik x
Bethany
Thank you soo much for these amazing tutorials! I thought I was getting pretty good with Illustrator before, but compared to what you do, I’m still a beginner! But hopefully with your tutorials, I’ll be able to learn more about the mesh tool and blending. Thanks again!
XIAN
Man,I got nothing to say but just awsome!
infiengham
OK! It’s a really good picture!
But… not for printing with CMYK, isn’t it?
hamza
i want to know if you can have a free photo shop trial
ugh
not design…just decoration
Goos design
So many cool techniques, I especially like the partical effect by using brushes, nice job!
MiSe
i luv ur webpage! and thanks for the awesome tutorials, i leanred more throug hyou than through my teacher the whole semester ;) greets and keep up the good work
Elu
Thanks so much, amazing job.. congratulations!
Att: Andean girl ;)
Tyrone
YOU ARE AMASING! You have taught me soooo much! Your tutorials are quick, easy to understand (even for inexpiranced people!) and wonderfully helpful! now I know CSS! YEH ME!
THANKS SO MUCH! Tyrone
Jason Marsh - Website Designer
Absolutely Brilliant, So many tips, tricks and tutorials all on one page, thanks for all the help!
Margarita
yo, ya design are tough! Thats the kinda stuff i wanna learn in my shop, i hope with a little of your techniques and ma imagination i can create some tough shit like you.
alzaman
it’s a really a wanderfull picture
but, is there an amazing photoes?
yishuzhong
很不错! 学习.
optimizer
simple and elegant approach. I like it. yes, this is not design, but the way of work. just example.
Kelley
I like your site!
nice artwork on the background!
Samira
Hi
that’s excellent!
How beautiful u mix different methods & make a wonderful pic!
i wish i could have more time to learn more about :)
Chadlonius
Nice tutorials!
Nicolas
ouo… nice job, congratulations…
KraliyetForum.CoM
cok tşkler
Eric
Thanks for the tips! I especially liked the particle effect.
Wedding Photo Services
Nice tutorials!
Aniliza
Hi,
Your site is very helpful. You’re generous in sharing some ideas and techniques. Keep it up. We are all brothers and sisters in the designing world.
Web Design
Absolutely astonishing Photoshop work. Incredible tutorials.
votranbaochau
Thanks so much for your tutorial, I do learn more about it. Really, I can’t say anything without thanks so much again.
JP
Really magical and delightful. Thanks!
Cell Phones Ringtones
Very beautiful work and info
Steve Collins
I am currently learning illustrator and I’m very impressed with your tutorial on spice an image up with the photoshop techniques mentioned above . Very informative and helpful.
Wordpress Themes Park
very cool techniques
Vita
WOW WOW WOW.. I am impressed. So many great tips on one page!!!
Thanks
mrvé
Wonderful..
I love these tutorials..
Design
Wow, I have learned a lot. Saved me so much time to search for PS tips and tricks.
You are fantastic and keep up a great job. Thanks.
daflai
great work
philfreelanceweb
such a great collections and effect enhancement.
retratex retratos
Design espectacular, está altamente.
Amazing design, it’s great.
sean
while i like the idea of polishing the vector graphics and making them more ‘real’ i think the style is a bit over done. maybe a bit too glam? not that i am anything to shout about.
thanks for the tips.
Rajita- Logo Design
I love the creation of lighting glow.It looks amazing.
dIEGO
hi .. can u explain in other tutorial how do you do to make the brush scattering an dynamics in the both sides of the brush .. i cannot do that if you make me the favor to explain me ill be so much glad .. thanks
Yemek Tarifleri
Thanks so much for sharing your techniques. Funda
sameer
from this site i have learn lot of hidden effects of photoshop….thaks dude for developing my knowledge of designing
Crazyhouse.cn
Wonderful..
KraliyetForum
thanks.
Strike
Amazing design, it’s great.
Edebiyat
I want to make some of my own graphic art for my condo and your tutorial is so inspiring..! Ferhat
Edebiyat
you’re fantastic. can you do a halftone tutorial soon?
Rüya Tabirleri
cannot do that if you make me the favor to explain me ill be so much glad
Ansiklopedi
I really love the background for this site, haha, did you do it yourself?
Burçlar
Thank you for your creative work.I learned and inspired a lot from it.
web design
creative work.great idea.
afg89
Beautiful, thanks .
Mcphisto
thank’s I was looking for something like these!!!!
Best Designs
Really awesome designs, I am loving it.
Yemek Tarifleri
Thank you ! you are great
sham
nice & nice… i think it’s very helpful 4 me….
infinite
Brilliant stuff man… I really like how you’ve broken technique down then leaving the rest up to our imagination.
Keep it up and I’ll be definately bookmarking this site.
Cheers :D
Reverse Mergers
Great tutorial… anything that can help me learn design from a professional is a big plus. I bookmarked this site as well and look forward to learning more in the future.
Deepak
I’ve alreay bookmarked this site… and after loosing all hopes of finding a quality designer, I’ve started to make the designs by myself. Thanks to you!
Deepak Goel
daswandern
great tutorial man… its just like you light a fire and its up to us to keep it growing :D
Sri
This is a awesome tutorial.
mario dragic
saved me 1000 years. Thanks for inspiring and showing this great tutorial
Las Vegas Holiday
Really good works, I’m trying to learn photoshop. These works are incredible.
reklam
thanks you.
Maicon
nice techniques! very useful to refinate the arts.
ilaçlama şirketleri
thanks youuu. byeee
web tasarımı
teşekürler türkiyeden slmm.
hazır web paketi
:)
tel çit
thnaks.
söve
thanks you..
bursa temizlik sirketleri
thnks you. bye
denizli evden eve
blog kurucularına çok teşekürler..
Joel G.
Great tips…I like them all. I’ve been experimenting with the watercolor trick lately…very cool. Here’s a sample:
http://www.behance.net/Gallery/Charity-Auction-Program-Cover/96630
Kevin Wuyts
Hello,
This is one of the best tutorials i have read the last months ! Keep up the good stuff here, thanks !
dsp_ins
hello,
i love design….but i’m late to realize it…
thx for sharing…
Angel
estupendos consejos, muchas gracias.
feder
kewl work …. thanx …!!! ^_^
melba
cool post!
thanks for the tips! :)
Best Web 2 Designs
Amazing skills!
See our best web 2.0 layouts on our site at, http://www.gigaturn.com
kesavarao
nice tips pls so all menu explain also
means file and content sub files
nice and learn easly
Calvin
I just want to say for some of us that just dabbles and wants to learn the techniques you use in your art work, your tutorials are FANTASTIC! Thank you for sharing I have been inspired to try some of these techs for my sons PeeWee football card. Thanks again
Gjermund Rein Gustavsen
I agree that a certain degree of polishing can provide some really neat details, but I think a key issue here is to show moderation. Many of the examples shown above has been largely overdone in my opinion, and I didn’t think of the original illustrations as flat or dull. I mean, they have lots of gradients and nice details, and doesn’t necessarily need all the extra elements scattered around.
But yeah, a nice tutorial overall! I just think it’s important to keep in my mind the old cliche of how great power brings great responsibility along.
James Kurtz III
Thanks for the insight!
pr yüksek siteler
thank you wery much…
brek
I agree that a certain degree of polishing can provide some really neat details
brek
Amazing skills!
temizlik şirketi
thank you wery much…
J Buchmann
Great stuff! You use some awesome techniques that I’ll be using in some of my future art. Thanks for sharing =)
githongo
I am overwhelmed by your prowess. When you say that your vector illustration are ‘dull’ or ‘boring’, to me that is a language hard to fathom as per now, this is because they already look complex and really nice. Moreover your tutorials have helped me a lot, imagine i have already been given a new, in the village(am in Africa by the way) i am being called a computer guru. They don’t understand the difference between a computer and software. I have never gone to any practical design class, thanks to you i have learned a lot. Mark you keep it up since i am still your student. Kudos and thanks.
temizlik firmaları
thank you:)
Camil8
Thank U, you save me, te agradesco que tutoriales tan completos, son los mejores que he visto hasta el momento, sigue asi.
saludos..
temizlik
thank…
film indir
thank you..
Harry
Beautiful works!!! This is the future of visual art presentation!!!
söve
thank you…
Frank
thank you
Aleks
Beautiful lessons! This is Magnificent visual art presentation! You the present professional and creative person Magnificent figures! I in a creative shock! I wish to you good luck! And there are a lot of design ideas
temizlik
thank you….
kiralık vinç
thank you….
Skout™
thanks for caring [oops, sharing]…
Tutorial Web Design
visit more tutorials at
http://www.tutorial-web-design.com
bursa evden eve
thank you….
tam
thanks, and stunning work!
click
Congratulation, it was very interesting surfing around here, It was a great pleasure for me to visit and enjoy you site. Keep it running!
j.na
Thank you so much for this tutorial! It totally rocks!!! I posted it on my blog:
http://blog.jessicana.com/2008/07/vector-illustration-polishing-tricks/
Thanks again for sharing
kynangtinhoc.com
This is a great post and you can read more at http://www.kynangtinhoc.com/forum/showthread.php?t=192
alan
adding my thanks. I’ve always wondered how the pros balanced illy and pshop. the only one I ever figured out myself was the color dodge one…
cynthia
really nice art work
Danh ba web 2.0
Great blog! Thanks for share !
DEEPIKA MEHROTRA
thankyou for sharing this amzing tutorial.
mrvé
I love these techniques..
Thank you N.! ;)
web development
Nice post, Thanks for sharing your knowledge…:)
Derek
Thanks so much for the tutorials. Really helped. Nice of you to share your knowledge.
gemi ve yat temizligi
thank you..
Mohammed
Thankyou for posting such tutorials which helps lot to improve your skills….
anjum
sir its really a good tutorial i like it
asansör
Thank you very much very helpful
Swapnil
Hi,this techniques are too good.Please publish some tutorials on how to Illustrate a character.Thanks a lot for this wonderful knowledge pond.
aqib
hey hi i have just saw your work its excellent i really like illustration part
and i want to suggest something that you could add more tutorials on your
web i mean for vector illustration side its could be amazing. best of luck
aqib ahmed !!!!!
Edith
Thank you for sharing your excellent styling techniques with us!
Blessings!
Worpdess Thems Park
the best tutorial i ever read about photoshop , man you are amazing
bob
I think the starting vector art was just fine!
hega
great tutorial i ever knew..
i’m just beginning to learn adobe illustrator..
n combine my first artwork with photoshop..
as i read u’r other tutorial..
finally i’ve done my first artwork..
i hope u’ll post another awesome tutorial..
thx anyway…
Andrea
You are God. Impressive!
yeoung
Indonesian designer respecta 4 people that love 2 sahre like you
BIG THANKS PAL! =D
XOXOXOXOXOXOXO^^
Avaloon
you are mind-blowingly talented my friend. your work is fantastic. do me a favor and keep it up :D
nicolaas van den broek
that is one of the most useful tutorials ever. thanks
asansör
Thank you for sharing…..
RaphaelDDL
Most useful tutorial ever made !
Thank you Nick :D
jaint
thx, for ur tutorials God Bless for sharing ur knowledge.
nirmal gyanwali
very good stuffs, keep on doing your job..
Neena
Loved your work. Your tutorial were extremely helpful. You are such an inspiration. Thank for sharing your tip. God bless You.
Leo
I’m so glad you posted this. This is gonna give me a great edge for my work.
muneef
really cool stuff..
noen
great stuff. thx
Daquan Wright
Great stuff man. Iove the glowing dust effects and the particle tails, keep it up! I’m always looking for ways to improve in illustrator and photoshop and I’ll be making my own online web presence very soon. Just want to do it right the first time.
Le Quan
If you ever in New York, I would like to meet you.
You are so generous by showing ur technique to other artist.
Keep up the good work.
Le
Loraine
I was using the guidelines given in the tutorial that links to this blog that gives three steps to make shinny buttons. I followed the steps (and the similar steps to make the shine in the itunes note) but I keep getting weir lines when I blend the different objects. I wonder if it has to do with my preferences, but am uncertain what will cause this problem. Do you (or any other visitors) know how to solve this?
event
Merci
florin barza
Man i’m not even a beginner. I’m an artist tough and looking toward the computer design. what i do in hard airbrush you perfect it in computer bits. I love it. And the fact that you put it on the net for everybody to see makes you an artist. Just like a sourgeon doing his miracles on a live camera. Thank you
Josemon
nice stuff…
I am a newbie at design These posts are really helpful. Thanks.
Conrad Gorny
Good stuff, cool glowing effects.
Conrad Gorny
Freelance Graphic Designer
http://www.conradgorny.com
tina
this whole page is sooo awesome!!!!
chethan
the pictures look great here and your website design is simply superb!
wesley
im starting to try to make vactor images and when u saw that skin tone in the image above i went out of my mind…i been lookin for something like,its a great smooth efect u have on the skin,congrats!
Paint
Boya,Söve,Mantolama
Lisa
I can´t play around with the settings of the brush pannel to get different results, i don´t know why…
TomTom
Great tips! Will be sure to use them in the future!! :D
Masker
Stunning effects, really!!
victor
wow~ thanx cool tips XD
siddhesh
really artistic and smart work !!!!!!!!!!!!
siddhesh
can isee more projects with there explanation as i teach my students same effects.
leir
有视觉冲击力
sandesh
some one help me guys
i am not beginer in photoshop , i can do many basic operations and i need a help to learn high level operation like mask operation,other than this more,pls guys som1 hlp me.
sandesh
Great tips! Will be sure to use them in the future!!
Joachim in Oslo, Norway
Thank you very much for your tutorials, they are very informative.
Wern
thank u so much!
jiro
where can i download all the plu-ins here?
Lana
are this images from http://www.ndesign-studio.com/? :) you everybody takes it from somewhere?
smilesquare
wow… It’s really nice photoshop tip.
the particles technique is great, I like it.
zada
Hi Sir or Madam,
Our company specializes in digitizing, vectorizing artwork and garment accessories such as patches, rhinestone heat transfers, heat transfer printing.
Digitizing: $2.90 for per 1000 stitches for small size logos.
As for big size logos, we charge them according to the complicated grades. You can send your logos and we will give you a quote soon.
pls have a try. your trial logo is $3 if the stitches of your logo is less than 10000.
free edit and free quote.
turnaround time: 12-24 hours
Vectorizing artwork: $14 for each artwork.
turnaround time: 8-24 hours
As for patches, rhinestone heat transfers, heat transfer printing, we do custom ones. Pls feel free to send your designs and tell us the sizes, colors, amount and other requests in details. we will give you a quote soon.
High quality and competitive price are worth your having a try.
Your response will be appreciated!
Sincerely,
Zada
Carlos Hermoso
Fantastic tutorial about vector polishing techniques. You are so good in what you do!
mauricio
que bueno que los pusieran en español
son exelentes
sm
有中文的吗?
Yinan
Hey Buddy, here’s English only.
哥们 没有中文的
SemaNur
Gerçekten çok güzel çalışmalar…Bende yapmak istiyorum
Dan Cobb
If you are looking for garment printing artwork try
http://www.quickartworkdesigns.com
vinç kiralama
463 comments (:
vinç kiralama
463 comments (: Bu m,illet sanattan anlamıyomu nedir, sanki pablo picasso
vinpizza
nice tip!
i like it and will try to put it in my artwork.
you are great.
Jon
Wow great article. Vectors can often look too ‘perfect’ so some of these techniques will bring a bit of life to my artwork.
poom
You very good idea
Thanks.
ขอบคุณสำหรับไอเดียแจ่มๆนะคะ
คุณใจดีจัง ทั้งเก่งทั้งใจดี
:D
D_E_R_M_A_N
thank youu
rj
thanks for sharing these!
TheDutchResistence
Wow, thanks so much for sharing your skillz. I am a Vector illustration junkie and this type of thing is just what I have been needing to get re-inspired. Thank you so much!
-Melanie S.
Ruby
great tutorial! I’ve been reading online tutorials for awhile! This is so far the best one on graphic design (no kidding!) So detailed and SO GENEROUS for sharing the tips and techniques in both illustrator and photoshop! THANKS a bunch! REALLY!
Aphos
own you thanks a lot ,hope you continuos working nd sharing your knowlegde hard.
anfeather
是在ai中, 还是ps里
منتديات
You very good idea
Thanks.
Sherri
Thank you for this tut I learned something new and simple
kristykk
I have a question. Are there any programs like that for windows or can i some how download photoshop onto my windows laptop????
Florida SEO
This … is a very useful tut …
Thanks for the share …
:)
Florida SEO
This is a VERY useful tut …
Thanks for the share …
:)
E
ranvier
Thanks for your generosity in sharing the techniques.
Barrett Greene
very clever! currently working on a project and can use these tips, thanks!
Windy
I will definitely be polishing my illustrations using photoshop with some of these techniques! Thanks so much for the education and inspiration.
Cheers
Camilla (RJ/Brasil)
Excelente a iniciativa!! Adorei!
cennetevi
these are awesome!
thanks for putting in the effort to get this list together
cennet
Thanks Thanks What’s the problem here? Google could bury the meager profit number from even the biggest media conglomerates.
cennetevi
these are awesome!
thanks for putting in the effort to get this list together http://www.cennet.gen.tr
cennetevi
Thank =)=)=) you http://www.cennet.gen.tr webdesignerwall Thanks
Aoobi
these are awesome! Can you write more tuts about ai skill.
bagsin
very clever! currently working on a project and can use these tips.
davekenobi
Thank you so much for your time putting this together, it inpires as well as informs.
Cyrus
Great , Vector Polishing Techniques
Great article. CSS saved web design
Cyrus
Visit http://www.psdtoxhtmlcoder.com
purplerain
so needed these tips for an assignment. love it
isa
awesome tips, very inspiring:) thank You!
Mike
these are awesome! Can you write more tuts about ai skill. I am a beginner.
Rama
Glorious tutorial! I love Illustrator, but find that my art is flat. Using your tips, I can now add life to them in Photoshop and give them a whole new dimension!
Thank You
vincentdresses
The designs showed here show what simple and tasteful design is all about. Another one to consider
Wener
what means this:
Experiment with the blending modes and drag the layers around (you will get unexpected results): Overlay, Color, Multiply, Screen, and Color Dodge.
i cant understand
step 1
step 2
step 3
???
can you send email to me i am a chinese student~~~~~~~~~
zamir
excellent tutorial…. Its very Helpful
Mimi
hi I’m using elements7 and i’m having problem on imitating your rainbow effect. its the layer mask icon I can’t locate and the gradient your using.. can you help me please..
rita
hi friends
check your website real value
websitereckon.com
WebsiteReckon contains a collection of useful features such as checking Google Page Rank (PR), Compete and Alexa Traffic Rank, Backlinks Checker, Server IP and Location on Google Map, DMOZ and Yahoo Directory Listings and more. You can use it for various purposes include doing research before buying or selling website; want to find out how popular the website is; use it as SEO analytic tool to improve your site performance; or just about curiosity.
sbobet
I was using the guidelines given in the tutorial that links to this blog that gives three steps to make shinny buttons.
Steve
Thank you so much for sharing your great talent dude, this I really a great help to all aspiring web and graphic designers. Keep it up and share more nice ideas. Your cool dude.
AC
Trying to design a cool business card. Just the tutorial I’ve been looking for, Thanks a bunch!!!
chinmoy roy
tutirial show with more detail
chinmoy roy
your tutirials are good for student.but how can we grow our creativity & colour sence.pls writre something in my problem.
thank you.
marcelo
each one of it are great!! thanks a lot!!!
Anton Boshoff
Hi, recently I was researching design companies and came across a South African website that has done some copy-pasting. I scrolled through the site and saw something very familiar in their footer; beautifully drawn doodles. I recognized it immediately as I was one your site before. As a designer I know how I would feel if someone stole my hard work. (This is actually just to bring it under your attention)
Oh yeah, here it is – http://www.cheapwebdesign.co.za/ .
Please let me know what you think!
temizlik
You have good techniques Nick! :) Thank you for share its with us.
Web Design
very easy to follow!! thanksfor sharing
gclub
Thank for your website I love gclub content and want you to see my website too.
fgdgdg
horrible…the name of the tutorial is abt glow and he doesnn’t teach it at allll
ninel conde
I loved the rainbow effect.
It costs a lot of work to do, without the toys that you have. :)
Ninel
Progs4u
Thank you so much ..
You are very cool
iphone
my favorite technique is Blurred and Darkened no7 fast and accurate
jithu
om
jithu
omsaravanababa
egypt mansoura web design
very vice. thank you very much
sbobet
Thanks for the knowledge to guide
C
Its a misleading name on this vector… And i think its sad to eliminate the positive effect of vectors by adding this stuff. In that case you had no need to use vector in the first place
Lorna
Thank you heaps for this you should do a book as its very hard to find descent vector painting that has light and tone.
Gclub
New knowledge that we receive.
web design egypt Mansoura
nice ., the powerful effects
Diesel Engine
Learning all tricks and how to use photoshop is really hard but with a little hard work after that all things looks simpler . The worst part is that there aren’t too many good vectors out there for use.
jyoti
very good lighting effiects.
akeanant
very good lighting effiects. Thk.
طرب
thanks its easy
rina
gmna caranya ngedapetin efek kaya gituuuuu ??
dimana ????
pake photoshop apa ???
ayolah aku pengen bisa ???
outlet uggs
good post ,thanks! This article was Very helpful. i like your website,I am fond of reading online punjabi news.
august
Thanks for tutorial,that’s right,vector image result often too flat,except for the expert of course and if we edit in illustrator it self,will need much time for best result,love this site.
Henry Peise
Apple’s launch of the iPhone 4 white has seen the greatest excitement for a new phone ever, with HD video recording, a super high-res screen and ridiculously slim dimensions, it’s not hard to see why its so popular in the world.
Juno Mindoes
People think that iphone 4 white is better iphone 4 black. Is that ture? Here you can judge by yourself.
Alexandra
Thanks a lot for your sharings :))) Have aHappy new year!
Uçak Bileti
kafir yarrr
Ben
It’s nice to once and for all find a web site where the blogger knows what they are talking about.
sesli chat evi
Thanks a lot for your sharings
sandy
wow………superb!!!!!thank “U”
Marcel
Thanks, very good lighting effiects.
altın çilek
These are so incredibly well thought out, I’m having such a hard time redesigning ours right now… I want to use all the ideas of inspiration, but that would mean I’d have the worlds longest footer
hcg damla
Thanks, very good lighting effiects.
Web Design
finally, sometimes useful post thank you for it
شات صوتي
thnks
goooooooooooooood
min:(
teeem
Uçak Bileti
Thanks.. i will share..
dexx
Excessive fear, anger, and work under stress last pregnancy, infants can lead to excessive hassaslığa. Intense emotions, going through the mother’s blood circulatory system and brain functions that affect the baby in some leads to the release of chemical
spacejelly
Vectors need not be flat & boring. You don’t always need to use Photoshop either – there are many ways of making 3D, glowing and particle effects using Illustrator alone without any raster effects.
Nice article none the less. very in-depth. :)
Abdullah
This is not a good website.
Abdullah
This is a good website.
Tampa Web Design
There are many ways of making 3D, glowing and particle effects using Illustrator alone without any raster effects.I find it interesting and informative.
panax clavis
çok saçma
business appraisals
Really nice..This effect works best with cyan, magenta, and purplish colors.
Alican
Nices techniques…thanks
asansör
tnk u so much. u are fantastic!
Misza
Thanks for sharing. I’ll have to take some time to review everything.
durban wedding photographers
This Gentling click on the area where you want to be dodged. Be easy and try to over-dodge the image.
special discount code
the techniques are explained in a very good manner and perfectly up to the mark explanation is there. It took time for me to read, but it was really very valuable. thanks for sharing such a nice post. Great efforts !
mychickencurry
Very informative! Nice site!
Business Directory Melbourne
I’ll answer that question in this, the first article from a series on vector images. In subsequent parts of the series, we’ll take the fundamentals we’ll learn here and see how they can be applied to a range of more complex design tasks.
shop online
A tip : Don’t merge or rasterize your shape layers. As long as all your layers are shape layers then you have a vector piece of art.
complex41
And then he handed you the thirty-five 45
Catarina
Hello
Could you explain the technique 5: particles for illustrator CS5? I would really appreciate it. Great website by the way!
pembe maske
Don’t merge or rasterize your shape layers
CiNiTriQs
Thanks for all these tips, some good freshening up. Keep up our blog here too, been an avid visitor ever since couple of years ago. Take care!
jquery zone
glowing and particle effects using Illustrator alone without any raster effects
asansör
very nice muck muck thanky…
prefabrik ev
ectors need not be flat & boring. You don’t always need to use Photoshop either – there are many ways of making 3D, glowing and particle effects using Illustrator alone without any raster effects.
www
It’s not my field, but the view is worth.
Design
Painting on the tablet is fun, but to do cool things need work.
Ajay
Painting on the tablet is fun, but to do cool things need work. s
ileri sürüş teknikleri
to do cool things need work.
Taniya
I’ve learned some new things today!! Thanks a lot :-)
Moliva
but to do cool things need work.
asansör
Nice site! thanx
shwetha
nice thanks a lot
Patrick
This is an old post that I never read before. Great post, by polishing vector with Photoshop effect, it can bring such a huge improvement.
Image To Vector
Perfect! Just what I was looking for.. Thanks a lot!
asansör
good technics.. Great solutions. I like This
Ami durgvansi
really nice techniquies…..thnx fr dat
seslichatclubu
woooowwww Thanks
apartman yonetimi
but to do cool things need work
zayıflama
Painting on the tablet is fun, but to do cool things need work.
Susana Winkeljohn
Excellent beat ! I would like to apprentice while you amend your site, how can i subscribe for a blog website? The account aided me a acceptable deal. I had been tiny bit acquainted of this your broadcast offered bright clear concept
φωτοβολταικα συστηματα
good post ,thanks! This article was Very helpful!
Lorena Gomez
wow, amizing tutorials!!
Spark
Awesome Techniques, Excellent work.
Thanks
ayam aduan pukul mati
You could certainly see your skills in the work you write.
The sector hopes for even more passionate
writers like you who aren’t afraid to mention how they believe.
Always follow your heart.