This is a Photoshop tutorial on how to create a beautiful photo film strip, as seen in Apple’s iLife package design (’06 version) and DigitalMash website. The warp tool will be used to create the twisting effect (so, you need Photoshop CS2 or above to complete this tutorial). With the completion of this tutorial, you will be able build a photo strip with your own photos or artwork. Don’t miss out this fantastic feature!
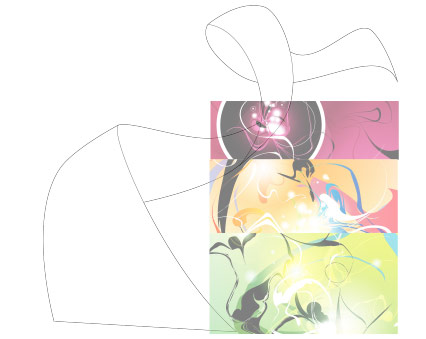
1. Create a Strip (Vector Shapes)
First, create a strip with the Pen tool (either in Photoshop or Illustrator). We will use these shapes as a guideline and for masking purposes.

2. Photo Stack
Choose 3 photos of your choice and stack them together.
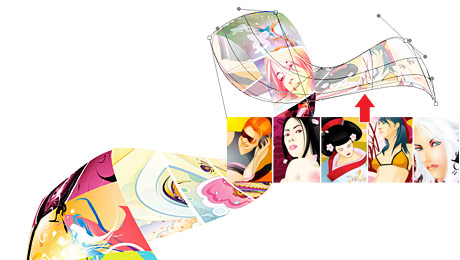
3. Warping (Photoshop Warp Tool)
Adjust the layer opacity to 40 or 50% so you can see the guideline underneath. Go to Edit > Transform > Warp. Now you should see a grid and 4 anchor points in the corner. To bending the image, simply drag the anchor points, direction points, or grid lines.
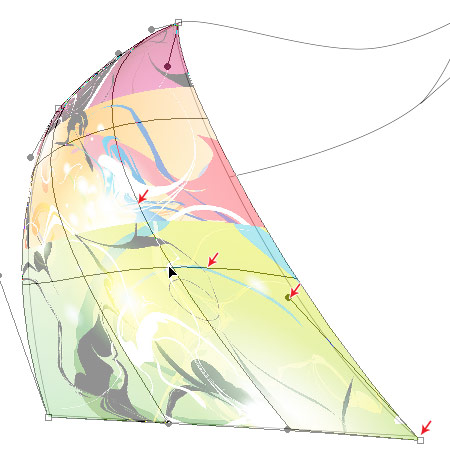
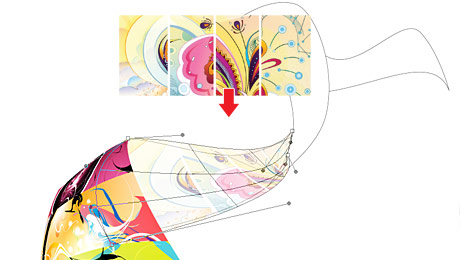
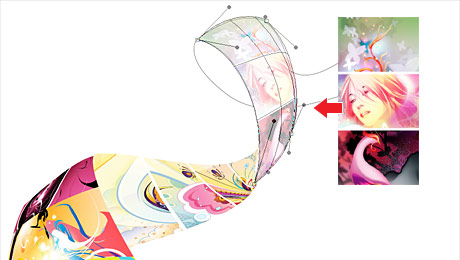
Repeat this step for the rest of the strip. Since this step is relatively simple and repeatitive, I’m not going to get into the details. Here are the screenshots of the steps:
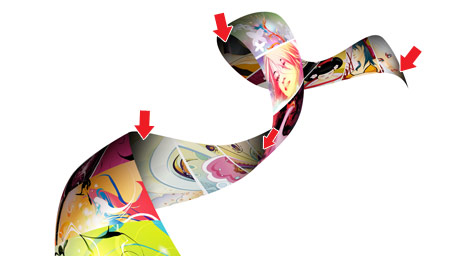
4. Masking
Organize the layers into groups (ie. strip 1, 2, 3, 4).

Load selection from the shapes you created in step 1 and add a layer mask for each group (so you get a perfect smooth curve).

5. Shadows
In masked group 1, create a new layer above the strip. Use the Gradient tool and drag from the top to bottom to create a black gradient.
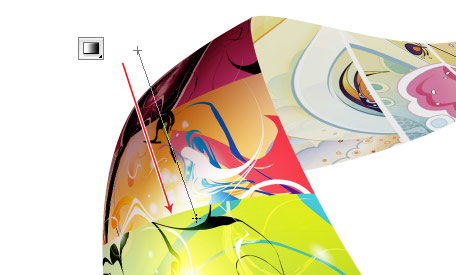
Repeat this step for the other strips.
6. Highlights
To make highlighted and glossy areas: create a round glowing circle, compress it, and rotate it in the angle according to your strip’s direction.

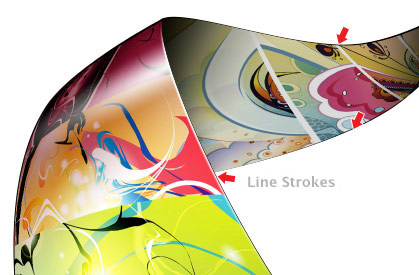
7. Line Strokes
To make line strokes: load a selection of the mask, create a new layer, fill it with black, shift the selection to the left by 1 or 2 pixels, delete the selected area by pressing the Delete key.
8. Final Touches
To make the image look more interesting, desaturated the two strips in the back.

Bonus Tips
The Photoshop warp tool is very useful when creating any sort of twisting and bending graphic effects. The following examples illustrate some of the things that you can do with the warp tool. Have fun!

NetOperator Wibby
*Very* nice tutorial Nick. I was just looking at the ’06 box art a few days ago. Thanks alot.
Greg Wilker
very very nice. I’ve been trying to think of something cool to use for a background of my photography blog. I’ll have to give this a go and see what I come up with.
Richelle
Oh I really like this I have a artsy client that will love this.
Thanks!!
Phillip
Really amazing, thanks!
Raymond Selda
Oh my goodness! This is really wonderful. Thank you for sharing this.
Todd Smith
what a cool idea… and great step by step. As a photographer, I’ll keep it in my bag of tricks.
Ben Jacob
Wow thanks for this awesome tutorial. I’ve been trying this myself for last somedays… Now I got a tut to do it in an easy way…
Cacao
This is really cool, it’s very simple and resourceful, I always thought of this effect being done on some 3d environment or some automated action of some sort. Kudos Nick, very inspiring.
satyaspb
This is really cool, it’s very simple and resourceful, I always thought of this effect being done on some 3d environment or some automated action of some sort. Kudos Nick, very inspiring.This is really cool, it’s very simple and resourceful, I always thought of this effect being done on some 3d environment or some automated action of some sort. Kudos Nick, very inspiring.
Sacha
Very nice ! And so simple.. Something tells me this effect will start popping up on websites everywhere from now on.
Marco
That was actually pretty simple, but the outcome is great – Well done Nick!
Marvin
wow. the final image is really cool. i have to try this. nice tutorial ;)
Lipton
Wow great tutorial! Thanks :)
David Hellmann
nice tutorial, thanks for it!
Fred Soler
Really good and simple way to do. Thanks.
Mohammed
thanks for the nice tutorial. beautiful and simple!
majann
I’m totally amazed to this site.
Wonderful tutorial, both beautiful and useful!
Thanx! (:
Web Designer Guy
How uncanny. Stumbled here just now – only a couple of days since planning to use just this kind of thing on my website. Thanks for the tut – I’ll be back!
Tom Ross
Simple technique, but awesome result. I really enjoyed this one.
E-maniacs
Nice, and very interesting tutorial.
It is very easy indeed.
Thanks
Lunnaris
Great job mate!!!! It’s gonna be perfect for a calendar that I’ve to make.
chris
nice. thank u for this
carrie
Wow. . . . thank you!
Majesticskull
Thanks! :)
printers in brisbane
Long time no post, Great to see a post ! This is a beauty too, thank I’ll have to give it a whirl :)
Jennifer Farley
Lovely tutorial with a simple and elegant result. Thanks.
Driveways
excellent tutorial and thanks for sharing :)
Designer
as always, this website gives few but really really great tutorials…… thanks a ton
LOmiG
Thanks a lot !
it seems easy this way. I have to try to see it’s hard.
Jeff
This is a good concept…I will try do some on my web site. thanks
Carlos Hermoso
It actually looks cool. I have to try this myself
Radek Kysely
Hey, very nice, man! But, anybody can’t use the Photoshop because it’s quite expensive way. I think, you can carry it out with another application for graphic designers, but it’s well by the Photoshop, too.
Bill
Great tut! You sparked my imagination with this one. There are tons of possibilities for this technique.
joyoge designers' bookmark
really nice tut. I like.. thanks..
Amjad Iqbal
excellent tutorial :)
thanks!
MSC
I really like the way you have elaborated making strips in photoshop reason being it is normally considered an illustrator job. Fantastic work. Thanks
Greg
Great tutorial. You guys should try to do more tutorials on here. I like!!
– Greg
Geoserv
Amazing tutorial, you make it look so easy.
Greg M
This is an outstanding effect. I look forward to giving this a try later this evening. Wonderful design work!
ben smithson
Gorgeous. Love this. Keep the posts coming!
Jennifer
wow! that’s amazing! can’t wait to try it out!!
Starstuff
Awesome! Thank you so much for this tut, it was exactly what I was looking for and at the right time. You’ve just made my day!
Kayla
Excellent tutorial! I cannot wait to try it out.
Nikko
This tutorial is awesome! Thank you very much..
Richard Andersson
Awesome tutorial! I was in awe when I saw it and when I saw the end result. WOW! MORE!
Thanks!
Paula
Excellent tutorial!
I’ll try it out soon :)
Thanks!
Timothy
Sick! Nicely done, once again. Thanks for the tutorial. It shall come in handy
Potisk triček
Good Tut. Thanks
Aaron
Amazing tutorial. With a little trail and error a designer could expand this tutorial to create an easy to follow method for lining up the ending pixels of the over and underlapping segments of the photo strip.
So for example, if a designer decided to use one really long image, the designer could break that image into parts to match the flow of a real world photo strip.
Actually with some thought, my idea is probably easier to accomplish in a dedicated 3D program with texture support; yet it would be a niffy expansion of this tutorial.
Thanks!
Xtence
This is great, nice work!
Josh Drake
Nice job! I always wondered if you did this with the Warp tool, or if there was some way to mold the pictures in 3D to the path. I see now. ;) Thanks!
BORABORA
Well done! It actually looks easier than it is :)
Thanks!
Dainis Graveris
so good tutorial! very, very useful – and nice technique!
Florent
Excelent ! Thanks you !
Simon
It’s strange how the simple methods look best.
Now all I have to do is gather a strip of images.
Thanks!
Max Weir
Stunning!! I’ve wanted to find out how this was done for quite some time. Its so simple and has endless possibilities.
Thanks!
Derek Hildenbrand
Neat stuff. Thanks for the post
Derek
New View Media
moih60
thanx..good work ..i like that finish
alisssa2003
very good article. there are a lot of tutorials and tips. you can do a lot of things with photoshop.
Krait
Great effection!!!
Krait
~that what look for~
Stephen Fairbanks
Thanking you, Web Designer Wall.
David Costales
Thanks WDW ;-)
Alvaromagal
Thanks! Fantastic!!
It is so simple when we know.
Thanks you
Milan
Hi thanks for this fantastic tutorial!! it’s always worth to take a look on this blog
Patternhead
Great tutorial with clear instructions. Thanks for sharing :)
João Henrique
Excellent
>>> http://www.swebstudio.com.br
Davor
Nice looking strip, great tutorial
Alis
Amazing tutorial, as always! Thank you for sharing your experience!
Jan
Wow, that’s great. I’ll try it out as soon as I find some spare time. Thanks!
Elizabeth Kaylene
Thanks for sharing this! I’m pumped to try this (if I ever have the time)!
debra r
very cool.. can’t wait to try this out.. thanks for all your tutorials!!!
Stuart Thursby
Fantastic tutorial for a great effect. Simple in theory, but I can imagine it takes some practice to get it down as polished as you have it. Thank you!
rossella sferlazzo
Compliments for your tutorials…. they are always nice!!!
http://sferlazzorossella.wordpress.com/
John
I stumbled across this site via dreamweaverlub.com. Very nice indeed and would love to win the win the 3D scrolling pic prize. Thanks and I will be using this awesome site again and again….JL
berkin
thanks, this is so creative
لمياء
it is very nice, excellent, thanx alot
Rijalul Fikri
Ah, at last, a nice tutorial as usual :)
DKumar M.
Nice Tutorial Nic !!
Cynthia
very cool tutorial! thankyou for sharing
Dan Selleck
Now that is just hot. :D
Dan
Great tutorial, I love simple effects like this one.
Anna
Excellent, thanks for posting. I needed some ideas for my blog header, and now I got some cool tips from here. Anna :)
Rosyid
what an outstanding tuts!! Thanks 4 the sharing !!
ralph
hi, thanks a lot for the tutorial, is very nice and effective. I like the effect very much i will do it in one of my designs one day.
Best
Ralph
http://www.deprowebs.com
Farid Hadi
Cool tut, thanks!
mokin
Very cool tutorial! thankyou.
Pim
Cool tutorial indeed! Thanks for sharing it with us. =)
Great Web Design
Its such a nice effect. Thanks for the step-by-step!
anime7graphic
Hi owners…
Nice web design, its very wonderful for me, i always visited here every week end but now I have a comment for my appreciate webdesignerwall.
Your tutorial and resource give me inspiration, i am sure…
See your link at my blog http://anime7graphic.blogspot.com/
Joey
simply, inspirational
Liselle
I am quite smitten with that DigitalMesh design.
WPCult
Thats pretty nice! Good tutorial!
Dy
Yeah thats nice one :)
amazing wrap in Ps
TypograhyExperimental tutorial here
http://disa4ever.wordpress.com/wp-admin/post.php?action=edit&post=186
Laura
Thank you very much vor this tutorial!
It will help me to Illustrate my own litte Website with my own Pictures and Graphics. I hope it will be finished soon.
I really love your work!
shirley
wow! definatly giving that a go :)
Ramalho
This tutorial is very good and came in handy because it was one my doubts. Your site is a folder of inspiration. Congratulations
Jan
Awesome tutorial Nick! Thanks for sharing this one! You’re the best!
jp
interesting~thanks for share
aşk
http://www.asklarinenguzeli.net/index.php
ohh fantastic…. wery good thnks.
bhim
so enough to see this dream tutorial
Andre
Amazing thing!
Stock Wallpapers
Great! Very good , thanks :)
CMHB
Oh I love this tutorial. Great work. I have never actually tried this effect, but this page is most certainly bookmarked now. Thanks a lot. Great work.
Brooke
Great tutorial. Use of the Warp Tool gave me some insight on how to achieve a similiar effect but with lines. I know how to do it in Illustrator but I need to find a way to make it work in Photoshop 7. Thanks!
Jan
You’re the best Nick!!!
nuke
hei,,
how to add layout for hompage?
but i must do it just for example in powerpoint…
help me pliiiish..
hheh..
Web Design Company
Hi
Great insights. This is really such nice post…
You have nicely described.
This is help to newbie those who are finding this kind of tutorial.
Keep Writing…
Simon Douglas
Great tutorial, something I’ve been trying to do for a while.
Now, all I have to figure out is how to draw the initial strip :)
iGameFlash.com
Very good tutorial , thanks
Flash Designer
Amazing stuff for vector graphics…Thanks
onlinedruckereien.info
nice tutorial. low skill level but still inspiring…
Agust Gudbjornsson
What a great tutorial, thanks allot for sharing!
calinus
great tut..
thanks!
Jeff
This is a great tut. Usually I just do this in illustrator using the envelope mesh tool. You can get some wicked awesome retro swirly loops a la’ Elliott Smith’s “Figure 8” album cover.
Nelson
I only recently discovered the warp tool myself and I must say that it is indeed useful especially when you’re into doing abstract. Awesome tutorial by the way!
Latest Gadgets
Great tutorial. bookmarking this page i’ll be back to do it myself when i get a minute
Morten Lassen (DK)
Hey!
This is a great tutorial. I didn’t believe you could make such art in Photoshop but you can. I’m really surprised!
I’ve tried it out myself but I’m having problems getting the strip shape right using the pen tool. Could you make a tutorial on how you made the shape for this piece of art or an overall tutorial that shows how you use the pen tool i PS CS3? Please? :-)
Morten Lassen (DK)
Forget the tutorial about the pen tool I suggested. I found out :-)
Nice site!
Barbie-dae
I am an old fashion artist that uses knives, brushes and tourches! I am trying to learn Photoshop 7, so this is really great info. Thank you and great success!
tamar
great!
thanx :)
MrH2o
I’m lost at step 7. “shift the selection to the left by 1 or 2 pixels” When i nudge it (arrow left) 1 step to left, I end up with a equally thick line, altho in the tutorial the line goes from thick black (1 px) to zero. Any help on this?
Michael
This was great but parts of it were baffling:
To make highlighted and glossy areas: create a round glowing circle, compress it, and rotate it in the angle according to your strip’s direction.
Vuongot
Yap, do you know how it’s great for me…
Thank you guy, this is an awesome tutorial!
E11World
Excellent tutorial!! Thank you sooo much for providing and sharing this knowledge with the world.
Roberto
Best tutorial ! Thanks
agnes
this is great tutorial.
Martijn de Valk
Nice tutorial this is my version of it. http://www.martijndevalk.nl/photo-strip.html
Nick
Thats a pretty amazing effect you’ve created there.
Although i’m not sure where i’d use it on any design at the moment I probably will in the future!
It might be quite nice to animate it a bit too…
Thanks
Jason
Is there a turorial anywhere for a noob about how to use the pen tool properly. Awesome site and awesome design. I am trying to learn how to create custom themes for wordpress so have lots to learn.
Ryan
Can You Post The Strip Part Itself As A PSD???
Please
Ralph
A nice idea, great. Ralph
Supermance
wow, awesome, tutorial ! more article like this please :)
webarticle
On webdesignerwall only the Best! Great!!!!
Seth
This is indeed a great tutorial – really useful for amateurs right through to professional graphic designers. It really gets you thinking about fresh ways in which Photoshop’s powerful functionality can be used.
I’ve added it as an extra to my Top 10 Photoshop Tutorials of 2008 list at here: http://www.kinocreative.co.uk/blog/?p=5, but only because you onlyposted it in 2009!
Ashley
I liked this tutorial!
Here’s my version,
http://aedesigns.org/images/photo_strip.jpg
Tamara Pundik
Es realmente hermoso…
Elzeth van Schalkwyk
Thanks for sharing. May the Lord bless you. regards elzeth – South Africa
themisfit
Excellent tutorial, I can’t wait to try it out.
Miss Blossom
Cool. In fact there aren’t enough o’s oin cool.
That is seriously coooooool.
Miss Blossom x
adam
wow, amazing.
great tutorial
ashok
this is very nice quit and this very good
iam seen in hyderabad (india) and i had read is tool
and how to creat the iamge
Streubie
Great Tutorial! Long time Photoshop user and designer, but I’ve never played with the warp tool quite like this before.
http://www.flickr.com/photos/7642888@N08/3290695591/
You’ve left out some of the subtle touches, but thanks to the photoshop file I got a better idea of the complete package, really appreciate having a final file to reference.
fara
thank you
this is very nice and unique
eza
nice tutorial…can u teach me on how to Create a Strip (Vector Shapes)???pls?
eza
how to make the strip???any video tutorials there pls????
Gareng
Nice tutorial … and cool pict here …
I’ll tried ….
Lorena
Fantastic!!! got to try it soon!!!
azaret
Wew…;
“good….;
>
Arun.P.S
Nice tutorial …amazing…..i like this tutorial …..
mr dung
very cool thanks share , tutorial good
Ruby
WOW!! Your tutorials are just… AMAZING!!! And all your designs! I’m going to be your fan / student!
Lou
thank you
in french please ???
je suis Lou, de france
tres jolie tuto merci, mais serait il possible de l’avoir en français ?
merciiiiiii
professional photo retouching
really nice tutorial. I will definitely use this in the course of my digital editing and retouching.
vishal
wow! What a nice and easy way to create beautiful and artistic work. Thanks for helping us with this Great Post!
Eunice
This is so good.
Thanks for this!
I wish I could master this one :)
dilan
thanks and nic
M
http://toptutorial.hu/photoshop/29-design/37-swirl-dizajn
Tijarmin
Thank you for this great tuto. I learned a lot ! See my version here, which I use as a dual display wallpaper:
http://www.flickr.com/photos/tijarmin/3407613137/
rosie
i like it
Sham
Wow!graceful and elegant:0)
Art
superb :D thank u guyz
Saw Htoo
Really useful tutorial. Thanks!
TechGirl7
This is wonderful! Thank you for sharing out! Oh, I read one of the comments on page 16 from “Lou” they may want to try google translator, I put this pages url in and it translated beautifully to French ;)
PS Website Design
What a realy useful tutorial, this is going to come in really handy for my next website design. Thanks.
Dionisie Lupanciuc
graet tutorial, thanks!
photo retouching
what a beautiful result!
Scott Birnie
This site is aving me hours of production time. I have been using Illustrator, Photoshop and all the usual suspects for years now and still finding out some truly superb techniques to speed up my workflow and continue creating powerful graphics and imagery.
Thanks Webdesignerwall! Who should I make the cheque payable too???
:-)
sandeep
excellent work of art! amalzing!!
Mona
First thing good sites … to refer ,hi i am designer i wanted create new designs every day ………..please kindy help in color and design … all short cut in key borad thank a lot to give us this site………….. :-)
mona
bala
hi dude this is really fantastic and this kind of word is matching upon you and You are the “creative student” forever and ever
thanks & regards
bala(creative student)
Nilami Karvin
Hi dude have done good job and it is really very nice to learn.
Amanda Stock
Love your site. It is beautiful and I love a lot of the functions you have on here. This tutorial is great! Keep up the great work! I will be back!
adil
coollllllllllllllllllllllllll!
oynana.com
its perfect tutorials.. i will re design my icons and logos :P
megan.kish
wicked. meLIKES.
砍柴的鲤鱼
谢谢,不知道大家能不能看懂中文,我个人(不包括我在祖国-中国)用很俗的一句话来表达我的想法:太牛B了。
Very Nice。
wnick123
我能看懂中文 呵呵
这文章确实很好很强大
Cubu
this is great tutorial! however, i don’t have the finest idea how to creat the strip outline. Would somebody be so kind to help? :)
monica
This was an AWESOME tutorial. I created a ribbon of photos for a DVD package and it turned out gorgeous. Without the sample and your perfect instructions I could never have accomplished this. Thank you so much!
wjk2813
我靠 好多中国人 真nb
great work
tt-shark
Very Cool!
stako
Veeeery nice!!
夜畔新雨
哥们 那不叫俗 在中国那句话怎么能叫俗呢
kusuma
i really love that and i will try it at home thaaaanks <3
nophe
i will try at home,,love it..
Luth Textile
nice tutorial bro!
nice blog!
Rufus
Nice tutorial. There are also some good ones at DocumentLab’s photoshop page
Thiago Holderbaum
The best film strip tutorial of the internet!!!!
Thanks!
esanstudio.net
huh…simple..
THANKS!!!!
photo manipulation
wow.. awesome,
I still have to learn a lot here :)
oh!curiouser
Great tutorial! thanks!!… i love your page ;)
preeti
very nice…..
preeti
very nice formet…..
sethu
Its excellent… good work… thank you for your great idea…
Shoshana
Thanks a lot! (: This was a great tutorial..But ii got stuck on Step 5. I’m a newbiee at Photoshop..any kind…&& ii don’t know how to add the smooth curve or mask the layer.. Please email [email protected] with the answeer! ;]]
-shoshana (;
Naughty Girl
i love this tutorial!
but my image when i warp it becomes blurry…how can i fix that????
Jonathan
You’re an excellent graphic designer, and an ever worse teacher.
“To make highlighted and glossy areas: create a round glowing circle, compress it, and rotate it in the angle according to your strip’s direction.”
Asspinchter says what?
umermasood
GRATE
mario
that’s cool design,
also the web pages.. i like the AMBIENCE it’s so cozy, not clumsy..
Luv Yach..!
cennetevi
these are awesome!
thanks for putting in the effort to get this list together
cennet
Thanks Thanks What’s the problem here? Google could bury the meager profit number from even the biggest media conglomerates.
Sameer
It very nice
thank you for keeping Download Free
Nisse
Thanks for this, wicked website design as well… good work!
Ahlem
j’aime bcq ça … c magnifique… merci bcq
jako
Cool effect, thanks for sharing.
psdlovers
cool tut..thanks for the tut :D
bagsin
Do help for me
jmutia
cool tutorial. love this site.
photo effects
very cool strip i really like it and much needed for some time finally i found it.Thnx
Web development lucknow
good tutorial,
thanks
pradeep
really wonder full/ what a amaging yar…. thank u for sharing…
Cyrus
Great , Photo Strip (Photoshop Tutorial)
Great article. CSS saved web design
Cyrus
Visit http://www.psdtoxhtmlcoder.com
rebecca
hi, i tried to do this tutorial but when i have my stacked photos it won’t let me select warp, if i bring the photos in seperately they are on different layers so i can’t select them as a group. how did you get your stacked photos to warp?
SAM
really wonder full but very easy and very creative tutorial,
Mike
cool tutorial. love this site.aa
ajampeace
luv you post..thanks for the tutorial
Christine
This is a great tutorial however…im a complete beginner in editing photos and doing all these complicated things on photoshop…I tried but i couldnt do it as professional as yours – how did you manage to wrap your phtos so neatly inside the strip guidelines?! Please help :)
Rajesh Maharjan
dear sir and madam,
a very good morning
we appreciate your website updated worldwide. please accept our heartiest reception from himalayan kingdom of Nepal.
we want to see the more & more attractive design for print advtertisement.
please demonstrate us.
regds,
rajes maharjan
maharajgung, kathmandu, nepal
[email protected]
zack
could not make the strip like i wanted, not to good wit the pen tool can u help??
prasanth
gp
Aji
Cool ! I wanna try this at home. Thanks for sharing…
diseño web
very good explanation, thanks for the contribution
Bakyavijayakumar
Thanks .it’s very useful for me . i will say again thanks…
Cliff
Very nice!…I created a similar tutorial using a 3D model of a filmstrip, which reduces the steps:
http://3dvia.tv/three-great-uses-for-3dvia-for-photoshop/
Jernej Demojzes
Great tutorial
Muhammad Usama Masood
Great Tutorial.
Ted Rex
Great tutorial to have found. I posted this as one of my three links for the day at my daily design blog: http://designthoughtfortheday.blogspot.com/
Ted
Issac Hunt
Utter Wank!
王瑞
喜欢你们的设计与技术,常来看看
haru
great tutorial.thanks
nazlı
thanks..
vipan kumar
i like this tutorial thanks
perry
i m stuck at step 5 plz reply me
lektira
i can say only one word : awesome!!!!
kristina
it’s is great article and This is very important knowledge
web art sense a leading web design company India
mehrez
very nice idea i apriciate
Aldo Yañez
Me encanto…. siempre quise hacer este efecto… Mil Gracias
vincentdresses
喜欢你们的设计与技术,常来看看
pale pasaribu
mantab!!
Buzztrip
thanks for share your knowledge.
vino
another awesome tutorial !
Sudhakar
…… awesome tutorial.
Tanzanian designer
bloody awesome tutorial. and very easy to follow! cheers
avn.rocky
Hey! Thanks, that’s really interesting – Avn
SEO Nottingham
Great post, I always wondered how this was done, I’ve seen it so many times on websites and always loved the concept, will give this photo strip tutorial a go later – great job!
Alex
Hi! Great post.
no name
thanks very much for this tutoria
Henry
wow, lots of good info cheers for the tutorial..
niliya
hi friends
check your website real value
websitereckon.com
WebsiteReckon contains a collection of useful features such as checking Google Page Rank (PR), Compete and Alexa Traffic Rank, Backlinks Checker, Server IP and Location on Google Map, DMOZ and Yahoo Directory Listings and more. You can use it for various purposes include doing research before buying or selling website; want to find out how popular the website is; use it as SEO analytic tool to improve your site performance; or just about curiosity.
sbobet
I try to follow the examples already. Results have recently been encouraging.
Web Dizajn
Oh, wow, nice one! Have to try this! :D
ktown
great tutorial. Thanks for sharing.
Danny
How do you create a round glowing circle?
Answer
Danny,
To create a round glowing circle, all you must to do is :
1-create a new layer,
2- press D on keyboard,
3-choose white for the foreground color,
4-take the gradient tool,
5-choose white to transparent,
6-choose radial gradient,
7-click and drag,
8-now you have a white glowing circle.
Answer.
Boon
very useful for me to understand the entire process! Great!
Web Design
very easy to understand…thank yoU :)
Master
Hi friend good work..
There is another one site having top page rank professional Photoshop tutorials
see link below
http://www.tutorials99.com
Hope it’s helpful!
Naomi
I have never used the pen tool before. So how do I go about drawing the beginning guidelines in step one? Does anyone have a step-by-step tutorial that I could follow? I was hoping to use it in a graduation poster I’m working on.
Other than my speed bump, this is very beautiful! I hope I can figure it out.
Jed
when i try to warp my images, and hit alt T to transform, it goes to my strip that i made with the pen…so i cant warp my image! what am i doing wrong!? thanks in advance and this is a great tutorial
Tony Photo-Restoration
Nice tutorial very creative & well explained use for the warp tool.
Aurora
i know the warp function in photoshop, but i just didn’t notice that i can actually create something like this using this feature. Nice job^.^
abdullah
it is easy.thx ı make it to.thx it is useful post and photoshop is very good.
Sam M.
Excellent Tutorial! Very Information & Intricately Detailed! Thank You for Posting.
Should Def. Check-out [ http://www.MadMediaMonkey.com ]
nidhi
love it
Elliott Benzle
Great tutorial. It helped me a lot on a current project. I appreciate it.
123thietkeweb.net
Thanks!
Very nice amazing photo.
malkovicht
great tutor, thanks :)
Web Design LA
Truly creative work. liked color combination and way of design.
Web Dizajn Studio
Very nice! :)
Thresa Marflak
Hello, i think that i saw you visited my web site so i came to “return the favor”.I’m attempting to find things to improve my website!I suppose its ok to use some of your ideas!!
AxiomDesigns
Very helpful Tutorial THX
Abhilash Thekkel
Thanks.. this is easier than i thought.
Tess
Realy nice step by step tutorial with a great end result :)
Thanks for this post.
robin
very usefull tutorial… thats great i can make something like that.., need creativity to make like this…
thanks
@meeehehe
simply marvelous. thanks :)
Caio Oliveira
Really nice tutorial, quite simple but with an awesome result.
Great website by the way.
Dr.Salt
Wish these were videos- not good at reading instructions… =[
Matt
This is a great and inspirational post. I can really visualise photos that I’ve taken in a photo strip like this. Great for displaying your portfolio in a quirky and unusual way. Thanks!
แทงบอล
this is really fantastic and this kind of word is matching upon you and You are the “creative student” forever and ever
thanks & regards
แทงบอลออนไลน์
very usefull tutorial… thats great i can make something like that.., need creativity to make like this…
thanks
ulises
gracias por el aporte
excelete desing
ulises
excelete desing
فيس بوك
wonderful and beautiful artistic design great work
Dan Flynn
Thanks! So simple and easy yet so clean and bold. That’s what I love about Apple’s design and marketing!
anndy
I have recently started using the blogengine.net and I having some problems here? in your blog you stated that we need to enable write permissions on the App_Data folder…unfortunately I don’t understand how to enable it.
pil
where can i find the tuts step by seps, because i feel like there are missing a few steps, like the one at the beginning, how can i stack the first 3 pictures, cuz i do it but then when i have to apply the transform tool, it only apply for the vector but not for the picture,
TY
sbobet
Thanks for the knowledge to guide
Ramsey Mike
Simply brilliant, I need to improve my PS skills for sure. I only use it to do simple image alterations, like cropping and resizing :)
Pandion
Great tutorial. Thank you so much and keep up the good work.
Premier pixels
Its really great and very usefull.
Melvins
Yes it looks like amazing. I got one new idea on designing and it increases my creativity. Thanks for sharing.
Los Angeles Web Design
webl development
really very nice information sharing and i am looking for such type of informative news and i get through this blog so i am very much thankful to you.
Zaros
Brilliant guide, very simple to use, even if Photoshop isn’t.
seoart
Спасибо за отличный урок. Все описано доступно и понятно. Я думаю что эти уроки воспримут к обучению все.
Henry Peise
The modern and delicate makes iphone 4 white so charming that even me, want to own one. But what i can do now, is to wait the price to decline.
Juno Mindoes
People die for iphone 4 white is understandable, isn’t it? The reason is quite simple, We all want to be differnt!
yagizcan
easy project tutorial, im try before and share facebook. Like it, thank you.
Uçak Bileti
photoshop u seviyorum
abi
Merci Beaucoup!!!!!!!!!!!!!!
formula 21
Brilliant guide, very simple to use, even if Photoshop isn’t.
punic
very usefull tutorial… thats great i can make something like that.. sbobet
altın çilek
Just saying thanks will not just be enough, for the exceptional lucidity in your writing.
Mansi
Really enjoyed trying this out… tks
Mini projects
Thats amazing tutor. Steps are explained very clearly. Thanks for sharing your design knowledge.
pechat-na-paketah
Really enjoyed trying this out
nathan
i need help…after i made my shapes with the pen tool and then stacked my pictures…when i go to warp the pictures, i end up warping the shapes and not the pictures…can you help me?
cheap christian louboutins
with the help of it, we can clear christian louboutin high heels open which a door.
Andrea
In step 5 when I put the gradient what do I have to do? do I lower the opacity? do i blend it? please help
tutooos
tnks , merci pour le cours , vous pouvez voire le tuto en francais je fé une tradiction de ce cours
Damon
Wow thanks for the tutorial! This will save my ass for my girlfriend’s birthday =)
fatih
peh gözel oluf canıım
IBCBET
That’s very amazing for tutor. Steps are explained for people is clear !!!
efekphotoshop dot com
wow…it’s very unusual. I’ll try it now! thank you very much. i very like your blog..
carrie
Never thought we can do it so easily like this. great blog will keep visiting for my design requirements. Thanks people.
complex41
And then he handed you the thirty-five 45
reza
very good tanksssssssssssssss…..
vipin
super…, thanksssssss……..
Mahad
Great work….nice tutorial….Thanksssss!!!!
Lida Ebbett
Netbest Shopping
pakDE-Nanto
Waoow… simple steps but excelent End…..
I like it so much….
That’s inspiring me….
graphic design los angeles
nice tut
DJA28
Nice Job…… :D
hakem
hi
BB
this would be much easier to make in 3d.
Joomla Templates
great tutorial keep it up
bitkisel
Thank you Thank you!asee
johnny k
This tut is great, as well as the other you do. Thanks for taking the time to put it together and sharing. Some good tips in it.
Graphic Web Design rochester, NY
Millard Minkel
whoah this weblog is wonderful i like reading your articles. Keep up the good work! You already know, lots of people are searching round for this information, you can help them greatly.
Manchester Design Ltd
Great tutorial this, have utilised it on a few advert designs myself – Great work, thank you.
Webdesign
nice tutorial, i seriously gonna use it in the future
victoria
how do you compress the circle?
yates en Ibiza
Thanks for taking the time to put it together and sharing. Some good tips in it.
Dman
Thank you so much! I love this concept and used on a poster for my school. Wonderful stuff!
Kazi Md.Mahaseen
It’s nice & easy to make a photo stip, thanks
breathtaking images
This is such an awesome idea, thanks for posting it! I will definitely be trying my hand at this later.
Wow
amazing
used it
LOVED IT