Have you been missing out the Illustrator Effects? Did you know it is a powerful tool for creating symmetrical shapes or adding texture to vector paths? For example, with just one simple effect, you can turn a polygon path into a flower shape. You can also make paths look sketchy with the Scribble effect. Read this tutorial to learn how to save time by using Illustrator Effects and work more efficient.
Arrowheads
Let’s start with a basic effect, the Add Arrowheads. Use the Pen Tool or Line Segment Tool to draw a straight line. Go to Effects > Stylize > Add Arrowheads and choose a style.
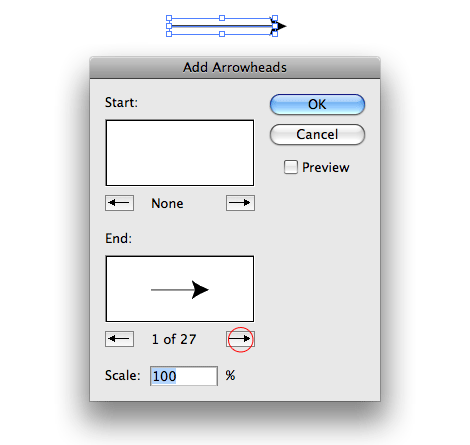
Appearance
The great thing about using Illustrator Effect is the ease of changing its appearance. In the Appearance palette, click on the Add Arrowheads layer, now you can easily change the result by selecting different arrow style. This effect is very useful for drawing diagrams.

Without The Effect?
Without the effect, the arrow shape will get distorted when the line is stretched. With the effect, I can easily adjust the length of the arrow without distorting it.

Round Corners
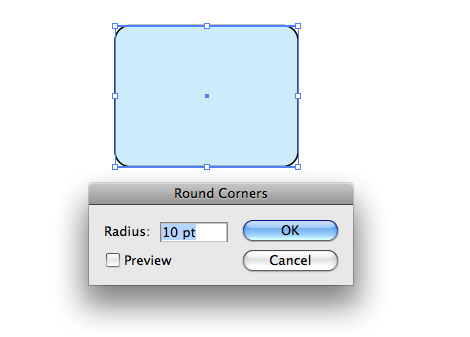
Draw a rectangle shape, go to Effects > Stylize > Round Corners and enter a radius value.
Without The Round Corners Effect?
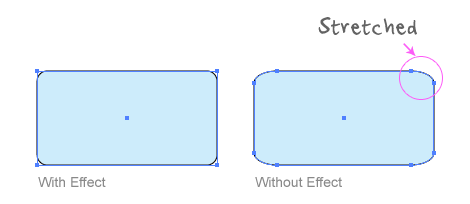
Round Corners is one of my favorite effects. It is my essential tool for designing icons. Not only it can prevent the round corners to be distorted when I stretch the object, it also saves me a lot of time. Could you imagine how long it will take to draw these perfect round corners without the effect?
![]()
Zig Zag Effect
Draw a straight line, go to Effects > Distort & Transform > Zig Zag and enter a value for Size and Ridge Per Segment.
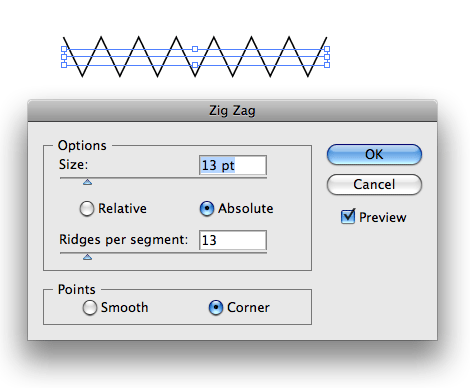
Wavy Line
Draw a straight line, apply the Zig Zag effect, select Smooth Points, and you will get a symmetric wavy line.

Badges
Draw a circle and apply the Zig Zag effect with the setting as shown and you will get a badge shape.

Play around with the Zig Zag options and you may get these shapes:

Pucker & Bloat Effect
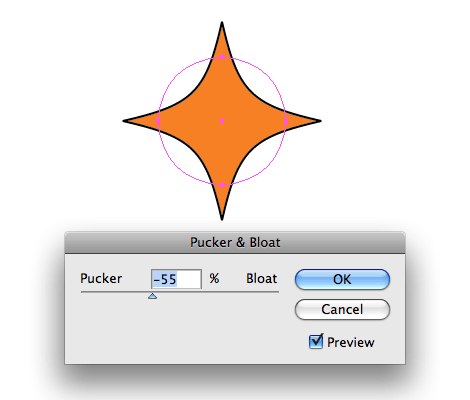
Draw a circle, go to Effects > Distort & Transform > Pucker & Bloat, enter -55% (Pucker), and you will get a diamond shape.
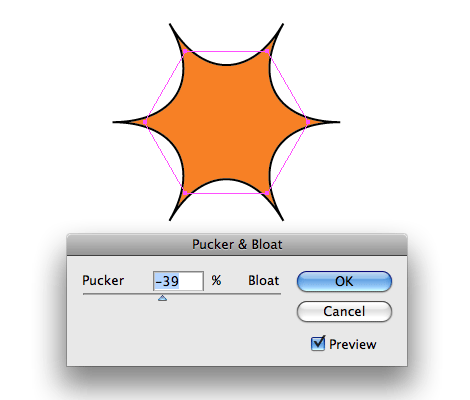
Draw a polygon shape, apply the pucker effect, and you will get this shape:
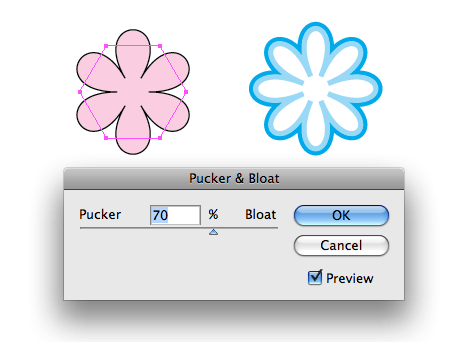
With the same object, change the Pucker & Bloat option to 70%, and you will get a flower shape.
Transform Effect
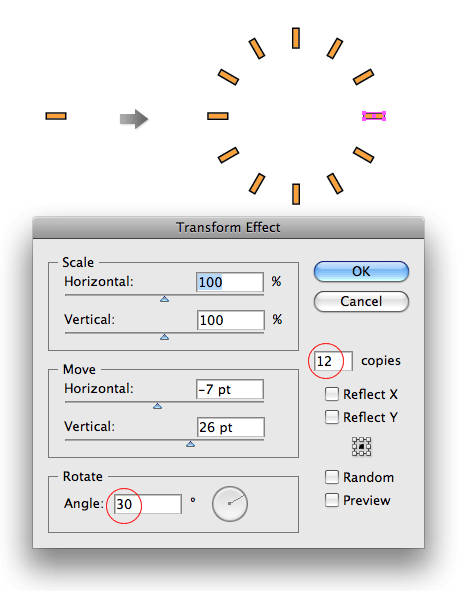
The example below shows how I can duplicate 12 copies of the object (in increment of 30 degree angle) with the Transform effect.
Play around with the shape and Transform setting, you may get the following:

Roughen Effect
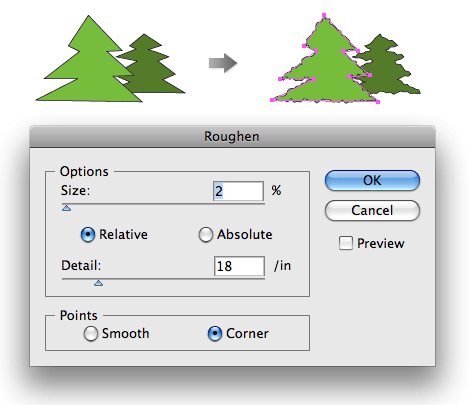
With the Roughen Effect, I can make the trees look more realistic.
Scribble Effect
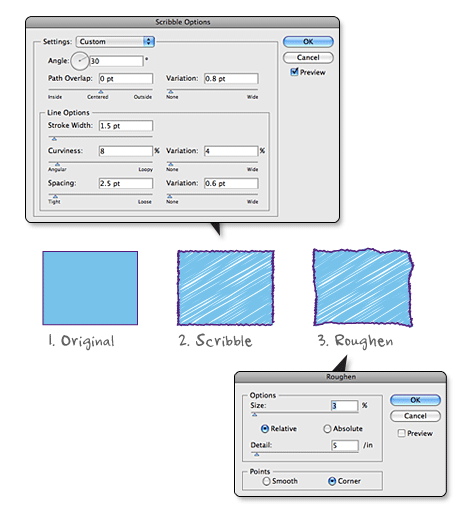
The example below shows how you can create a sketchy effect combining the Scribble and the Roughen effect. First apply the Scribble effect (Effects > Stylize > Scribble) and then apply the Roughen effect as shown.
Sketchy Icons
If you are constantly using the same effect, it is wiser to use the Graphic Styles to save time and maintain consistency.
![]()
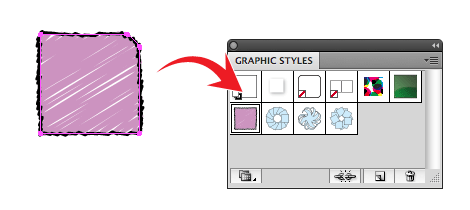
After you’ve done the inital sketchy style, drag the object to the Graphic Styles palette to create a new Graphic Style.
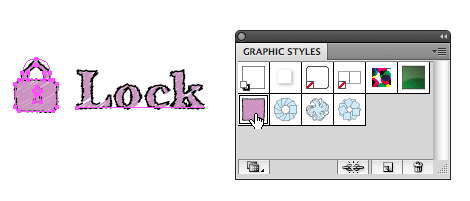
Now, select the object(s) where you want to apply the styles. Then, click on the Graphic Style that you’ve just created. Change the fill and stroke color if you want. Don’t forget you can also apply it to text, which remain editable.
Conclusion (There Are More…)
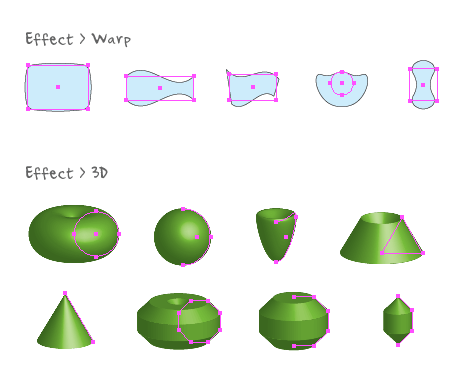
I’ve only showed the basic Illustrator effects. There are actually more cool and useful effects. Don’t be afraid to explore the effect menu and experiment with the other effects such as the Warp and 3D.
Tips For Using Illustrator Effect
- Graphic Styles – save time by using Graphic Styles.
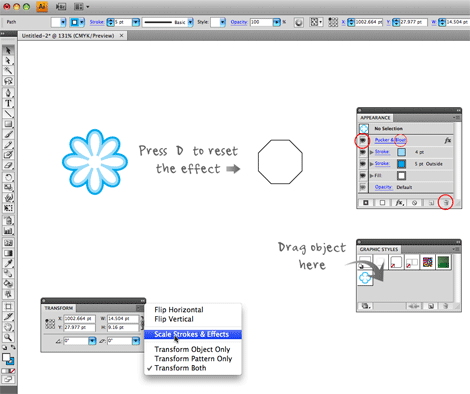
- Scale Strokes and Effects – you can toggle Scale Strokes and Effects option via the Transform palette.
- Appearance Palette – you can turn effect layer on/off or remove it. Double-click on the effect layer to open the option dialog.
- Press D to quickly remove all effects.
- Expand Appearance – if you want to expand the appearance into paths, go to Object > Expand Appearance. Note: once the effect is expanded, it will become ineditable.
Download The Source File
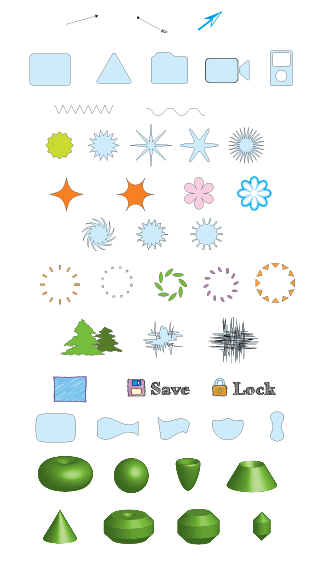
You may download the Illustrator file (CS2) that is used in this tutorial for your learning purposes.
Krazim
That’s really cool! Thanks for the tips! :)
Grafiko
Very useful refresher. thanks for sharing
mauricio
GREAT!
I always wanted to use illustrator, do you recommend a beginners book? and also a beginners book for photoshop? thanks
mikw
really brilliant and simple article
Surya
great tutorial..
thanks
Nick Yeoman
Great, I love tutorials that are actually useful.
Anubis
Thanks so much for your tutorials, I learn so much!
Josh
Good to know! Thanks!
Almog Koren
Thanks really good
Todd
Great post! Its the little tips that make the big difference. This will help in creating seals, badges, and other symmetrical illustrations.
Manuel
Still Illustrator keeps the status of adobe enemy no. 1!
illu could be such a sweet program…
but I’m happy to see some ppl are able to actually work with this program;)
thanks for the advices, they’re all nice and good 2 know.
Ben
Whoa Whoa Whoa! This is awesome! I had this client who used another designer who made this great chalk board effect which I couldn’t figure out how to replicate and I’m 99% the scribble/roughen business is how they did it! Thanks for the amazing post!
Calvin Tennant
I’ve never actually messed around in the Illustrator effects. Seems like I should.
Matthew James Taylor
Wow these are great. Perfect for drawing complicated diagrams and illustrations.
Ebi Atawodi
I just discovered the power of these in may, thanks a lot for making a comprehensive list of the basics! Delicious I shall!
Dainis Graveris
beautiful and simple tutorial, I didn’t know about lot of those small features, big thanks explaining them :)
Pu
great, thanks for your support
夜畔新雨
very nice~expecting more wonderful things from you
Cody
I like this guide…..well I mean I like most of the tutorials here. Many were not found elsewhere. thanks
Brock Angelo
I’m just opening Illustrator, having always been a photoshop person – very helpful walk through – nice job
Mick
I really really like every your articles !!!!!!!!!!!!!!!!!!!!!!!!!!!!!!!!!!!!
Chad Jewsbury
This is so useful right now!! Wow… I’m designing my wedding invitations and website – needing to build some simple flowers etc and this saves me a lot of time.
We’re using photoshop and illustrator together.. Maybe sometime soon you could do a tutorial on linking between the two for one project. I’m having trouble getting what I create in AI to go into Ps correctly… I know it’s supposed to be simple but I’m a newb. :)
Any advice or posts would be great!
And thank for this one.
Ronen
Great post. I’ve only just now transfer myself from freehand to illustrator and there are lot’s of stuff that aren’t working the way it “should”. This post solved a lot of these problems, and gave me good tools for the future.
keep up the good work.
Arian
These will definitely save me a lot more time :D Thanks!
Matt89fe
Nice!! Thank you!!
lisa
it is wonderful, I always learn a lot from here, Thanks and keep going.
Lastwebdesigner
Great! as usual ..
Thanks Nick!
yuyu
Nice article! Thanks!
Hendrik
Nice collection – maybe i finally try to get into Illustrator … time to get the dust of my wacom tablet :)
Nikolai
So clear, easy to read and inspiring! Thank you for doing this.
liloo
tnks!
i didnt know the 3d efect could do that
Chris
These are great tips that anyone using Illustrator should familiarize themselves with. Thanks again for the post.
hagi
great nickk – thanks for sharing this. i love your work
Jorgen
These are absolutely fabolous! Love the sweet, quick format they are presented in. Great job! :-)
Jacque
hey thanks for the tips, i’m just starting out with illustrator and I’ll be sure to use these tips for my next design :]
Sun
Duh! Didnt even know about these! thanks a lot! :D
Flash Designer
thanks great tut
Manuel
oh Thanks… Some interesting things I didn’t know yet.
SaraMac
“Could you imagine how long it will take to draw these perfect round corners without the effect?”
Um…. the same amount of time. While the rounded corners effect may be good if you need to alter the proportions of your object, the Rounded Rectangle Tool works just fine. If using the effect, don’t forget to go to Object -> Expand Appearance once you have your object the way you want it. The rounded corners effect doesn’t always play nice.
john steinkamp
I knew about a few of these but I definitely got a good few tips from this, thank you and keep up the good work
Andy Sowards
These are awesome!
Keep up the good work!
Krystal
I love your layout! it’s really cool! i especially like the background and how it’s paper! ;D
that’s an amazing effect!! did you make it using photoshop? or use it i mean lol! i wanna try it :)
Robert
Arrows, transform effect? Where were you 8 months ago? Ah! thanks for the knowledge!!!
Francois Royer Mireault
Thanks again. I always work with photoshop and you gave me a good teaser of Illustrator with these effects.
Juan
very nice tips, great tut!!!!!
thanks!!!
games
brilliant post, very useful to me , really great work.
Vector Ornament
Thanks for the great tutorial!
katef
I am just beginning to learn illustrator and this is just an awesome tute! thanks!
shravan Mishra
Very useful in creating icons.
Kristin
great! thx
Elizabeth K. Barone
You’ve just inspired me to start playing with Illustrator again. (If only I had more time!)
Thank you for posting this. I really love this site and didn’t want to give it up. I do understand that you’re busy but the giveaways were starting to get a bit excessive. In my opinion, a simple tutorial or link collection is the best giveaway possible.
Anistock
lovely layouts and tips, like it
Sklep zoologiczny
Simple yet powerful examples. Thanks a lot!
Shane
Very interesting overview. I still think that Illustrator is an underrated and somewhat neglected tool in web design.
Thanks a lot for the post.
pandita
:O is great!! thanks :)
Kooldesigning
Great work and too helpful
thanks!
Chase
Great tips!
Illustrator Effects are a great way to save time and concentrate more on the overall vision, not have to sweat the actual implementation. Great advice!
Vim
I’m not really that good with using illustrator, but these tutorials will be a starting point for me to get the jist of illustrator.
Jack
Very nice indeed Nick, thanks a lot for these.
arhcamt
wonderful! thanks for sharing. :)
Sylvia
Thank you very much for your tips, they`re really cool!!!
De-Light
Hello there.
Very interested about visual effects. And also I’m looking for a web-designer, logo-designer (any country) with any kind of experience.
To contact with me use the contact form page “Contact us” at our web-site.
De-Light
Sorry, didn’t find the Jobs wall for a first time.
Artur K
Very useful and great tutorial. Thanks!
T
God bless you! Looove these tips. I’ve been wondering about a couple of them for a while. I actually printed this off to read on the tube home.
aym
This really helped ALOT!!!!!
I knew the 3D stuff, but not that simple stuff like rounded corners, actually!!!
Kayla
Wow, amazing stuff. I’m just now really getting into Illustrator, so this post is incredibly helpful. Thanks for all this!
Chris Robinson
Nice, didn’t know about the round corners effect. Definitely something I could have used last week.
cash for clunkers
That is absolutely amazing! I had no idea you could do all that in Illustrator.
Lisa
This is really interesting. Thank you for telling us about it!
David
Great Tips, Keep up the good work !
ZZX
cool
Anunay
hey. this is soo cool. thanks!
a great tutorial. :D
diseño de grafico
Great blog! thanks from argentina
Calgary Graphic Design
Mmm Illustrator! Thanks for the tips. I’ve dabbled in the effects, but never dove right in.
Prasad
Thanks a lot for the tips
Prasad
sam
truely wonderful tips!
keidi
Q effects and thanks for this, I can review my AI now.
nandha - India.
Very useful tip, great !
Thanks for sharing.
seraphangel
thanks for some interesting and useful tips, will try some of them out
Cyclonic
I usually find that using the offset path effect twice (once in with “Miter”, once out with “Round”) usually has better results than the round corners effect (the round corners effect messes up when the sides are curved). The only problem with offset path is it doesn’t work for concave shapes.
acı cehre
Thank you for your explanation
Lily
This is a great tutorial! Very detailed and well-explained.
It really helped me.
Zia Rahman
I was looking for this. Thanks.
Kaplang
thanks for the great tips :)
Manuel
thanks for explaining all the tricks – i improved my skills a lot :)
losteyes
hello.
RaphaelDDL
Very nice tutorial Nick!
Damn, now that i read your tuto, reminds me that i’ve lost lot of time trying to make those effects by hand :/
Well, at least i know the hard way now lol.
Regards,
Raphael DDL
Amy Haynes
Great tutorial! I really like the detail that you provide. I find many tutorials are rushed and skip steps on their screenshots, etc. I will definitely recommend and forward. @eyesocketnet
Jon
there are some good treasures in here. thanks!
Unleashed - Portland Web Design
Thanks for all the greats tips!
Kaplang
thanks for taking the time to create this tutorial, it is well worth the read :)
Keane
Great tutorial! Very helpful! :)
cennetevi
these are awesome!
thanks for putting in the effort to get this list together
cennetevi
these are awesome!
thanks for putting in the effort to get this list together http://www.cennet.gen.tr
Don
Great and simple, mastering these simple techniques will lead you to be a great AI guru someday. Thanks for sharing, I’m planning to change to Illustrator soon for now i still using my dear FW – Don
Michèle
I really appreciate you putting all the work into this tutorial. It is totally awesome! The course on Illustrator I have taken doesn’t even touch on many of these tasks! This far surpasses the course in visual & explanation on how-to without all the fluffy stuff! Many Thanx!
jaki
this is wonderful – thank you! i’m actually just learning illustrator at work and was finding it very difficult…..this tut alone has shown me how to do some of the things i’ve wanted! very clear and concise and i’m having a ball!
Sofia Wirberg
Great tutorial. Thank you! Just one thing missing. How do you create the two strokes (light and dark blue) on the polygon flower?
Cyprian Gwóźdź
This is awesome!
This quick review thought me second time on webdesignerwall a lot and will probably save lots of my time in the future.
Randi
Super easy to get started in Illustrator with effects! Thanks !
Design Wannabe
Thanks for the tut! Its Fab.
LarryLar
Sweet. Great tips. How do you find the time to do so much.
Allan de Ramos
For a newbie in Illustrator, these tips will surely help me lot!! Many thanks!!
凡旗
this web is very beautiful.
I want learning now.
good~~~~
Cookie Creative - Graphic Design Manchester
Appreciated thanks, :)
lombok island
it’s fantastic i have try to learn it but it still hard for me
keici
Interesting tuts. nice site.
wien
thank u for this post.
very helpful.
abdul
awesome and you make it look real easy.nice, real nice man.
THANKS
bagsin
Super easy
TCW
Thanks! “step by step” Illustrator.
lee
hi all iam having trouble with my site http://www.diyanswerdirect.com and need some help with the xhtml on it. I have 54 warnings when i try to verify it iam using site builder with yahoo and cant see the html all i can see is the files in my site. my question is how do i solve this problem is there any webpage anyone knoes of that can give me some advice thankyou lee
Anna
Great tutorial, I didn’t know how helpful these effect are! I’ve been struggling with round corners and arrowheads so far. Thanks a lot! :)
David
Great info and really helpful for me as I try to get to grips with Illustrator. Very clearly presented, well done :-)
rikuka
These are wonderful & extremely helpful! Thanks so much :)
sofi
this is perfect! little things like these keep me going after hours of trying things out :)
purplerain
they layout and steps are so easy to follow. these are awsome
Lindsay
Thank you for this guide. I am bookmarking it. I’m teaching myself illustrator and would be lost without tutorials like these. It’s nothing like photoshop. Not a lot of the commands seem to be intuitively named and it’s definitely less user friendly than photoshop. I refuse to give up nonetheless. Thanks again.
Kate Nickerson
Very inspiring post, thank you!
Jesse Wall
Thanks for the refresher1
Mike
Great tutorial, I didn’t know how helpful these effect are!
RJ
for beginner..this is great! tnx
yoshi
for beginner..this is great! tnx
Al
Thanks for this tutorial, it will certainly save a lot of time for this novice!
Birgit
Your article is like an eye-opener to me. Amazing to see how simple it is to create stunning effects in Illustrator!
Thanks for the great tutorial!
acai
My company is starting a complete re-brand for all of our products and this would be most helpful to the development cycle.
himanshu
mast hai bidu…..
John Willemse
Thanks a lot for this useful information!
vincentdresses
喜欢你们的设计与技术,常来看看
Meghan B
What an amazing tutorial! Thanks very much.
Imran Subhani
lovely and awesome tutorial … thanks
harry
nice.. thanks for the informations
Ruddes
thanks for the useful lesson!
octoz
nice lesson
Michelle
You’ve opened my eyes to faster, easier, more efficient ways of doing things! I was doing it the hard way and often avoided using Illustrator altogether if I could. Awesome, thanks!
branquito
very good my friend, thanks ;)
bert
The round-corner effect is even worse than normal corner radius-entry. The effect is mathematically complete nonsense. The radius depends on the angle and is not constant. Best thing to draw rounded corners, is to draw them in applications that do work on this subject: Freehand or Autocad. Forget it in Illustrator.
redtank
How do you apply the effect, so that you can see the vector lines of the finished object and continue editing?
Thanks
diş beyazlatma
re lovely and awesome tutorial thanks
Kelly
oh my god, you just saved me a ton of time and I ended up with a much nicer wavy line! Thank you!!
Ali Çınkı
Thank you very much. It is a wonderfull share.
Sandee
OMG!!! Thanks so much for sharing this – talk about saving a life?! I had no idea Illustrator could do this – I was taught Photoshop at college, but illustrator seems to offer so much more if you’re trying to do patterns and prints!
You are awesome!
ps. found you via: Leo on the Loose
Web Design
wonderful share…thank you for sharing
Progs4u
Thank you so much ..
You are very cool
Kristin
Hi, I am trying to figure out how to acheive transform effect for CS5. I want to create a perfect ring of circles. Help:) HTanks
jithesh
Beautiful Great
Taulant
Thanks for sharing this tutorial.I also had a question regarding the distortion tool:
How can I turn a distorted object into an outlined object?
The path/outline command doesn’t seem to work on them.
ايفون
by doing this way it saves time more than any other way thank you
David Brown
Thanks for Sharing this Tuotorial. We Are Professional Web graphic Designer and Developer.
they are very helpful us.
Thanks
Giselle
Wonderful tips. Very useful! Thanks so much.
Melvins
Very helpful points as a designing point of view. Thanks for upgrading my knowledge.
Los Angeles Web Design
Nima
very
rizalmovic
wow.. thank you so much for this tips.. :D
Henry Peise
Don’t you attract by the elegant white iphone 4? But its likely to release untile next summer! What’s worse, it is said it may not release at all! What a pity!
Juno Mindoes
At 7 June, 2010, the latest iphone 4 generation was announced. It’s been a high time to get the iphone 4 white, or we may lost the fashion trend. Don’t we?
Michele
Thank you for this tutorial! All of the tips are very useful and will definitely save time in the design process.
Uçak Bileti
bende hep merak ederdim bunlar nasıl yapılıyor diye
Ben
Your position on it is diametrically contradicted to what I read earlier.
altın çilek
That’s Great! Thanks for the post!
hcg damla
Wonderful tips. Very useful! Thanks so much.
Edward Ridding
I think you have just trippled my illustrator skills!!!!
Mark Hamilton
Good tips and nicely presented. Will share it with our team of Web Designer in London & yes nice compilation and thanks for that hard work.
Peter
Truly a master illustrator tips from you . I will keep coming back.
Pawan kumar rai
Very helpful points as a designing point of view. Thanks for upgrading my knowledge.
Thank you for your turorial in orignal illustrator very very helpful in simple
panax clavis
I always follow your site thank you
ORJİNAL PEMBE MASKE
good site thankss
SEO
Is a program that can design a variety of styles, very interesting.
Burt
Whoa… Thanks heaps for posting this. It is really inspiring. I tried illustrating a mascot design for a project of mine and couldn’t seem to get it right. In the end I decided on getting some professional help. The designers at http://www.mascotdesigncorner.com managed to realize my vision of illustrating a character design that was above expectations. I highly recommend them. For the price I paid it was indeed a steal. I guess I am not good at designing at all. Anyway, thanks for providing a source of inspiration I might add. This site rocks big time…
xbox 360
The program is very popular today.
shubham
nice site liked it…….
pembe maske
Thanks heaps for posting this.
วิธีลง App iPhone
how to install app iphone 4
pankaj
this is very easy but this software is not supports for print positive film
print how to use for printouts & other
Best Small Dog Breeds
Thank you for Illustrator Effects.
Verma
Great.
Najmudheen
Thank You For Illustrator Basic Effects
กลูต้าไธโอน
Thank you very much. Boost up my design layout.
spring valley vitamins
definitely, a BIG BIG deals.thx, for article
Marjie
Thank you so much – your ‘Press D’ just prevented a bald spot I was working on from ripping out my hair to get that bloody rounded corer effect to turn off!!! Merci!
MOhammed naser
THanks For Helping Me, Dude
Jennifer M.
Ooh thank you! You’ve given me a lot of good ideas.
Nand Kishor
This is time saving lesson for illustrator …
Amit Kumar
IT’S NICE IMAGE
sidd
Thank you,
And looking for more usfull tips and tricks.
Thank you,
Sidhu
quick cash loans bad credit
I pay a quick visit everyday some web pages and blogs to read content,
however this web site offers feature based articles.
Claudio
Nice article, lack of the Outline Object and Object Stroke effects that are a little hard to explain..
Jacob
great tutorials, thank you! :D
Pinaki
your tutorials help me a lot, thank you :)
ganesh
Thanks
Bill Nguyen
Thanks a lot.
raman somarajan
Thank you Sir,
I started practising
very useful and simple tutorial