Inserting icon fonts to your layouts adds fun visual queues for your users and are especially successful as menu links or as replacements for larger graphics. Like standalone SVG files, they can be scaled losslessly and manipulated with CSS for easier customization. Icon fonts are normally displayed by including an icon font stylesheet, then inserting an HTML element where the icon should appear, such as <span class="icon123"> or <i class="xyz">, but using the HTML method is not always possible. This quick tip will show you how to add icon fonts to any element in your site safely with just CSS.
Install Your Icon Font
Before you jump into adding icons, you’ll need to choose an icon font library to use, such as Font Awesome or Themify Icons.
There are a couple ways to go about adding icon font libraries to your website:
- Including a remote library (popular)
- Downloading and hosting it yourself (best performance)
Themify WordPress themes already come with both FontAwesome and Themify Fonts installed. Learn more about Font Awesome install options or learn more about Themify Icon install options.
Exercise – Adding Icons to Menu Links
In the following demo, I’ve included the Font Awesome library and an example menu styled three different ways to show how you can add icons before (or after) the link, or replace the link with an icon.
![]()
Step 1 – Get Your Element’s Selector
The CSS3 pseudo-element ::before will place the icon before the link text.
In this example, the ID selector for the menu’s home link is #menu-link-1 which you can see by right-clicking the link and choosing Inspect in the browser menu.
![]()
The combined selector looks like this:
#menu-item-1 a::before{ }
You can also use the ::after pseudo-element to place an icon after the link text.
Here is a look at the menu HTML and CSS together:
...
  <ul>
    <li id="menu-link-1"><a href="#">Home</a></li>
    <li id="menu-link-2"><a href="#">About</a></li>
    <li id="menu-link-3"><a href="#">Contact</a></li>
    </ul>
</section>
    <style>
    /* icon-added icon styles */
    #icon-added a::before{
      padding-right: 10px;
      font-family: "FontAwesome"
    }

    #menu-link-1 a::before{
      content: "\f015";
    }
    #menu-link-2 a::before{
      content: "\f2b9";
    }
    #menu-link-3 a::before{
      content: "\f0e0";
    }
    </style>
Step 2 - Drop In The Icon
There are only two critical pieces you need to get an icon font to display: the icon's unicode number, and the font-family, which is always "FontAwesome" for Font Awesome, or "themify" for Themify Icons.
font-family
Since this menu has an ID of "icon-added" we can use that ID to set a font family once for all links inside it that have a ::before pseudo-element.
#icon-added a::before{
  padding-right: 10px;
  font-family: "FontAwesome";
}
content
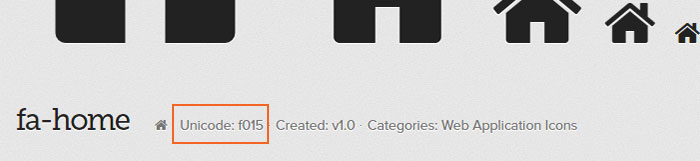
The icon is rendered in CSS by setting the content property to the icon's Unicode or ISO number. This number is listed at the top of each icon's detail page on the Font Awesome website:
You can also find this number by right-clicking an icon, such as those on the Themify Icons page, expanding the HTML to find the ::before element, then looking at the CSS style:
![]()
#menu-link-1 a::before{
    content: "\f015";
}
This will place the house before the Home text in the menu link.
![]()
That's all there is to it!
Replacing Links With Icons
If you want to hide the text inside the link so only the icon appears, you can use this little trick. This technique can be applied to many different HTML elements and their content where you want to use an icon font, such as replacing images, sprites or spans.
First, we restyle the menu's default links:
#icon-replace a{
  color: transparent;
  overflow: hidden;
  max-height: 40px;
  width: 16px;
}
- The
transparentvalue forcoloris a safety measure in case the link text peeks out on a specific display. - The
overflowandwidthresize the link element so only the icon is visible, andmax-heightensures the link element doesn't expand if the link text wraps(set here to the same value as the menu's originalheight).
The font family and icon unicode are declared the same as in the last example:
#icon-replace a::before{
  font-family: "FontAwesome";
}
#menu-link-4 a::before{
  content: "\f015";
}
![]()
Extra Tip: Icon Hover States
To apply a specific hover color to the icon, you can combine the :hover pseudo-selector with the ::before pseudo-element like this:
#icon-replace a:hover::before{
   color: #0CF;
}
To learn more about styling icons, or implementing them through custom HTML, see FontAwesome Examples
John
Don’t use icon fonts, use svgs instead. This has been common knowledge for some time now.
Nick La
If you use a lot of icons, using icon font can reduce http requests.
Alex
@Nick La – Use svg sprites
Hans Koch
SVG spritesheets or HTTP/2 ;)
Jess
SVG sprite sheets solve that issue :)
rkgttr
No Nick. The correct way to use a SVG icons system is to have all your icons defined as symbols in a single SVG file. So a single HTTP request is needed. These icons are then referenced (using the tag) into inline SVG elements in your markup.
Joost
Use an SVG-sprite in that case…
John
If you use a lot of icons, you can generate an SVG sprite using the build tool of your choice that bundles them as symbols. You can then access said icons via .
I’ll admit that you will still need BoomSVGLoader or a similar solution to have it work with an external sprite and still have it cacheable, but the solution in itself is far superior to icon fonts which have a ton of accessibility and rendering issues.
Nick La
SVG-sprite is only good for custom/client sites when you have the exact icons. For WordPress themes that we do at Themify, icon font is the best solution because users can pick any icon and manipulate the color/size, etc. It depends on the situation and purpose.
John
You can manipulate everything on an SVG with CSS/JavaScript: color, shape, visibility, You can have multiple colors without hacks and umsupported ligature features and you’re not leaving people with disabilities in the cold.
I advise you read up on SVG. Read Sara Soueidan’s blog or Chris Coyier’s book on SVG and you’ll quickly realise there’s no upside to fonts over SVG for icons.
Johnny
Yesss!!! Thank you! I’ve been trying to figure this out!
L. Pillai
What are SVGS? Why are they better than icons?
John
Ok, let’s try that again:
<svg><use xlink:href="#id-of-symbol /></svg>
of if that doesn’t work the following pseudo-code: svg – use xlink:href=”#id-of-symbol – /svg
Vail Joy
While this tutorial is aimed at cases where you need to modify existing markup (where injecting an SVG via CSS is not always possible or easily understood by everyone), I wanted to mention that Font Awesome 5 will be introducing an SVG framework for who like to use them, which will be as easily to implement as standard
itags. For those of you who are unsure what SVGs are and why there is debate over them, designer Ben Frain offers a balanced argument for why Icon Fonts are still viable, especially for the average web person, and is an excellent place to add your input on the debate: https://benfrain.com/seriously-use-icon-fonts/If you do have an SVG or SVG sprite you want to use in this way, you can use a pseudo element in much the same way by either setting the
contentproperty to the SVG url like this:or by setting a background declaration as shown in this codepen.