by: Neil Duerden
Right time to go into Photoshop and create a "simple" moody image using loads of simple effects to create an image with depth and composition. This is simpler than you think but can demand a lot from your system. You will be switching between Illustrator, Photoshop, Painter and throwing a few hand rendered elements in just for good measure so put the kettle on, sit back and get ready to begin!
Step 1
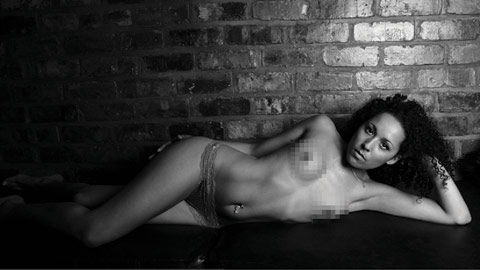
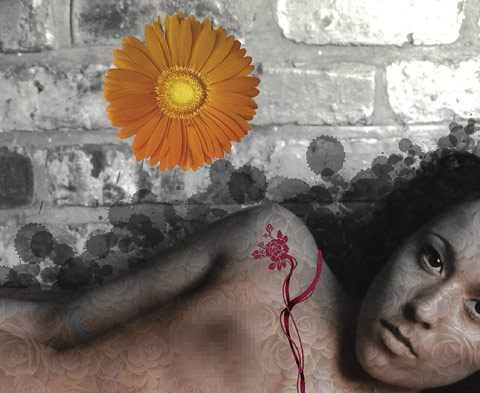
Obtain a mono shot which has good deal of contrast, the shot can have a background or be on an infinity screen, each will give a different feeling to the final piece. Your main task here is to find a shot you like as you will be staring at it for some time.
Step 2
Mask off the subject as tightly as possible, do this by creating a duplicate layer and adding a layer mask set to reveal all. Next select the mask itself and draw around the image you wish to keep. You can use feather edge brushes to allow semi transparent edges. Alternatively use a piece of masking software like Ez mask, a lot easier!

Step 3
Now add a layer in between your two existing layers and add a splash of colour, simply add a gradient of your chosen colour to create a little contrast and simply use the hue command in the layer effects. Don’t make this too obvious as the effect should be subtle.

Step 4
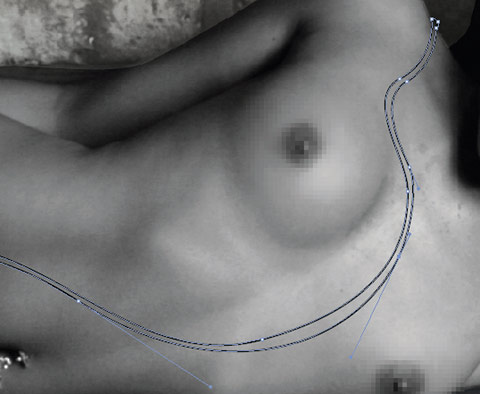
Now switch your image into Illustrator. Just open up the image and begin to draw vector lines over the top. Remember to place it on a separate layer and lock it down before you start as to move the image and continue to draw your vectors is not good! Draw whatever you fancy and is fitting with your chosen image as this is where you stamp your mark on the piece.
Step 5
If you have kept the original the same size in Illustrator all you need to do is paste it in and it will be the correct size in photoshop. Also if you are not happy with the colour simply adjust the hue via the Hue and Saturation command in the Image > Adjustment > Hue and Saturation
Step 6
Now highlight vectors using the burn brush, use this to give added depth and vary the brush size to get the best possible result. You want to make this in between looking real and plastic false to help it stand out from the original layer. This will obviously differ depending on what you used as a base image.
Step 7
Dupe up the top layer of the subject and then adjust the Hue and Saturation as in step 5, find a colour that matches the composition of your piece. Then add more sections to your layer mask to hide areas and give more interest to the viewer. Use your own personal judgement here and don’t be shy!

Step 8
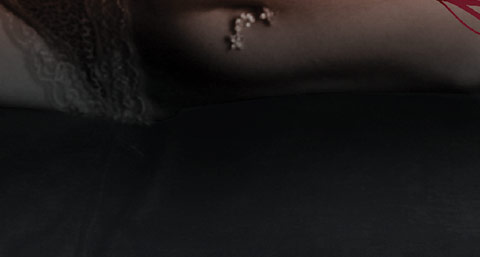
Now freehand draw a shadow beneath the model and using the layer effect multiply place one below at 100% opacity and one above at around 50% opacity to hide the joint between the model and the background.
Step 9
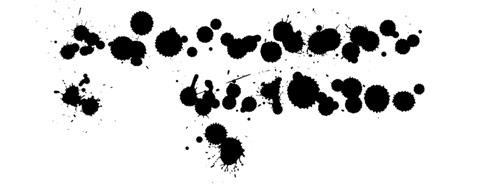
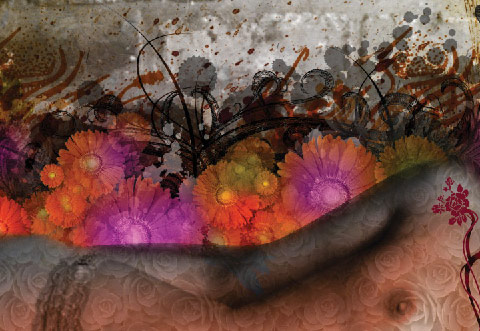
Open up the file splats.ai and paste onto your image and multiply the layer down. Place this image behind the main masked subject layer and experiment with the layer opacity to get the effect level you think is right. Then repeat this process numerous times until you get the complexity you desire.
Step 10
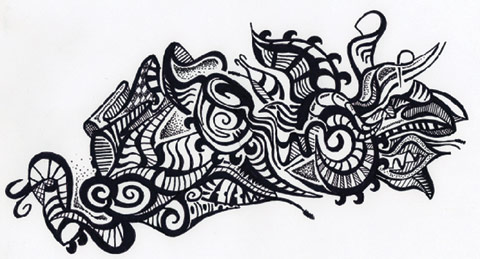
Next get out your pen and paper and do a few hand rendered drawings, scan these in and place them behind your subject image. The image then needs to be again multiplied down and also use the Edit > Transfer > Perspective function in photoshop to get it to match into your composition.
Step 11
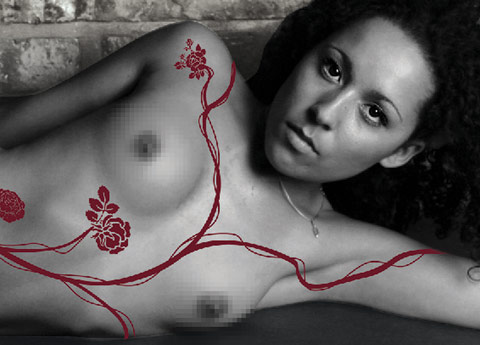
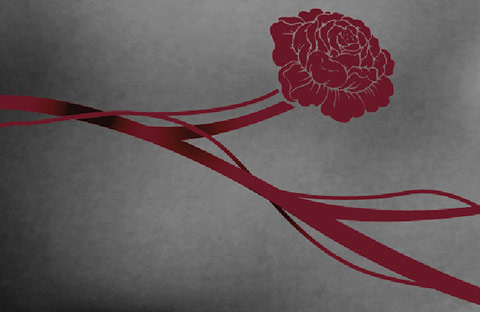
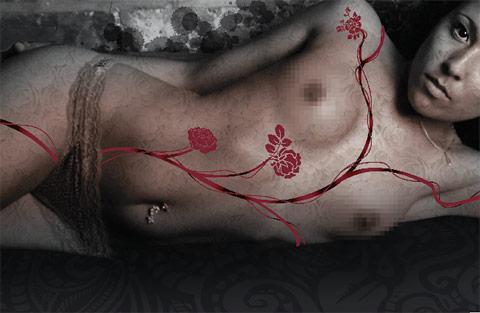
Right time to swap programs again. Open your layer file into Painter and dupe the master layer of the girl, then apply the Effects > Fill > Pattern filter and choose the rose design. Then apply thelayer over the top using the Gel layer effect and reduce the opacity to around 15%.
Step 12
Next get a picture of an item that complements your image and clipped out then place the image behind the main image, then add a slight drop shadow, not too much but enough to boost the contrast. You then need to dupe this layer and resize and change the opacity and layer modes in random to get a mixed effect. There is no science to this just experiment!
Step 13
Now dupe up the splat effect and flower layers, change the Hue and Saturation to fit in within with the composition. This will give an overall more blended feel to the image as a hole, again multiply these layers down using layer effects in various fashions. I can’t stress enough just experiment!

Step 14
Now introduce some other elements using the same effects as with the flowers in the earlier step, don’t be shy here just pile them up and work on your composition. You can take this as far as you want. Remember this is all about experimentation and making it different so try to get a good selection of items in at this stage! Drawing vectors and importing them can be a good idea to add more depth.
Step 15
Now continue experimenting in this way adding layers until you are happy. Then just flatten your image and hey presto you are done!

About the author
Neil is a self confessed Mac monkey based in a rural miners cottage 20 miles north of Manchester. He creates pieces that combine elements from mixed media, photography that are interlaced with complex vectors to create pieces that always hit the brief for clients all around the world. Visit Neil’s website to see his works.
Macrike
Stunning. Simply awesome.
Thanks for sharing this with us. One never goes to bed without learning something new. :)
Han
the colours aren’t quit to my tastes, I’d have a few colour layers in there to get a more uniform colour scheme but that’s just me!
Interesting censoring going on there too! lol
sturdy
wow, impressive work! well done.
Solomon Gebbie
ooo Very nice :) Love it :}
flingumine
wow, ugly and sexist!
Ufuk Ömür
well done !
Bárbara
Great Tutorial!
Neil is genious!
Thanks to share the secret of the best photomaniuplations!
Neil Fahey
I think it’s pretty cool…
Why would anyone call it sexist?
I do wonder about the decision to censor her breasts. If this is art and not pornography then we are looking at the body as a thing of beauty. Why would you need to censor one part of it?
Peter
Unbelievable. Awesome! Thank you!!!
shery
WOW
yapita
cool
blue_banana
Nice… real great Tutorial ;)
Adrian
Wow….great work!
lexx
Wonderful!
Darren
If I’m being honest, step 11 just doesn’t fit in but I like everything else. I would say the censoring is a bit odd. As some people have said looking at this as art wouldn’t require the censoring. Also the censoring didn’t really hide it all that well.
Viktor
great one! really inspiring work. i have thought a long time about these kind of digital art. and now i am gonna try it..
thanks
giacomo coppola
Awesome!! I will try it as well!!
Fireproof83
Pretty cool! I like the result!
Andrei Gonzales
Any particular reason for the painter step? AFAIK, you could accomplish the same thing in Photoshop, or does Painter have a better texture fill algo?
Daniela
thanks for put things like this in here! great!
John
Nice, but not work safe, even though you (barely) pixelated her boobies. It could still get me fired.
Nate
Heres the thing people: Nick featured Neil Duerdan as one of his choices for his talented people column on this website. From the look of his portfolio online Mr. Duerdan has worked for clients that we all dream of working with as graphic designers, Coca Cola, Nike etc. Mr. Duerdan is also hired SPECIFICALLY for his style of illustration. He opened up his illustrators tool box and basically told us the secrets to his style which not many people do. Instead of critiquing the steps he provides and the choices of colors and the subject matter of the photo, you should all be grateful that he shared this with all of us, and that you got knowledge from an extremely accomplished artist for free.
Thanks Mr. Duerdan for sharing this tutorial with us, I have always wanted to know how to achieve a similar style, and your tutorial provided some great tips and tricks that I did’nt know about before!
Harmony
This is wonderful Neil, thank you very much for taking the time to document your steps, this is a fantastic resource!
Ivan Minic
Great tutorials, especially this one… but this site’s design is so cute, so perfet, I’m stunned!
Robert
Thanx for the walkthrough. Solid basis to produce more….
Kiosuki
Well… Beautiful! Baut not difficult! I’m not understanding unfounded admirable!
Rebecca Strasser
Amazing. Thanks for the excellent tutorial. Trying to create a piece for class and just not finding the inspiration! ARGH.
Mark Fulton
Excellent work :)
Char
this is truly amazing!!!!!
Cento
Excelent! it’s amazing
juggy
You rock the girl man !!
Osvaldo Uribe
woooow… that’s great…
always is nice to check a PS tutorial xD
good job man!
SuMac
Thanks alot, nice tutorial.. this can be an inspiration for my graphic design project, two thumbs for you Neil ;)
Alex Dodig
nice tutorial ,
and nice site (just discovered)
Tom
LOL – Why do you bother blurring the nipple?
rrmleroux
Awesome tutorial, can’t wait to get home and try it!
Sequnix
lol @ Tom ^^
Tzec
Excelente!!! Felicidades.
luiscam
excellent tutorial, you’re an artist
maryanna
WOOOOWW!!
AWSOMEE!!
GREAT JOB !!
jon
Thanks for this great little tutorial
Saulo
Thanks for this great tutorial. It’s really nice!
Benex
great tutorial! :)
anelly
very nice! perfect work!
Squawk
How do you switch between photoshop and illustrator? Do just open the same file in the other app, save it, and open it somewhere else again? (When I did this I always got some kind of import box)
Awesome work bytheway…
eshark
Nice one!
Sérkan
Allahtan memelere sansür koymuş tasarımcı arkadaşımız baya etkili olmuş :P
BATA
wow! just like mucha! but this one is really urban and feels the “today” thingy!!!
Neil D
“How do you switch between photoshop and illustrator?”
Simply copy the artwork from Ai, (don’t cut!!!), then swap into psd and paste it down. Use the pixel criteria from the popup menu and it will be in psd.
If you cut from Ai then quite ofen the image will be lost and a blank pixel will be pasted onto it’s own layer in the centre of the image with psd. Also make sure you have enough hard disk and ram availible.
N;)
Lo
Hey Neil, a question.. How much time do you spend on such an image?
Lo
oh and of course.. Awesome job! Very inspiring!
KEVIN
Im new to photoshop and im having trouble with the whole masking and cropping and layering. I think I need a step by step
Neil D
Hey Lo :: Depending on the project a piece could take from as little as 5 hour to over two weeks! ::
:: N:) ::
Lo
thx for your answer! after your tutorial I started experimenting and got this as my first attempt:
http://www.ditmoetjenietdoen.nl/img/grl.jpg
Rather simple when i look back, but I learned a lot through it. Hope to make work as inspiring as yours! :)
eVictus
Excuse me, but what does “dupe” mean? Thank you! Awesome image!
lewis king
lo: lowen smells
nafeesa
i never thought that a nude picture can can be look so artistic and beautiful. it’s really an awesome tutorial. i’m going to do my own piece now. thanks a lot.
shafy
never thought that its’s gonna be that easy to make an amazing graphical image like that…very helpful steps…
mustafa
supper….çok güzel olmuş elinize sağlık….very nice
Laura
Fantastic! Amazing!…Perfect and charming…
nguyen duc hoai
i need this picture Floral souce .AI please share for me
[email protected]
nicolaas.vandenbroek
help, im out of coffee
baloot inc
damn.. it very pretty..
how about draw tattoo in face and body??
did u had tutorial for tattoo??
Dirtyold Mann
damn you pixelizer!! i wanna see nipples. where do i find nipples on teh internets?
kishihagan
-_- just 1 question, Why you have to choose that picture
flx-me
wow, it’s stunning, lov it.
great tut.
Joomlabased
Wow this one is perfect, amazing…
Storm
wow it looks so easy! i really need to brush up on my illustrator skills. i’m quite rusty because i’ve been so focused on photography lately
keith
seriously though, is there any place where i could get some moody images for free? thanks.
Volumenine
Wow, that is just amazing.
Tying to do it myself, it never works.
chilangabanda
Muy bueno, gracias por la idea, saludos
Ekaterina
The great beauty of the body!
Silence
Wow…
great…
thanks for this tutorial…
maybe i translate this tutorial to Persian…
Arnold
Great Tutorial!
Thanks a lot for sharing!
brainstorm
im stuck at stage 2, can someone explain? *confused*
Michael D.
It’s impressionnant work.
The finish is incredible.
Kavita
Wow! This is really kewl! Thanks!
Lorena
very good!!! I like so much!! I wanna know if you have vectors?
dwin
这个做的太棒了!加油
ibnushodiq
Tutorial keren…trim’s
nounaa
minta tutorial lagi dongz,,
moRe tuToRiaL pLease,,
i’d LiKe to maKe a design with effects Like Cork Board With Masking Tape n Mini Paper Clip,,
so,i need your heLp to give me the tutorial by photoshop,,
i’ve been meaning to learn photoshop,,
thank you,,
diana
loving your works man! keep it up!
Andrea
Do you really think it is appropriate to be using a half-naked woman as imagery for a
tutorial? As someone that works in the industry I would be more careful with the way that you present yourself online. After seeing this I would never enlist your services.
karen
amazing image!
the art comes from the creators expression not the view of the critics..
well done!
*alondra*
hola q onda nams que quedo bien chhodo lo malo que no esta en español
vharodark
These eyes…
Andrew
“Do you really think it is appropriate to be using a half-naked woman as imagery for a tutorial? As someone that works in the industry I would be more careful with the way that you present yourself online. After seeing this I would never enlist your services.”
Oh, grow up. Are you really that immature? It is a work of art, and I think that it is amazing. Great tutorial!
Brtk
[quote]Do you really think it is appropriate to be using a half-naked woman as imagery for a
tutorial? As someone that works in the industry I would be more careful with the way that you present yourself online. After seeing this I would never enlist your services.[/quote]
ROFLOL !
what a crap post…. naked woman is also a piece of art… get a life..
er4st
“ROFLOL !
what a crap post…. naked woman is also a piece of art… get a life..”
Loser!
artsymom
I think that’s beautiful! And very hip. It’s definitely artistic. Interesting techniques to achieve a cool & edgy result.
ntas
harika! perfect
vharodark
Wonderful!!! Esta página es puro arte… un camino a la imaginación…
Salt
Beautiful work, but the cencorship really goes overboard.. you’re ruining a perfect work. stop being so naive and afraid
bander
nice work
great tutorial
David
I have a real hard time reading this tutorial with the censorship on the ART. I understand you’re trying to compromise for a less mature audience, but honestly, it is a huge distraction.
Jeff_W
Wonderful post. And frankly, the negative posts regarding the nude subject should be totally ignored. What could be a better subject than a nude? — it was good enough for the Greeks, Romans, the Michaelangelos, Bernini and all the rest! The layered artwork + the nude ensnare one’s attention — just wonderful. Thank you for this website and for posting these tutorials. – Jeff W.
lanie
i am really having a hard time…
i got stucked in step 3…
i really want to make my picture in that style…but damn…
huhuhu..
your art is great…huhuh
kadın
because women, nice health women
Tina Turner
i love seeing a piece of art like this! it deffinatly shows the real beauty of a naked woman and how perfect they really are!
p.s.
i love the flowers! :)
Kovy Rinzler
i love seeing the naked girl
thats the only good thing about this picture
5reeef
thanx body
gr8 lesson
dhhdd
thank you
Claudia
Hey! i love your posts and all, just a recommendation, it would be nice that the links open in an external window so as not to have to go back on the browser after viewing the link, just close the window and continue on your website! :)
Kristina
Great tutorial. Great results.
If you have issues with a naked woman.. you don’t have a body below the neck (therefor aren’t aware what a body looks like and seem to be amazed that people take photos of them); have not looked at paintings of the past in which many, many were portayed nude. (Even men. Famous statue?); don’t even have to stare that hard at a tutorial to be offended and can just click ‘x’ to get out; OR use a NON-nude picture. Yeesh, it’s not like it’s a hardcore pornography photo.
Personally I think the results are great, it gives off a fantasy style, like a fairy (faerie) or the like. It’s really beautiful :)
ramya
the tutorial is good, but should not have used nude kind of photos since these kind go into other category. so better avoid these kind and can present any other photos that depict this tutorial..
Please avoid these kind in future
Nigahiga
that girl has a nice body and really nice tits
KR
I’m a little lost – do the vector images end up being on a different layer than the woman or on the same one? I got lost in the switching from photoshop to illustrator and back again for the first time.
other than that, this is a great tutorial and I like how you give suggestions for how and where, but not telling us exactly what to put, leaving space open for creativity. thank you!
bagsin
that girl has a nice body and really nice tits, thanks
Cyrus
Great , Deep and Moody
Great article. CSS saved web design
Cyrus
Visit http://www.psdtoxhtmlcoder.com
Mike
wow great tutorial!
allthough you shoulnd have censored the breast if its art and not porn. i want to try this but i need that picture where did you get it?
Mike
WOW great tutorial
allthough you shouldn’t have censored the breast if its art and not porn, thats what makes it art and beautiful. i wnat to try this but i need that picture where did you get it?
shiva
Really you are doing good job keep it up, in this web site all tutorials is very good and looking high range effects like holly wood effects, i so impressed about this web site thank’s for giving these type of tutorials.bye…………its yours
viewer:Shiva
Mike
Really cool deep effect
vincentdresses
The designs showed here show what simple and tasteful design is all about. Another one to consider
hungama
thanks buddy….very nice helping hand …….i like your post …..
amin
send for me,plz
Gil
Hi, and Great. Excelet post!!!
Fine fine fine, very good very good very good very good ……very good very good very good
khay
thank you so much for sharing. great post. i like it :p
saane
deneme
Henry Peise
Take the latest white iphone 4 Conversion Kit and start to change a new look to your favorite iphone 4 now! You can sure love it!
Juno Mindoes
We love black iphone, and we also love the white Conversion kit iphone. Now you have a chanve to change your iphone 4 white.
Uçak Bileti
aşkınla yanmaya geldim
Ben
Ive been meaning to read this and just never got a chance.
tütüne son
Fine fine fine, very good very good very good very good ……very good very good very good
altın çilek
thank you so much for sharing. great post. i like it :p
شات صوتي
thnks
goooooooooooooood
min:(
^_*
mmmdoe
alan
hi guys! i’m from brazil!
very good this picture!congratulations XD
bye!
complex 41
Complex 41 saç bakım seti, tamamen bitkisel ve doğal içeriği nedeniyle güvenle kullanabileceğiniz bir üründür. complex 41İçeriğindeki bitki özlerine
(55 çeşit bitkinin özü vb.) aşırı hassasiyeti olan kişilerde saç derisinde bir miktarkızarıklık yapması doğaldır. Bu durumda kullanım sıklığını azaltmanız tavsiye edilmektedir.
complex41
And then he handed you the thirty-five 45
resimler
hi guys! i’m from brazil!
very good this picture!congratulations XD