This tutorial explains how to create a energetic, vibrant, colorful wallpaper, like the ones available at Color Charge. These lines, which we’ll call Chroma were highly inspired by the iPod Nano Ad from 2006 and some Quantum Chromodynamics nerdery stuff. You will learn how to bend blurry shapes with Warp tool to draw the lines, beams, and steams. Then you’ll know how to add some glowing and vibrating color effects, and finally polish your drawing. Aside reading this tutorial, you’ll need Photoshop CS2 or CS3, and preferably a computer with a lot of memory and a larger screen to achieve that effect.
Initial setup
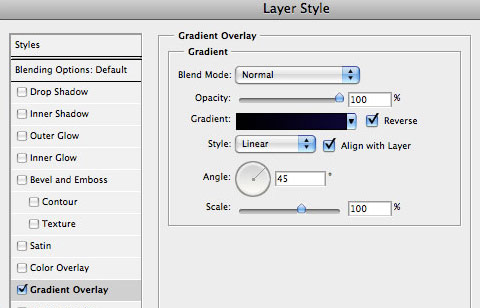
Start with a very, very large screen: 3000 px x 2000 px wide. Draw a rectangle as background for the whole area and fill it with a dark linear gradient layer style. Align that gradient with 45 degrees vertically (sometimes you may change that angle to 90 or 60 degrees). Since the beginning, pay special attention to colors: black and dark violet as base color. The waves colors will match a triad complementary balance with the base color, in our case, the violet-cyan-orange axis.
Warp Tool
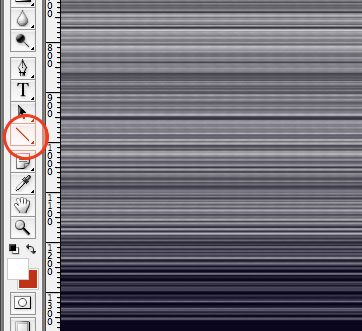
Draw lines! Many parallel lines (horizontal or vertical, or both!). Group them, duplicate, rasterize, group, duplicate, rasterize… and finally add some blur. In this example I used white as base-color for the line themselves (white is the easiest color to balance and add glowing and other layer styles):
After you reach a wide and tall group of lines, is time for some magic: randomly distort the shape with Warp Transform Tool ( Photoshop > Edit > Transform > Warp ):
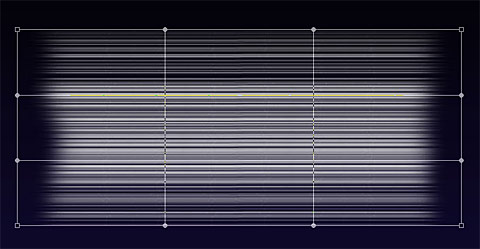
One thing you’ll probably notice is the amount of confusing structural lines crossing over the shape; your first attempts are going to be almost trial-and-error, later you’ll get used to this really amazing tool and will master the shapes of Chroma. Don’t worry trying to find the perfect shape so early, things will fit better together when you have more than 5 separate shapes matching a pattern or a familiar shape.
When complete, remember to press the Enter key, or click on the Apply Warp button, on the top. If your computer survives the intense rendering and image post-processing… ;) your artwork should be something like this:
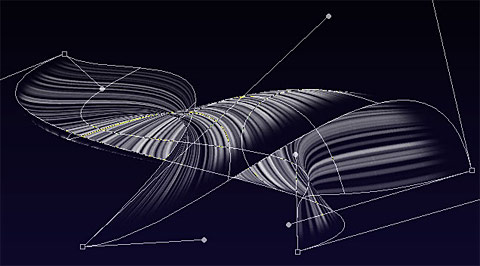
Remember to use the Erase Tool to remove sharpen edges and give the wave a surreal looking. Explore other combinations of shapes, lines, and textures – they’ll enhance your drawings.
If you did a small shape I don’t recommend you size it up or even warping again. The Warp tool isn’t that smart because you’ll be playing with rasterized shapes – not smart objects or vector shapes. If you insist warping the same shape again, your shape is going to get some unwanted sharpen or sometimes blurry edges (depending on your case). To avoid that, I recommend you the opposite way: start with a very large area and a large shape, then size it down. Better results, easier to distort.
Glow, screen, multiply, and other layer styles
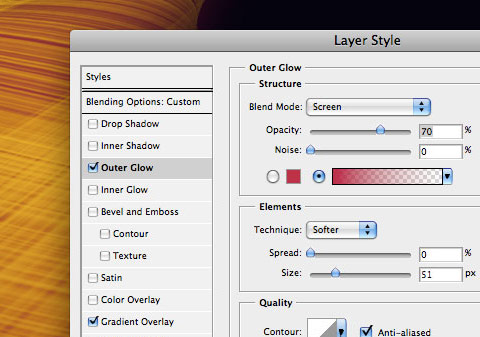
When you have the perfect shape, you will need to add its soul, I mean, the layer styles :). Again, open the layer styles panel, and mix Gradient Overlay with Outer Glow styles, and combine them with Screen, or Overlay as layer Blending Mode. A secret hint: when glowing, try using brightly and vivid colors, such as yellow, lime, pink, or cyan, picking the color that is in complementary contrast with the dark gradient we did on the beginning.
To achieve the Chroma effect, I used a gradient fill (yellow to gold), plus the following Outer Glow styles with the following configuration:
Brush polishing
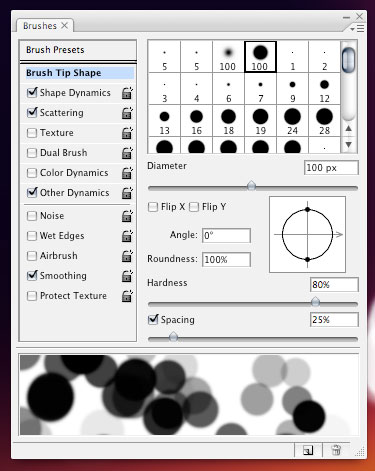
Bring your drawing to life with motion. Add some scattered round dots to simulate speed and movement. Within the Brushes panel ( Photoshop > Window > Brushes, or F5 ), explore the sizing, scattering (with fade), spacing, and pressure:

The big cells are just the way the smaller ones, except the size and spacing. A bit of randomness is really welcome and exciting:
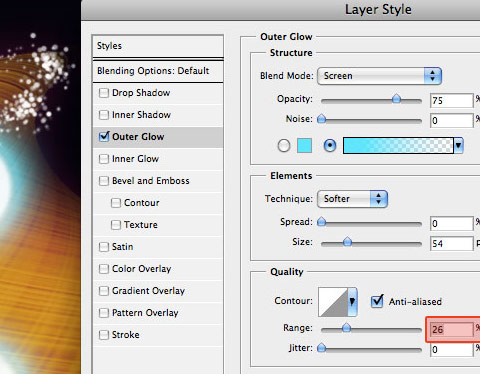
The "range" option in this step is very important – it will give a cellular-looking to the glowing particles – like if they were intensely vibrating:
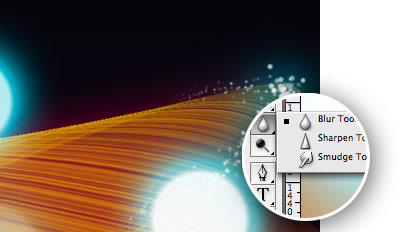
Poor kid…got any blurry edge? Don’t worry. Use the blur tool and correct that.
Finalizing the drawing
Be creative and fearless to do a complete mess with the shape – in my experience, the messier the better. Size down the area and crop. Draw as many layers as your computer’s memory can handle. Sometimes you won’t be able to merge layers because the effects and styles that were applied. Also use layer’s blending and opacity to give your shapes a translucent appearance.
Our final result, after cropping:

Conclusion
Now is really easy to get waves, brightly flowing across the infinity of color…okay, I went a bit far ;). I hope this tutorial helped you. If so, please let us know more about your artworks and drawings based on this tutorial on the comments. Thank you!
Download the Photoshop Tutorial file.
Download some Chroma wallpapers at Color Charge.
Noah
Cool Tutorial!
marc
Very efficient. Great! Thanks!
Spencer
Sweet
Jonathan
Thanks for this kick-butt tutorial!
Debbie
Wow! Such a quick way to do something that looks like it took hours and hours to do! I’m very impressed. Thanks.
Andris
Very beautiful!
Matt89fe
awesome
aj
wonderfull..
Bramus!
Neat!
Alex :: Web Design
Wow! I love how using a few different and simple techniques together can create such a stunning effect. Great work, keep them coming!
Toby
great tutorial! thanks a lot!
TzPshopChopz
What version of Photoshop introduced this feature?
“Warp Transform Tool ( Photoshop > Edit > Transform > Warp ):”
Plenty of cool things are missing from version 7.0 dating back to 2002 already wow :(
Claudio
I think its an amazing trip Nick, it looks great! But, ok, just my opinion, I think that all those blue lights mixed with the yellow waves look kinda strange… Maybe using less blue effects, or maybe using another color would make it look good.
Jen
I think the blue and yellow look great together. They add to the movement and excitement of the image. Thanks for the tutorial…actually, tutorialS…they’re all awesome.
Rick
I’m happy you liked the tutorial, thanks!
Ritchie
wow.. nice one.. Thanks for the warp tip.. Never think of using it that way.
Christian Mejia
Ha! I was experimenting with this not so long ago and nearly pulled my hair out when my goal wasn’t accomplished. Thanks for the tut! I’ll be exploring the new possibilities tonight!
sam
Cool Tutorial, I liked the way you ve authored this tut…keep up the good work !
Erika
What an awesome tutorial! I know it’s sometimes tough to give up your favorite trick, so I wanted to personally say thank you.
I wound up coupling it with an overlay of the cloud rendering directly above the background, and it gives it even more of an ethereal look.
Again, thanks! :)
screenfrog
Sorry, but I think this is a weak tutorial, but thanks anyway ;-)
Darren Northcott
Looks good man! Nice one.
shw
A little offtopic – do you plan to publish results of TxEff contenst? I check the blog everyday to see did you post the results and every day there’s nothing.
Rich Ta
I always admired the wallpapers at Color Charge. It was therefore very interesting to read your tuturial to see how the magic is done!
Nathan
Great tutorial you have! I am so going to use it to make something! Its really great! Good work!
Hieu
Great tutorial, thanks for posting, I’m making a wallpaper based on this one :D
Fabian
Nice… I’m going to make one myself right away!!
Joyce
Very pretty! Thanks for sharing!
web site design , web designer
Great tutorial really enjoyed it and you can take further with making it a background image and adding some vector art graphics.
Thanks
Vincenzo Zuccarello
Hey guys,
Sorry but I am trying to reproduce this tutorial on CS3 – I am new in Photoshop and can’t get pass the stage to rasterize. The option is grey out in PS and if i try to wrap – nothing happens.
Any ideas?
Thanks
Alvin
Great tutorial but not so much explained in detail. Its for pros only
frky
i love this website,but i don´t like this final wallpaper.
Elton
Holy bamboozling blogging batman.
That looks awesome but I’m scared to even attempt that one lest I fail miserably.
Patris
thank you! I’m a huge fan of your blog!
Harry
Nice one! I think I’ll try that out.
jessica
i think i love you.
nitos
hey! thanks!
this is an awesome tutorial!!!!!
Suscribed!
nitos
thanks! I finally made it! hahaha
really cool while making it.. you have a lot of fun! hehe :)
RVSwanson
GOOD, now i realize how much I don’t know
Segarceanu Razvan
I thought I knew all about Photoshop, now I realised I do NOT! :D
Thanks for this great tutorial, I’ll never close the “unuseful” brush panel.
Alice
YOU ARE GREAT DUDE!
Amazing tutorials…THANKS!
aynur
thankssss…
I’m a huge fan of your website
Drasick
i love your website! nice tutorial!
erikaontiveros
Nice, I really love it!
tom
it’s very nice!! thank for this tutorial.
Christy
Thank you so so so much…
I’m Chinese and it is difficult for me to read…
But I made it at last…
Happy!!!!!
Tom Ross
Very cool tutorial, however the spots of light seem a little intense…
lagaba
Great fx! I really like the lights…
Peace
Alex
Great tutorial.
I really love your work.
Greetings from Vienna,
Alex
carrotmadman6
Great Tutorial… :P
& A.W.E.S.O.M.E website!
Abba
i need a back ground pls. send it to my mail
web design , almog , media design
really great thanks
naran_ho
mmmmm,,, really good work, thanks,,,,nice
Zeb
Awesome ! Thanks to you ;-)
SJshah
WOW..
This Is Just Great! =o
thanks for the inspiration =D
Matthew Griffin
Amazing tutorial as usual. Thanks.
Aileen Feng
Great,send it to my mail.thanks very much.
Braden Keith
awesome, spectacular. yes.
I enjoyed walking through this.
rafael torales
I learned this tutorial in person! Good job!!
Phalkunz
Thank alot. this is really great!
Chris Laskey
Great tut. Never thought of warping a set of straight lines (guess that’s why I’m still ‘learning’ the ins and outs of photoshop).
Love learning something new.
Cheers
gr8pixel
wow!
moti
slick
Paris Young
Inspire the next!
Chelissamow
This was an awesome tutorial! I’ve learned so much from it. Thanks for the inspiration!
John
Thanks for your wonderful tutorial.
Felipe Ramos
Awesome Tutorial Photoshop time! :D
Thanks for this…
prasanth
hai htis is prasanth from india i am working in hometextile designing .im using photoshop cs2 i dont know how to giving the weaving effect in stripes check designes in this softwear if u know about this plz send me the metod of weaving effect to my address
Amanda
Mine didn’t quite turn out the way that your’s did. I didn’t get those nice rings around the dots like you did. :(
wanderful
Awesome! Reason to start using Photoshop again!!
jhun
wow, just amazing! very creative, i also love the tips you are giving, keep it up!
SiteFX Web Design
Awesome tutorial!
Anna
How do I group the lines in the warp step?? I’m fairly new to design, heh!
arunachalam
hai this is very super but more line is here so aoide the best anyway keep it up
William
You lost me on the first step with the add lines part. Using the line tool first creates a path, so then I added in the lines but did not get the result as shown. Why also would you say to put on an overlay layer style without putting anything down on the layer itself, after doing this step by your description, your still left with a blank layer.
shital jethva
oh thts very nice
Thanks for such a good tutorial
William (a different one!)
@William: With the line tool selected you can click what way you want your line displayed in the top left. There’s fill pixels (which just adds pixels to an existing layer, like a brush), paths (what you have), and shape layers. We want to use shape layers so that the lines will stay independent and editable. Eventually you’ll want to rasterize them so they’re not shapes anymore, but at at least they’ll still be their own layers.
Katalog Stron
Excellent tutorial. Thanks.
Mandy
is there an easy way to do this w/the 1st CS?
Mandy
maybe i should have mentioned… i can do the dots just fine, but no warp tool
=*(
Extermist
Cool but i think you shouldn’t have added those tiny lights or atleast made leaser… it amazing.. keep it up
maanjoy
It’s cool!
ricky
those are the most emotional and cool wall’s that I ever seen in my life!!
I will use it!!
Bobbink SEO Blog
Nice tutorials! Thanks!
Leonel Alvavrado
I cannot seem to get past the part where you start making the lines, group them, and rasterize them. For some reason the warp tool is not available. Can someone please tell me what steps I’m missing? I would really appreciate it. Thanks.
Ronnie
excellent tutorial. however i agree with the previous comment. which is a great alternative to the warp tool?
fy
photoshop CS 3 have the warp tool
Q
Thank you for this tut!
aziz
WOOOOOW! Cool i like!
Breinlyn Francisco
Who cand send me in spanish
anpora
cool!
david
Very cool and ta for the tutorial
Daniel Vergara
excellent tutorial!!!
Boriana
Thanks a lot for this tutorial. It is fantastic :-)
Tommy_Gun
Thx. Its good tutorial
kid
Superb tutorial!!
Pragmatic Design
This is great. Thanks very much :)
wallpaper
cool.this wallpaper seems like unusual.
monica
this is awesome :)
Dizi indir
cool thanx
Kunal ~Kgunner~
Thnxx the tutorial is v good ..!!!
Greg
been trying to find something like this for an age!
Amazing!
wenshen
nice!,,,,,,,,,,,hihi!!!!
wenshen
我是中国的,你这这些都好棒啊,谢谢啦
The Trendsetter
This was excellent! I’ve been looking for this tip for a long time also. Thanks for the post.
Photoshop CS3
I love this article!
Really nice for me, It will polish little more all of my design work.
so suductive queens
i like this one≤3
i am going to put it on myspace
i love u
bye
call me (310)9409236
Giuseppe
Thanks!! As always useful and very good!!
Joefrey Mahusay
Awesome tutorial I will surely try this. Thanks.
Joel G.
Great tutorial…here’s what I got: http://i42.photobucket.com/albums/e344/glovier/ChromaLinesArt-JAGOriginal.jpg
Joel G.
OK, so I made a wallpaper out of my practice run as making “chroma lines.” In fact, I made a wallpaper for several screen sizes, include for a mobile background. I acutally have mine on my Motorola Q now! You can get them here: http://www.jagdesignideas.com/2008/06/abstract-chroma-desktop-wallpaper.html. Design is so much fun!!!
Katja
I stumbled upon your website today. This is awesome. Thank you!
noname
can you be more specific on the things you have done?
there are some steps i can do because i don´t no how can i do it
Jon
Quality effects
http://www.graylabel.co.uk
Web Design Kingston
Rob
Love it!
Janan
I couldn’t do exactly what it showed without photoshop, but I got some good ideas. Thanks. :3
Mohammed Dhuliawala
Simple KOOL effect..
Very easy to make and fruitful outcome..
send me more of these..
regards,
Mohammed
PervasivePersuasion.com
More great tutorials!
Ricky
Here’s what I created… My desktop background. I added a cloud layer, to enhance the brightness of it all, but I can’t see to get the lines quite right. I have them quite thick…
http://i73.photobucket.com/albums/i224/Sykaryus/DesktopBackground.png
kaiser
ever tried the gradient-tool? you can use “noise” insted of “solid”… makes the same result in just some seconds…
IT services india
Cool effect…help to create more funky vector shapes for my art work.
msm
very cool :)
what is the name of this virsion “photoshop”?
Amber
This effect is AMAZING, thank you so much for sharing how to do this. I am going to keep working on this, and perfect it:) Thanks again!!!
shee
i dont know how to wrap the lines. im using photoshop CS
anyone can help me?
Anita
What I did to get the lines without spending all that time with the line tool was first set my brush to a 1px circle with 100% hardness and 854% spacing, then use the pen tool to draw a vertical line th the left, point-to-point from top to bottom that is completly straight, then right-cliked and set the stroke path to the brush (simulate presure UNchecked) so I had a vertical line of dots, then I used the “Move Tool” (with “Show Transform Controls” checked off) to stretch it sideways so my dots grew into horizontal lines. I repeated this a couple times with different colors/sized/spaces to get the same effect it much less time.
marco
I just loved the tutorial!!! I’m new in practicing seriously whit photoshop and i can’t describe my happiness when I found this site, your works and ”lsessons”. Thanks a lot.
Marco, (Italy).
ashe
i’m working in CS3 web premium on a pc. i don’t seem to have the ability to control the spacing on the scatter effect. i also don’t see where you can use “fade” with “scatter”. anybody have any tips (besides use a mac =D )
hirday
design relif sculpture
Jitendra Nate
hi
i like this
majid
very goooooood
tanks
خیلی با حال بود دمت گرم با این که زبون مارو نمی فهمی
اینجا می گم که یادگاری بمونه
فقط
—————————-:::^^:: خاطره :::^^::——————————
majid
http://www.wallpaper.ir2.ir
http://www.wallpaper.irq.ir
http://www.wallpaper.blogfa.com
—————————————-
http://[email protected]
————————————————-
I ———::^::———— LOVE ——–::^::———- خاطره
—————————————————————–
ghazal
very good tanks
Negin
that’s nice
mfadel
go lack man and very good man
Neena
love the tutorial. You are great.
Conrad Gorny
Wow so simple yet effective. This is one that i will try, Thanks
Conrad Gorny
Freelance Graphic Designer
http://www.conradgorny.com
renzy
Hi! Nice Coding and designing out there ha? I hope You can demonstrate a lot of examples and Tutorials for the days to come
best regards:
Renzy12
janey.b
oh boy!!
your website is…simply AMAZING!!!
i LOVE! it!!!
so fresh,light,energizing..reminds of..happiness :)
great job!! keep it on :)
+ > thnx for such an amazing tutorial & sharing!!
all best!!
kailash
Thanks awesome tut ;)
i will add this tut on my blog :D
Nilou
Awesome tut. I love your site
wallpapers
might give that a try – nice
majid
very wery good
I LOVE BMW
ridhoyp
wow.. cool..i love it so much… :)
skully
the download psd file is corrupt… can u change the link so that i can download it.. i really want to learn this technique huhu,,,
plz
bernice
this stuff is really cool.=]
Carlos Hermoso
Nice one. Thanks
shyam
its jus simply superb!!
NoONoO_chan
nice i doit ^^ thanx
Y.Fang
Good tutorial~~
A little difficult for me~~I’ll try it step by step
THX for share~
ged
I tried it out and here is my outcome. I like how it came out.
It’s really a great tutorial! Thank you for sharing!
brahim
merci tous
sang kresna
mbuhlah ………….
Kate
thanks for the tutorial.
but… i have CS4 and i cant find the warp tool.. :S
bhea
awesome… though I tried a couple of times to make it successful,, anyway nice work! love it!
FYI: “mbuhlah” is a traditional language in Indonesia which means “whatever or I dont care, or I dont know” is it right sang kresna?
=D
2N
wow!
ramiz
its really very nice work ….
can anybody tell me how to subscribe for more tutorials …
my ID is [email protected]
Ruby
I’m SOURPRISED!!! Wow, FINALLY I found this tutorial of HOW TO DO THIS!!!!! Thanks so much! I’ll try it when I have no more jobs in this week. Thanks a lot again!!!
ZARU
i have CS and i cant find the warp toolS
Rick
I’ve been looking for a tut like this so I could include this style wallpaper in my website.
Thank you!
CgBaran Tuts
Creative effect and great tutorial thanks
laxmikant
masldlasdk
sandeep
Gud job n Expect more wallpapers from u ;-)
shriya
WOW….
really so pretty ……….
Papirne case
Pretty nice technique.
wezi
XD
LaughingMan
Impressive.[img]http://www.websmileys.com/sm/aliens/abduct.gif[/img]
sheila
hmm..im sorry…but its so hard to explain…ur tutorial is so hard to understand..unlike other tutorial…T.T
Rahul Singh
this is gos
harjinder kaur babrah
It is good. but difficult.
กฤติยา
มันเป็นสิ่งที่ดี. but difficult. แต่ยาก.
เห็นด้วย แต่มันก็ไม่เกินความสามารถค่ะ
San
The tutorial is good. But I think the only difficult thing in this is making the lines. Because when I would try and duplicate the layers, it would not show. There must be a certain brush that one can use to make the lines?
alvin brown
I LOVE A BACKGROUD THAT REMINDES ME OF THE SPIRITUAL REALM
The O
no matter what I try it doesn’t come out at all the way you do it, you just don’t know how to explain the step-by-step process, you need to redo this, which I doubt you will
TSOY
unsaon pg.group
reply(09224638269)
Joe B
Nice attempt to help us. Many of the most important settings and steps were skipped. For the uninitiated like me this tutorial is not thoroughly informative. Just a hint of what can be done withe the warp tool.
Carter
Just a little tip to avoid all the hassle of drawing the lines one by one:
Create a new document the height of your original document and one pixel wide. Then add monochromatic noise. Then go select>color range and select the shadows and then delete them. Repeat with the midtones. Now press ctrl-a and the go edit>define brush preset and name it whatever you want. After that, go into you original document and on a new layer select the fill tool. Then switch the fill from foreground to pattern and choose the pattern you just created. Then use it just like you would normally. This way reduces a lot of clicks.
patty
I don’t care what they say, this tutorial is great. You do leave some gaps, but I believe not everything needs to be explained… sometimes you just have to play around! Great Job! ;)
Ben
I have found a cool new way to do this great tutorial! Skip drawing all those lines: Go to the gradient tool, and select Noise in gradient type. Put Roughness up to around 100%, and select add transparency. Seems complicated, but it is super easy. The best part is, you can do multi-color warps!
Aoobi
I LOVE A BACKGROUD THAT REMINDES ME OF THE SPIRITUAL REALM
bagsin
thanks again
Ölbilder
thanks very nice !!
doha el mallah
good effect, i do it, thank you.
panel radyatör
great work i will digg it
Mike
Awsome.I learned it right now
eddie
hmm can someone help help me when i do this and save it it only lets me save it in psd or some weird big formats ive never come across and windows dosnt rearly reconise them and i cant use it for a background please help it will be much apcriated
cascd
hmm.eddie.u can change the format of your psd file.
go to file>save as..> then u chnge the format follow the format that you want.
to make it as ur desktop bckground, mybe you need to increase the picture size.=D
Bo.
Jeez guys, how do you set up the brushes? Could somebody please describe it more into detail?
nadia
this is one perfect and clean tutorials, thanks for sharing
panel radyatör
it was excited
تجريبي كوم
thank u
tjribi
this is vere goooooooooooood
vincentdresses
The designs showed here show what simple and tasteful design is all about. Another one to consider
Ofori Anthony
Thanks for all that you have been able to do so far. Keep on keeping on. bye
relly
the Warp Transform Tool ( Photoshop > Edit > Transform > Warp ): isnt working any ideas?
Kitap özetleri
thanks
tutorial add http://www.gorseldersler.net
sbobet
How do adjust the head with a brush.
oyun hileleri
I agree with you, good luck.
Laith
laith sabah
Janice Magsombol
wow….. amazeddddddddddddddddddddddd….
Web Design
wow in awe!! thanks for sharing
Kişisel Blog
I agree with you, good luck.
piter
hi
the pic was very kiri……ok!
Kampanya
thanks for all post
shoaib hussain
wow thats a nice abstract piece m trying it,thnx a lot for giving something to kill my time.
Progs4u
Thank you so much ..
You are very cool
Charles Luyimbazi
Thanks for sharing. It’s cool and i have liked it for sure.
brackets
Great wallpapers, thanks a lot!
ulises
excelete desing
ابل
thanks for the tutorial and for the download sample
Ali
The pics very coooooooooooooooooooooooooooooooool
paul
nice one :D i sort of made it my own but i’m a bit of a Ps novice. Cheers for the help though nice and simple to follow
ajit
Beautiful Effect through your tutorial ….its Great
RamaRanjan Mohanty
very good tutorial
Mungno
gfhfhjg
tech-tak-talk
Very nice tutorial. I am trying to make this one. Thanks for sharing.
Niraj Thapa
Thank for your great tutorials. One problem is that i could not understand is that what is mean by Group them, duplicate, rasterize etc. Kindly request to answer me.
With best regard
Niraj Thapa
Henry Peise
No wonder, with white iphone 4 in your hand will make you be the focus of the crowd! You won’t miss it!
Juno Mindoes
I just can’s believe how surprise when i receive my iphone 4. Its so charming and functional! But there’s one thing i don’t satisfy, i don’t like the color. Waiting for the coming white iphone 4 conversion kit.
tütüne son
Herkez burada ekleyin tabi nasil olsa beles :)
Uçak Bileti
chrome nin wallpaperler çok güzel denedim oldukça güzel durdu
Uçak Bileti
sevda kelepçesi
Ben
Just saying thanks will not just be enough, for the exceptional lucidity in your writing.
tütüne son
Very nice tutorial. I am trying to make this one. Thanks for sharing.
uçak bileti sorgula
Uçak bileti sorgulamanin tam zamani.
altın çilek
Thank for your great tutorials. One problem is that i could not understand is that what is mean by Group them, duplicate, rasterize etc. Kindly request to answer me.
altın çilek
Just saying thanks will not just be enough, for the exceptional lucidity in your writing.
abdul qader
GOOD WEBSITE I Ha
شات صوتي
thnks
goooooooooooooood
min:(
teeem
Uçak Bileti
liked those posts really .great!
Temaları
excellent … Thanks
diş beyazlatma kalemi
All whitening formulation is applied by dentists with quality features, powerful, secure, and very reasonable prices, as well as the missing handbag is a unique product design, fashion styling you will not ..
Test msg
Merhaba ben test :))
test2
Woow GReat post :)) thank you !!
azaf
hayret bu olay :) thankks i loved it
s. bala
Thank for your great tutorials. One problem is that i could not understand is that what is mean by Group them, duplicate, rasterize etc. Kindly request to answer me.
same problem i having facing ? pls tell me how to done it…..
Rick
Great to see my tutorial still gets some visits 3 years after published. Thanks!
Some new stuff is coming…
dexx
Another questionnaire, the participants’ problem identification and structuring, idea generation, problem elaboration and clarification, such as creativity, problem solving insertion sezkin idea which one’s preferred styles are evaluated. While participants preferred the style of non-disclosure and intellectual development of ADHD, with ADHD, participants chose to produce ideas.
aaron
i cant follow ur instructions because my photoshop is 5 please make ‘nother one :D
Prince Goyal
thanx alot for tis tutorial i hope it will be more helpful for me
alex
Nice. good work
complex 41
Complex 41 saç bakım seti, tamamen bitkisel ve doğal içeriği nedeniyle güvenle kullanabileceğiniz bir üründür. complex 41İçeriğindeki bitki özlerine
(55 çeşit bitkinin özü vb.) aşırı hassasiyeti olan kişilerde saç derisinde bir miktarkızarıklık yapması doğaldır. Bu durumda kullanım sıklığını azaltmanız tavsiye edilmektedir.
gainmax
Complex 41 saç bakım seti, tamamen bitkisel ve doğal içeriği nedeniyle güvenle kullanabileceğiniz bir üründür. complex 41İçeriğindeki bitki özlerine
(55 çeşit bitkinin özü vb.) aşırı hassasiyeti olan kişilerde saç derisinde bir miktarkızarıklık yapması doğaldır. Bu durumda kullanım sıklığını azaltmanız tavsiye edilmektedir.
complex 41
And then he handed you the thirty-five 55
complex41
And then he handed you the thirty-five 45
Ken
Nice wallpaper
venomboy
A really big thanks for the tips
ercan
Your blog is wonderful, I like it very much, thank you!! boyaci Thank you to expect this site
repair missing dll
This is the greatest driver site on the web. Not only did I find the drivers I needed to update my product, but also get other helpful information to optimize my computer. My computer never ran so well like now. Thank…
adobe photoshop technique
nice works dude…
KHOKON
Great Post. thanks for share.
Seam
thanks Brother
yemek tarifleri
nice works dude…
fzvc
dsadaddasd
fzvc
nah i is really good
fzvc
it*
Daljit Singh
hmmmm ……………………………
çizgi film
nice sharing.. thanks..
Frank Vega
Thank you for the tutorial, very nice. Would you be so kind as to teach a newbie how to get through the step where you say “Group them, duplicate, rasterize, group, duplicate, rasterize”? Thanks a lot.
john lester garcia
is there any video?? Because i cant follow the instructions..
DymoLabels
hi
i really like your collection
i really like it
thanks for sharing
Thilagam Shanmugaraja
Hi…it is very nice…
very useful to Photoshop learners…
Thanks for sharing….